


DIGITAL TUNER
Tuning to radio stations
1 Press y to on, then press Source selector to
select
TUNER.
— is displayed briefly and then the radio sta-
tion frequency, waveband and, if programmed, a
preset number are shown. (See 3)
2 Press Band selector once or more to select your
waveband.
3 Press and hold ∞ or § until the frequency in the
display starts running.
™ The radio automatically tunes to a station of suf-
ficient reception. Display shows during
automatic tuning.
4 Repeat steps 2-3 if necessary until you find the
desired station.
¥ To tune to a weak station, press ∞ or § briefly
and repeatedly until you have found optimal recep-
tion.
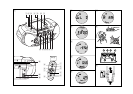
To improve radio reception:
¥ For FM, extend, incline and turn the telescopic aer-
ial. Reduce its length if the signal is too strong.
¥ For MW/ LW, the set uses a built-in aerial. Direct
this aerial by turning the whole set.
Programming radio stations
You can store up to a total of 30 radio stations in the
memory (20FM, 5MW and 5LW), manually or automat-
ically (Autostore).
Manual programming
1 Tune to your desired station (see Tuning to radio
stations).
2 Press PROGRAM to activate programming.
3 Press PRESET
-, +
(on the remote control 3,4)
once or more to allocate a number from 1 to 20 for
FM, 1 to 5 to MW and 1 to 5 for LW.
4 Press PROGRAM to confirm.
5 Repeat steps 1-4 to store other stations.
Helpful hints: You can erase a preset station by
storing another frequency in its place.
Autostore
Autostore automatically starts programming radio sta-
tions from preset 1. Available stations are pro-
grammed in order of waveband reception strength:
FM, followed by MW/LW. Any previous presets e.g.
manually programmed will be erased.
¥ Press PROGRAM for 4 seconds or more to activate
autostore programming.
™ Display:
AUto, PROG flashes.
After all stations are stored, the first autostore preset
station will then automatically play.
To listen to a preset or autostore station
Press the PRESET
-, +
(on the remote control 3,4)
buttons once or more until the desired preset station
is displayed.
CD PLAYER
Playing a CD
This CD player plays Audio Discs including
CD-Recordables and CD-Rewritables.
1 Press y to on, then Source Selector to select
CD.
2 Insert a CD with the printed side facing up and
close the CD door.
™ is displayed as the CD player scans the
contents of a disc, and then the total number of
tracks and playing time are shown. (See 4)
3 Press 2; to start playback.
4 To pause playback press 2;. Press 2; again to
resume play.
5 To stop CD playback, press 9.
Helpful hints: CD play will also stop when:
– the CD door is opened
– the CD has reached the end
– you select tuner, AUX or tape source.
Selecting a different track
¥ Press ∞ or § (on the remote control ¡ or ™)
once or repeatedly until the desired track number
appears in the display.
¥ In the pause/stop position, press 2; to start play-
back.
Finding a passage within a track
1 Press and hold ∞ or § (or press SEARCH 5, 6
on the remote control).
™ The CD is played at high speed and low volume.
2 When you recognize the passage you want, release
∞ or § to resume normal playback.
Different play modes: SHUFFLE and REPEAT
(See 5 - 7)
You can select and change the various play modes
before or during playback, and combine the modes
with PROGRAM.
shuffle — tracks of the entire CD/program are
played in random order
shuffle and repeat all — repeats the entire
CD/programme continuously in random order
repeat all — repeats the entire CD/program
repeat — plays the current track continuously
1 To select play mode, press MODE (SHUFFLE or
REPEAT on the remote control) once or more.
2 Press 2; to start playback if in the stop position.
3 To select normal playback, press MODE repeatedly
until the various modes are no longer displayed.
— You can also press 9 to cancel your play mode.
Programming track numbers
In the stop position, select and store your CD tracks in
the desired sequence. Up to 20 tracks can be stored in
the memory.
1 Press ∞ or § (on the remote control ¡ or ™) to
select your desired track number.
2 Press PROGRAM.
™ If you attempt to program without first selecting
a track number, is shown.
3 Repeat steps 1-2 to select and store all desired
tracks.
™ Display: if you try to programme more
than 20 tracks.
Helpful hints: During normal playback, you can press
PROGRAM to add a current track to your program
list.
Reviewing the programme
In the stop position, press and hold PROGRAM until
the display shows all your stored track numbers in
sequence.
Erasing a programme
You can erase the contents of the memory by:
¥ opening the CD door;
¥ selecting TUNER, AUX or TAPE sound sources;
¥ pressing
9
twice during playback or once in the
stop position.
™ is displayed briefly and PROG disap-
pears.
AUX (audio cable not included)
This 3.5mm socket allows you to connect other audio
equipment to your system e.g. a MP3-CD player.
1 Press y to on, then Source Selector to select
AUX.
™Display shows: AUH.
2 Use an audio cable to connect the AUX socket to
the LINE OUT/headphone socket on your external
equipment.
3 To avoid noise distortion, turn down the volume on
your external equipment.
4 To adjust the sound and volume, use the sound
controls on your external equipment and the
AZ2060.
CASSETTE RECORDER
Cassette playback
1 Press y to on, then Source Selector to select
TAPE.
™ Display: shows throughout tape opera-
tion.
2 Insert a cassette and close the door.
3 Press PLAY 1 to start playback.
4 To pause, press PAUSE ;. Press again to resume.
5 Press SEARCH 5 or 6 to fast wind the tape.
6 To stop the tape, press STOP/OPEN 9/.
¥ The keys are automatically released at the end of a
tape, except if PAUSE ; has been activated.
DIGITAL TUNER CD PLAYER CD PLAYER CASSETTE RECORDER