


English Controls
Power Supply
Power supply
Whenever convenient, use the mains lead if
you want to conserve battery life. Make sure
you remove the plug from the set and wall
outlet before inserting batteries.
Batteries (not included)
Main set (See 2)
• Insert 6 batteries, type R-14, UM2 or
C-cells (preferably alkaline) with the correct
polarity.
Remote control (See 2)
• Insert 2 batteries, type AA, R06 or UM3
(preferably alkaline).
• Incorrect use of batteries can cause
electrolyte leakage and will corrode the
compartment or cause the batteries to
burst:
• Do not mix battery types: e.g. alkaline with
carbon zinc. Only use batteries of the same
type for the set.
• When inserting new batteries, do not try to
mix old batteries with the new ones.
• Remove the batteries if the set is not to be
used for a long time.
Batteries contain chemical substances,
so they should be disposed of properly.
Using AC Mains
1 Check if the mains voltage, as shown on
the type plate located on the
bottom of the set, corresponds to your
local mains supply. If it does not, consult your
dealer or service center.
2 Connect the mains lead to the AC ~ inlet
and the wall socket.The mains lead is now
connected and ready for use.
3 To switch the set off completely, withdraw
the mains lead from the wall socket.
4 Install the unit near the AC outlet and where
the AC power plug can be easily reached.
• Disconnect the mains lead from the wall
socket to protect your set during heavy
thunderstorms.
The type plate is located on the bot-
tom of the set.
Helpful hints :
– To avoid unnecessary energy consumption,
always adjust the Source selector to
TAPE/OFF
after using the set. Also check
that the tape deck keys are released.
For users in the U.K., please follow the
boxed instructions ‘Important notes...’ .
CAUTION
Use of controls or adjustments or per-
formance of procedures other than
herein may result in unsafe operation.
This set complies with the radio inter-
ference requirements of the European
Union.
Supplied Accessories
– AC power cord
– Remote control
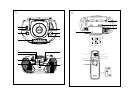
Top and front panels
(See 1)
1
Source selector: CD/MP3,TAPE/OFF,
TUNER
–
selects CD/MP3, tape or radio source of
sound
–
power off switch
2
BASS BOOST
–
turns the bass enhance-
ment on/off.
3
VOLUME
–
adjusts volume level.
4
Cassette recorder keys:
PAUSE ;
–
pauses playback or recording
STOP•EJECT 9
/
–
stops playback or recording.
–
opens the cassette holder.
F.FWD/REW 5 or 6
–
fast winds/rewinds
the tape
PLAY 1
–
starts playback
REC 0
–
starts recording
5 LIFT TO OPEN – lift here to open the
CD door.
6
TUNING
– tunes to radio stations
7 BAND –
selects wavebands
8
iR
– infrared sensor for remote control
9
MODE
– selects different play modes:
for example:. REPEAT or RAN-
DOM (random order)
0
NEXT,PREVIOUS §, ∞
C
D/MP3: – searches back and forward
within a track;
– skips to the beginning of a
current track/ previous/ later
track
!
PROG – programs tracks and reviews the
program
@
STOP
9
–
stops CD/MP3 playback;;
–
erases a program
#
PLAY/PAUSE
2
/
;
–
starts or pauses
CD/MP3 playback.
$
ALBUM+ /-
MP3 only: selects albums (up, down)
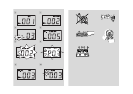
% Display - shows disc functions
Back panel (See 2)
^ Battery door - open to insert 6 x 1.5V
R-14/ UM2/ C-cells.
& AC ~ - inlet for power cord.
* p – 3.5 mm stereo headphone socket
Helpful hints: The speakers will be muted
when headphones are connected to the set.
( Telescopic antenna - improves FM
reception
Remote control (for disc oper-
ations only) (See 2)
1 MODE – selects different play modes:
e.g. REPEAT or RANDOM
(random order)
2 PROG – programs tracks and reviews the
program
3 ALBUM +
MP3 only: selects albums (up);
4 ALBUM -
MP3 only: selects albums (down)
5 PLAY/PAUSE – starts/ pauses CD/MP3
playback
6 STOP – stops CD/MP3 playback;
– erases a program.
7 ∞§
C
D/MP3: – searches back and forward
within a track;
– skips to the beginning of a
current track/ previous/ later
track