


RQTX1066
RQTX1066
RQTX1066
RQTX1066
11
ENGLISH
This is a 12-hour clock.
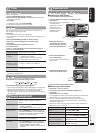
Press [CLOCK/TIMER] to select “CLOCK”.
Within 5 seconds, press [e,r] to set the time. (Press and hold to
change the time faster.)
Press [OK].
To display the clock, press [CLOCK/TIMER].
Reset the clock regularly to maintain accuracy.
•
•
Setting the clock
You can set the timer to come on at a certain time to wake you up.
This unit offers 3 optional play timers.
Preparation:
Turn the unit on and set the clock (➡ above).
Prepare the music source (disc, radio, iPod
®
/iPhone or AUX) and set
the volume.
Press [CLOCK/TIMER] repeatedly to select play timer.
Within 5 seconds, press [e,r] to set the starting time.
Press [OK].
To set the finishing time, repeat step and .
To activate the timer
Press [z, PLAY] repeatedly to turn the selected play timer on.
Press [^] to turn the unit off.
•
•
Play timer
Change the settings
Repeat step to (➡ above).
Change the source
or volume
Press [z, PLAY] twice to clear zPLAY
indicator from the display.
Make changes to the source or volume.
Perform step and (➡ above).
Check the settings
(When the unit is on
or in standby mode)
Press [CLOCK/TIMER] repeatedly to select
“zPLAY 1”, “zPLAY 2” or “zPLAY 3”.
Cancel
Press [z, PLAY] twice to clear the timer
indicator from the display.
The timer will start at the preset time, with the volume increasing
gradually to the preset level.
•
Sleep timer
The sleep timer can turn the unit off after a set time.
Press [SLEEP] to turn the sleep function on or off.
Press [SLEEP] once to check the remaining time.
The play timer and sleep timer can be used together. The sleep timer
always has the priority. Be sure not to overlap the timer settings.
When AUTO OFF is ON and the unit is left unused for about
30 minutes, the unit will shut down even if the play time or sleep time
has not expired.
•
•
30MIN 60MIN 90MIN 120MIN
OFF (Canceled)
Preset EQ Press [PRESET EQ] repeatedly to select
“HEAVY”, “SOFT”, “CLEAR”, “VOCAL” or
“FLAT”.
Bass or Treble
Press [BASS/TREBLE] repeatedly to select
“BASS” or “TREBLE”.
Press [e,r] to adjust the level (-4 to +4).
Surround Sound Press [SURROUND] repeatedly during play to
select “ON SURROUND” or “OFF SURROUND”.
If interference in FM stereo reception increases,
cancel the surround sound effect.
D.Bass Press [D.BASS] repeatedly during play to select
“ON D.BASS” or “OFF D.BASS”.
Re-master Press [RE-MASTER] repeatedly during play to
select
“ON RE-MASTER” or “OFF RE-MASTER”.
Digital remaster is effective on MP3.
Analog remaster is effective on iPod
®
/iPhone
and AUX.
•
•
Sound adjustment
11
Timer
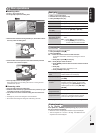
Enjoying audio from iPod
®
or iPhone
External unit
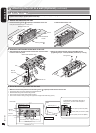
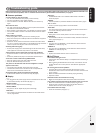
g Inserting an iPod
®
/iPhone
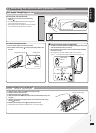
Press [;, iPod] to open the sliding door.
Insert the suitable dock adapter (not included) for the
iPod
®
/iPhone.
g Removing an iPod
®
/iPhone
Press [;, iPod] to close the sliding door.
Repeat step and (➡ above).
To remove, simply pull the iPod
®
/iPhone straight out to
disconnect it.
Repeat step and (➡ above).
If the iPod
®
/iPhone dock is not tilted when connecting or disconnecting
the iPod
®
/iPhone, it may cause damage to the connector.
When inserting an iPod
®
/iPhone into the unit, be sure to use the
dock adapter either supplied with the iPod
®
/iPhone or commercially
available from Apple Inc.
Reduce the volume of the main unit to minimum before connecting or
disconnecting the iPod
®
/iPhone.
•
•
•
Play
Press [iPod q/h].
Pause
Press [iPod q/h] or [g].
Skip track
Press [u/t] or [y/i].
Search the current track
Press and hold [u/t] or [y/i].
Display iPod
®
/iPhone menu/
return to previous menu
Press [iPod MENU] in the play mode.
(Remote control only)
Select contents from
iPod
®
/iPhone menu
Press [e,r] and then [OK].
(Remote control only)
Connect the iPod
®
/iPhone
(not included) firmly.
Be sure to remove the iPod
®
/iPhone
from its case.
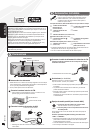
Push the docking switch lever
back until it clicks into place.
Press [;] to unlock the
iPod
®
/iPhone dock and then
pull the docking switch lever
to tilt the iPod
®
/iPhone dock.
[;]
Dock adapter
Click!
Lever
Connector
Clips
Click!
Push!
Insert the side of the
iPod
®
/iPhone dock
adapter with the clips
facing towards you
first and then push the
opposite side until it
clicks into place.