


15
RQT6951
After plugging the unit into your household AC outlet and pressing
[Í] to turn the unit on for the first time, the unit automatically tunes
in all the channels it can receive and sets the clock.
The unit determines the type of transmission, TV or CATV, as
follows:
TV: when there are less than 5 CATV channels.
CATV: when there are 5 or more CATV channels.
Preparation
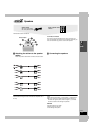
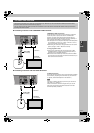
≥Confirm that the antenna is connected correctly.
≥Turn on the television and select the video input for the VCR.
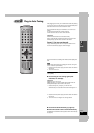
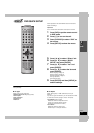
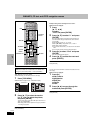
≥Press [VCR] to put the remote control in VCR mode.
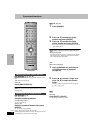
Press [Í] to turn on the unit.
Plug-in Auto Tuning starts and the unit puts the stations it can
receive into channels (➡ page 43, Channel range).
The unit starts auto clock setting when finished, then displays the
time.
[Note]
If auto tuning stops partway (by changing the source, turning the
unit off, or due to a power failure.)
1 Disconnect the AC power supply cord on the main unit and then
reconnect it.
2 Turn on the main unit.
To cancel partway
Press [MENU].
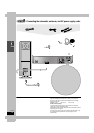
∫ To start Plug-in Auto Tuning again (after
relocation, for example)
Preparation
≥Press [Í] to turn on the unit.
≥Make sure there is no video cassette tape loaded in the unit.
≥Press [DVD/VCR] to select “VCR” as the source.
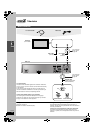
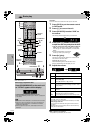
1 Press and hold [CHX] and [CHW] on the main unit
simultaneously for 3 seconds until the channel changes to “2”.
2 Disconnect the AC power supply cord on the main unit and then
reconnect it.
3 Turn on the main unit. Plug-in Auto Tuning restarts.
∫ To set the channels manually (➡ page 43).
∫ If the unit couldn’t set the clock automatically
The MANUAL CLOCK SET screen appears. Set the time manually
(➡ page 42).
STEP
5
Plug-in Auto Tuning