


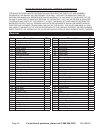
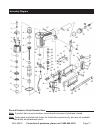

Page 10 For technical questions, please call 1-800-444-3353. SKU 68018
tool. Other components, such as coupler
plug and industrial-grade quick coupler,
will make operation more efcient, but
are not required.
WARNING! TO PREVENT SERIOUS
INJURY FROM ACCIDENTAL
OPERATION: Do not install a quick
coupler on the tool. A coupler contains
an air valve that will allow the air tool to
retain pressure and operate accidentally
after the air supply is disconnected.
Note: Air ow, and therefore tool
performance, can be hindered by
undersized air supply components.
3. The air hose must be long enough to
reach work area with enough extra
length to allow free movement.
4. Release Trigger (32).
5. Close the in-line safety valve between
the compressor and the tool.
6. Turn on the air compressor according to
the manufacturer’s directions and allow it
to build up pressure until it cycles off.
7. Adjust the air compressor’s output
regulator so that the air output is enough
to properly power the tool, but the output
will not exceed the tool’s maximum air
pressure at any time. Adjust pressure
gradually, while checking the air output
gauge to set the right pressure.
8. The air pressure setting must not exceed
job site regulations/restrictions. The air
pressure setting must not exceed 90 PSI
when being used with work pieces that
have a thickness of less than 1-3/4”.
9. Inspect the air connections for leaks.
Repair any leaks found.
10. If tool will not be used at this time,
turn off and detach air supply, safely
discharge any residual air pressure,
and release Trigger to prevent
accidental operation.
Note: Residual air pressure should not be
present after the tool is disconnected
from the air supply. However, it is a
good safety measure to attempt to
discharge the tool in a safe fashion after
disconnecting to ensure that the tool is
disconnected and unpowered.
Work Piece and Work Area Set Up
1. Designate a work area that is clean and
well-lit. The work area must not allow
access by children or pets to prevent
distraction and injury.
2. Route the air hose along a safe path to
reach the work area without creating a
tripping hazard or exposing the air hose
to possible damage. The air hose must
be long enough to reach the work area
with enough extra length to allow free
movement while working.
3. Secure loose workpieces using a vise
or clamps (not included) to prevent
movement while working.
4. There must not be hazardous objects
(such as utility lines or foreign objects)
nearby that will present a hazard
while working.
OPERATING INSTRUCTIONS
Read the ENTIRE IMPORTANT
SAFETY INFORMATION
section at the beginning of this
manual including all text under
subheadings therein before set up
or use of this product.
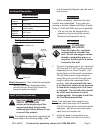
Inspect tool before use, looking
for damaged, loose, and missing
Operating Instructions