


EnglishEnglish
56
AM/FM TUNER
OPERATION
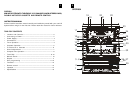
• Press the STANDBY/ON Button (16) to ON . The Standby indicator (19) will go off.
• Set the Function Selector (14) to the TUNER position.
• Select the desired frequency band with the Band Selector (28).
• Tune to the desired radio station by turning the Tuning control (29).
• Press the STANDBY/ON Button to OFF.
ANTENNA
• For FM reception there is a built-in FM antenna wire at the rear of the unit. Move the wire
around to obtain the best reception.
• For AM reception the signals are picked up through a built-in ferrite antenna. Your may
have to orient the unit to obtain the best reception.
FM & FM-STEREO RECEPTION
• Stereo reception is possible when the tuned FM station is broadcasting in stereo.
• When the FM Stereo button (26) is “up” and the station is broadcasting in Stereo, the
STEREO indicator (18) lights up.
• When FM stations are weak and are disturbed, listening can be improved by pressing
down the FM STEREO selector (26). Reception will then be in MONO.
CASSETTE OPERATION
INSERTION AND REMOVAL OF CASSETTES
• Press the STANDBY/ON Button (16) to ON . The Standby indicator will go off.
• Set the Function Selector (14) to the TAPE position.
• Press the Stop / Eject Key (36) to open the Cassette Door of Compartment B.
• Slip your cassette tape into the door, with the exposed section facing downward
and side A with full spool of tape on left side facing you.
• Close the Cassette Door securely.
• When finished, press the Stop / Eject Key to open the Cassette Door, and retrieve your
cassette tape.
PLAYBACK
• Set the Function Selector (14) to the TAPE position.
• Insert your cassette tape in the Compartment B.
• Press the Play Key (33) to activate playback.
• Use the Pause Key (37) whenever you want to suspend playback.
• Press the Stop / Eject Key (36) when finished. Otherwise the tape will stop automatically
when the end of the tape is reached.
CONTINUOUS PLAYBACK ( ONLY RUNNING FROM TAPE DECK B TO A )
• Set the Function Selector (14) to the TAPE position.
• Insert your cassette tapes.
• Press the PLAY Key (33) of deck B.
• Press the PAUSE Key (8) and the PLAY Key (4) of deck A.
• Deck B will now proceed to play its side.
• Adjust the VOLUME (24) control to the preferred level.
• When Tape Deck B has finished playing, it will stop. Tape Deck A then starts playing
back automatically.
• When Tape A reaches its end, it automatically stops.
RECORDING (ONLY ON TAPE DECK A)
• This unit has Automatic Level Control circuitry. This means that the recording level is
set automatically. The volume or tone controls will not affect the recording.
• Record Key will not be pressed down when the record prevention tab is broken or
removed from the tape.
RECORDING FROM THE RADIO
• Set the Function Selector (14) to the TUNER position.
• Tune in your station using the TUNING Control (29) and put in your blank cassette tape
in cassette compartment “A” (9).
• Press the Record Key (3) and the Play Key (4) at the same time on Tape Deck A to start
recording.
• Press the Stop / Eject Key ( 7) when finished. Otherwise the tape will stop automatically
when the end of the tape is reached.
RECORDING FROM THE CD
• Set the Function Selector (14) to the CD position.
• Put in your blank cassette tape in cassette compartment “A” (9).
• Select the CD (1,2 or 3) you want to play/record with the Disc Selector button (39).
Press the Record Key (3) and the Play Key (4) at the same time on Tape Deck A to start
recording. Press Play/Pause Key (27) on the CD player.
• Press the Stop / Eject Key ( 7) when finished. Otherwise the tape will stop automatically
when the end of the tape is reached.