


132
Zone 2 and Zone 3—Continued
If you’ve connected your Zone 2 speakers to the AV
receiver, as explained in “Connecting Your Zone 2
Speakers Directly to the AV receiver” on page 130, you
must set the “Powered Zone2” setting to “Act” (Acti-
vated).
Notes:
• When “Act” is selected and Zone 2 turned on, the
Zone 2 speakers connected to the ZONE 2 L/R
speaker terminals output sound, but the surround back
speakers connected to the SURR BACK L/R speaker
terminals do not. When “Act” is selected and Zone 2
turned off, the surround back speakers output sound as
normal.
• Powered Zone 2 cannot be used if “Speaker Type:
Front(Speaker A)” is set to “Bi-Amp” or “BTL”, or
“Speaker Type: Front(Speaker B)” is set to “Normal”,
“Bi-Amp”, or “BTL” (page 61).
• This procedure can also be performed on the AV
receiver by using its [SETUP] button, arrow buttons,
and [ENTER] button.
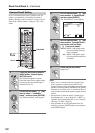
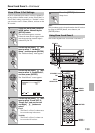
Powered Zone2 Setting
1
Press the [RECEIVER] REMOTE
MODE button, followed by the
[SETUP] button.
The main menu appears onscreen.
If the main menu doesn’t appear, make
sure the appropriate external input is
selected on your TV.
2
Use the Up and Down [ ]/[ ] but-
tons to select “7. Hardware
Setup”, and then press [ENTER].
The “Hardware Setup” menu appears.
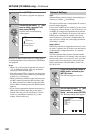
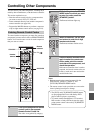
INPUT SELECTOR
ON STANDBY
DISPLAY MUTING
G
U
I
D
E
E
X
I
T
PREV
CH
DIMMER
CDR/MD/DOCK
SAT
TAPE/AMP
SLEEP
MACRO
REMOTE MODE
--
/
---
10 11 12
TV
TV CH
TV VOL
PLAYLIST
RANDOM
DVD
AUX1 AUX
2
GAME/TV
CBL/SATVCR/DVR
D. TUN
CD
TUNER
TAPE
PHONO
REC
ENTER
T
O
P
M
E
N
U
M
E
N
U
VOL
CH
DISC
ALBUM
TV
VCR
CABLE
NET/USB
DVD
RECEIVER
CD
+
-
123
ZONE
3
ZONE
2
INPUT
+
-
+10
0
CLEAR
123
456
789
S
E
T
U
P
R
E
T
U
R
N
NET/USB
SP A SP B
SETUP
RECEIVER
ENTER
3
Use the Up and Down [ ]/[ ] but-
tons to select “2. Zone2/Zone3”,
and then press [ENTER].
The “Zone2/Zone3” screen appears.
4
Use the Up and Down [ ]/[ ] but-
tons to select “Powered Zone2”,
and use the Left and Right
[ ]/[ ] buttons to select:
Not Act: ZONE 2 L/R speaker termi-
nals not activated (Powered
Zone 2 disabled).
Act: ZONE 2 L/R speaker termi-
nals activated (Powered Zone
2 enabled).
5
Press the [SETUP] button.
Setup closes.
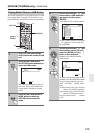
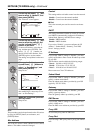
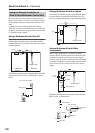
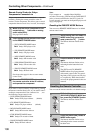
7-2. Zone2/Zone3
Powered Zone2
Zone2 Out
Zone3 Out
Not Act
Fixed
Fixed
MOVE VALUE RETURN
RETURN
EXIT
SETUP