


13
Getting to Know the AV Receiver
—Continued
M
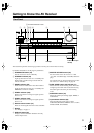
IR IN/OUT
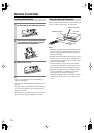
A commercially available IR receiver can be con-
nected to the IR IN jack, allowing you to control the
AV receiver while you’re in Zone 2, or control it
when it’s out of sight, for example, installed in a
cabinet.
A commercially available IR emitter can be con-
nected to the IR OUT jack to pass IR (infrared)
remote control signals through to other components.
N
12V TRIGGER OUT ZONE 2
This output can be connected to the 12-volt trigger
input on a component in Zone 2. When Zone 2 is
turned on on the AV receiver, a 12-volt trigger sig-
nal is output.
O
AC INLET
The supplied power cord is connected here. The
other end of the power cord should be connected to
a suitable wall outlet.
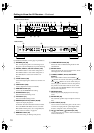
P
DIGITAL COAXIAL IN 1, 2, and 3
These coaxial digital audio inputs are for connect-
ing components with a coaxial digital audio output,
such as a CD player or DVD player. They’re assign-
able, which means you can assign each one to an
input selector to suit your setup. See “Digital Input
Setup” on page 52.
Q
DIGITAL OPTICAL IN 1, 2, and OUT
These optical digital audio inputs are for connecting
components with an optical digital audio output,
such as a CD player or DVD player. They’re assign-
able, which means you can assign each one to an
input selector to suit your setup. See “Digital Input
Setup” on page 52.
The optical digital audio output is for connecting a
digital recorder with an optical digital input, such as
a CD recorder.
R
GND screw
This screw is for connecting a turntable’s ground
wire.
S
CD IN
This analog audio input is for connecting a CD
player’s analog audio output.
T
TAPE IN/OUT
These analog audio input and output jacks are for
connecting a recorder with an analog audio input
and output, such as a cassette deck, MD recorder,
etc.
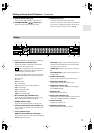
U
AUX 1 IN
A VCR for playback only or other video source can
be connected here. There’s S-Video and composite
video input jacks for connecting the video signal.
V
GAME/TV IN
A game console or TV output can be connected
here. There’s S-Video and composite video input
jacks for connecting the video signal.
W
CBL/SAT IN
A cable or satellite receiver can be connected here.
There’s S-Video and composite video input jacks
for connecting the video signal.
X
VCR/DVR IN/OUT
A video component, such as a VCR or DVR, can be
connected here for recording and playback. There’s
S-Video and composite video input and output jacks
for connecting the video signal.
Y
DVD IN
This input is for connecting a DVD player. There’s
S-Video and composite video input jacks for con-
necting the video signal.
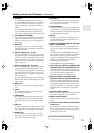
Z
FRONT L/R, CENTER, SURR L/R, and SURR
BACK L/R SPEAKERS
These terminal posts are for connecting the front
L/R, center, surround L/R, and surround back L/R
speakers.
The FRONT L/R and SURR BACK L/R terminal
posts can be used with front speakers and surround
back speakers respectively, or used to bi-amp or
bridge the front speakers. See “Bi-amping the Front
Speakers” and “Bridging the Front Speakers
(TX-SR875 only)” on page 24.
The TX-SR805 does not support bridging.
a
MULTI CH input: FRONT L/R, CENTER, SUB-
WOOFER, SURR L/R, and SURR BACK L/R
This analog multichannel input is for connecting a
component with a 5.1/7.1-channel analog audio out-
put, such as a DVD player, DVD-Audio or
SACD-capable player, or an MPEG decoder.
b
PRE OUT: FRONT L/R, CENTER, SUB-
WOOFER, SURR L/R, and SURR BACK L/R
This 5.1/7.1 multichannel analog audio output can
be connected to the analog audio input on a multi-
channel power amplifier for when you want to use
the AV receiver solely as a preamplifier. The SUB-
WOOFER jack is for connecting a powered sub-
woofer.
c
PRE OUT: ZONE 2, ZONE 3
These analog audio outputs can be connected to the
line inputs on amplifiers in Zone 2 and Zone 3.
d
ZONE 2 L/R SPEAKERS
These terminal posts are for connecting speakers in
Zone 2.
e
AC OUTLET (North American and European
models only)
These switched AC outlets can be used to supply
power to other AV components. The type and num-
ber of outlets depends on the country in which you
purchased your AV receiver.
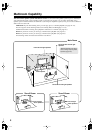
See pages 20–43 for hookup information.