


70
Recording a Source
—Continued
Some steps can also be operated on the remote control-
ler, but described here are operations on the
TX-NR1000/TX-NR5000E.
Notes:
• No surround effects can be recorded.
• No DVD or any sources whose copyright is protected
can be recorded.
• There are some restrictions on recording of digital
audio/video signals. Refer to the manual of your
recording component.
• If recorded as analog signals, DTS signals are
recorded as noise, so never record signals from a
DTS-compatible CD or LD.
Recording music or a movie you are currently playing.
Operate on the TX-NR1000/TX-NR5000E in the main
room.
You can record an audio source or a video on a compo-
nent while playing another source on another compo-
nent. For example, you can record a CD while watching
a DVD. Operate this function on the TX-NR1000/
TX-NR5000E in the main room.
Recording Audio/Video While Playing
1
Turn on the power supply to TX-NR1000/
TX-NR5000E.
2
Check the connection to your recording
component.
An audio recorder should be connected to the
AUDIO OUT or DIGITAL OUT jacks, and a
video recorder to the VIDEO OUT jacks.
3
Check settings for a recorder connected.
1. On the Setup menu (See page 91), select
“Speaker/Output Setup”
→
“Audio Output
Assign,” and specify “Rec Out” as the setting
for the jack to which your audio recording
component is connected.
2. Similarly, select “Speaker/Output Setup”
→
“Video Output Assign,” and specify “Video
XX Rec Out” as the setting for the jack to
which your video recording component is
connected.
3. Press the [SETUP] button to close the menu.
Hint:
Since Zone 3 Out and Rec Out use the same cir-
cuitry, audio recording is disabled if Zone 3 Out
is specified. Audio/video recording is also dis-
abled on the same component as that for playing.
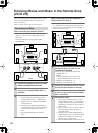
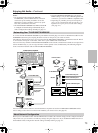
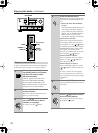
STANDBY/ON
STANDBY
PURE AUDIO
MASTER VOLUME
OPEN
ZONE 2
()
GREEN
MAIN
()
BLUE
REC
/
ZONE 3
(
)
RED
DISPLAY
DVD
VIDEO
3
VIDEO 4 VIDEO 5 VIDEO 6 VIDEO 7VIDEO 2VIDEO 1
MEMORY
SETUP
EXIT
PHONES
VIDEO 7 INPUT
S VIDEO
DIGITAL
AUDIO
VIDEO L R
LISTENING
MODE
AUDIO
SELECTOR
TONE
CLEAR
DIMMER
ZONE
2 REC/
ZONE 3
LEVEL LEVEL
SELECT/
PRESET
CONTROL
/
TUNING
PUSH TO ENTERPUSH TO ENTER
C
D NET AUDIOPHONOTUNERTAPE 1 TAPE 2
TUNING
MODE
REC/ZONE 3SETUP
CONTROL/TUNING
SELECT/PRESET
Input source buttons
STANDBY indicator
4
Press the input source button to select
the component for audio/video recording
(player side).
5
Press the [REC/ZONE 3] button, and within 3
seconds, select “Rec Sel: SOURCE” with the
[CONTROL/TUNING] dial.
Pressing the [REC/ZONE 3] button makes the
[STANDBY] indicator blink for 3 seconds.
Select the target source while the indicator is
blinking. The name of the source to be recorded
is indicated in the display window, and the button
for the source selected lights in red.
Audio/video recording is enabled on the compo-
nent for which “Rec Out” was specified in step 3.
6
Prepare the component for audio/video
recording (recorder side).
• Put the component for audio/video recording
into the recording standby status.
• You should adjust the recording level on the
recording component.
• For how to record, refer to the manual of the
recoding component.
7
Start audio/video recording
Play the component selected in step 4.
• Switching the source during audio/video
recording will record the source newly
selected.
• If you select FM (or AM) with the [TUNER]
input source button when the recording source
is set to AM (or FM), the output for the record-
ing source also changes to AM (or FM).
Recording Audio/Video on a
Component While Playing Another
1
Turn on the power supply to TX-NR1000/
TX-NR5000E in MAIN A or MAIN B mode.
Proceeding to the next step in the Standby status
makes the Zone 3 mode effective, so be sure to
turn on the power source.
2
Check connections and settings to the
recording component.
Refer to steps 2 and 3 in “Recording Audio/
Video While Playing” in the previous section.