35
Connecting Your Components
—Continued
With (Remote Interactive), you can use the following special functions:
■
Auto Power On/Standby
When you start playback on a component connected via , if the AV receiver is on Standby, it will automatically
turn on and select that component as the input source. Similarly, when the AV receiver is set to Standby, all compo-
nents connected via will also go on Standby. This function will not work on components connected to an AC
OUTLET on the AV receiver.
■
Direct Change
When playback is started on a component connected via , the AV receiver automatically selects that component
as the input source. If your DVD player is connected to the AV receiver’s multichannel DVD input, you’ll need to
press the [MULTI CH] button to hear all channels (see page 43), as the Direct Change function only selects the
FRONT DVD IN jacks.
■
Remote Control
You can use the AV receiver’s remote controller to control your other -capable Onkyo components, pointing the
remote controller at the AV receiver’s remote control sensor instead of the component. You must enter the appropri-
ate remote control code first (page 64).
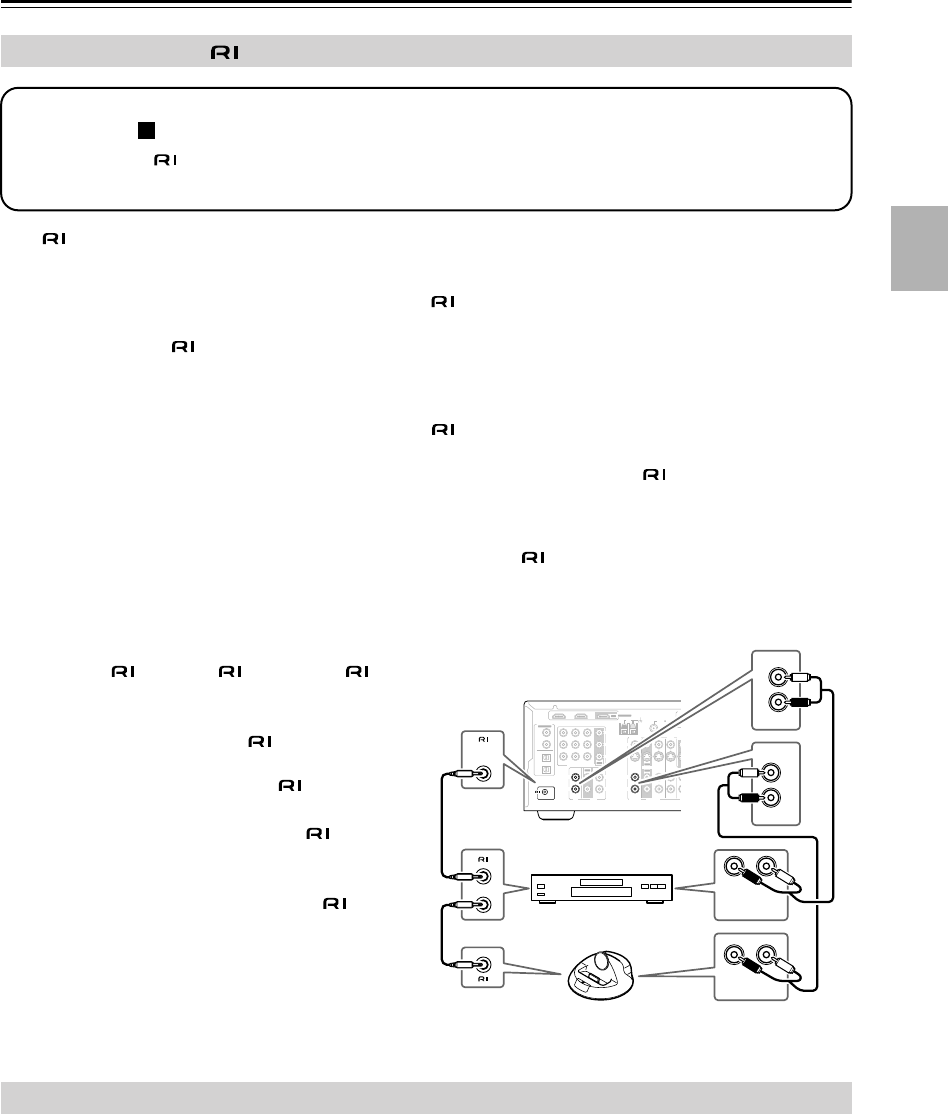
Notes:
• Use only cables for connections.
cables are supplied with Onkyo players (DVD,
CD, etc.).
• Some components have two jacks. You can
connect either one to the AV receiver. The other
jack is for connecting additional -capable
components.
• Connect only Onkyo components to jacks.
Connecting other manufacturer’s components
may cause a malfunction.
• Some components may not support all func-
tions. Refer to the manuals supplied with your
other Onkyo components.
• Connect the AV receiver’s power cord to a suitable wall outlet.
Notes:
•
Before connecting the power cord, connect all of your speakers and AV components.
•Turning on the AV receiver may cause a momentary power surge that might interfere with other electrical equipment
on the same circuit. If this is a problem, plug the AV receiver into a different branch circuit.
Connecting Onkyo Components
Connecting the Power Cord
Step 1: Make sure that each Onkyo component is connected to the AV receiver with an analog audio cable (con-
nection in the hookup examples) (see pages 26 to 34).
Step 2: Make the connection.
Step 3: If you’re using an MD, CDR, or RI Dock, change the input Display (see page 41).
a
OUT
OUT
CBL/SAT IN
IN IN IN
IN
IN
IN IN
VCR/DVR IN
DVD IN
OUT
COMPONENT VIDEO
Y
C
B/PB
CR/PR
L
R
ANTENNA
FM
AM
75
SUB
WOOFER
FRONT
SURROUND
CENTER
CD
R R
LL
TAPE
OUT
XM
SIRIUS
CBL/SAT
CBL/SAT
VCR/DVR
VCR/DVR
DVD
DVD
R
L
S
V
R
L
MONITOR
OUT
S
V
PRE OUT
SUB
WOOFER
SURROUND
SPEAKERS
FRONT
SPEAKERS
CENTER
SPEAKER
REMOTE
CONTROL
IN 1IN 2
OUT
HDMI
ASSIGNABLE
ASSIGNABLE
COAX-
IAL
OPTICAL
1
(DVD)
2
(CBL/SAT)
1
(VCR/DVR)
2
(CD)
DIGITAL IN
LR
IN
CBL/SAT
L
R
IN
CD
L
R
REMOTE
CONTROL
ANALOG
AUDIO OUT
LR
AUDIO OUT
e.g., CD player
e.g., RI Dock


