


DSFG Defeat (HD•CTR)
Main/Surround Configuration (HD•LRS)
Both the HD•CTR and HD•LRS feature
crossover mounted switches which cus-
tomize the response of the speaker. In the
HD•CTR, the switch controls whether the
Directed Sound Field Geometry feature is
On or Off. (It is useful to switch it Off when
the speaker is installed at ear level, for exam-
ple, behind a perforated screen). In the
HD•LRS, the switch sets the speaker’s
response for Main (front) or Surround. The
Surround setting manipulates the response of
the speaker to provide a diffuse sound field.
BumpBack
™
Woofer Magnet(s)
Niles engineers have utilized a unique
magnet construction allowing far greater
“throw” or voice coil excursion. This
allows a new level of deep bass perfor-
mance to be achieved.
X-Matrix™ Reinforced Baffle
The X-Matrix Baffle design uses specially
molded ribs to add rigidity to the baffle
assembly. The end result is better bass and
improved midrange detail.
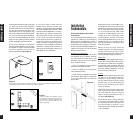
Absolutely Flush to the Wall
Appearance
The unique mounting system of the HD
loudspeakers powerfully clamps the frame
to the bracket, sandwiching the wall mate-
rial between them. Because the clamping
action is totally uniform around the frame,
there are no shadows or gaps between the
wall and the frame. Additionally, the Niles
mounting system is carefully optimized to
stiffen the surrounding drywall and pre-
vent it from resonating. You hear only the
music, not the drywall.
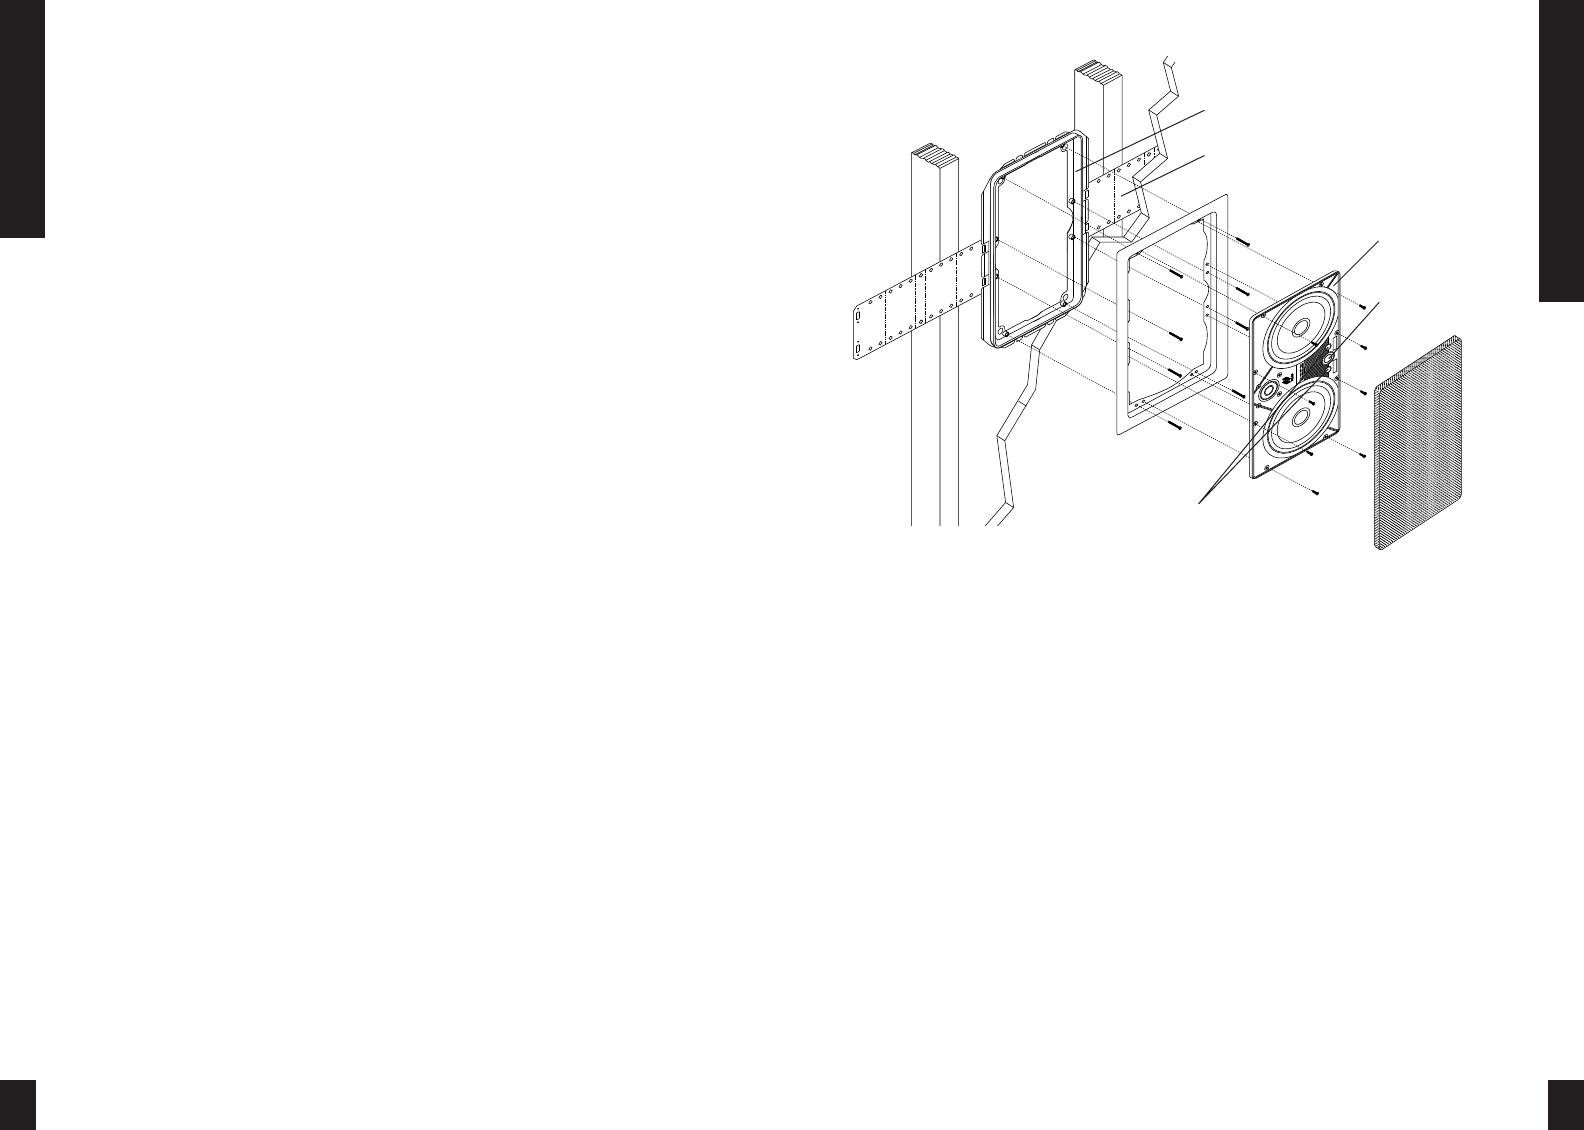
Easy Retrofit Installation in your
Existing Home
Designed for ease of installation, the Niles
mounting system makes retrofit installa-
tions simple and fast. A supplied template
assures fast and accurate hole cutting. The
bracket slips behind the drywall and the
screws secure the bracket to the frame,
sandwiching the drywall between them.
The speaker baffle attaches to the frame,
and the grille mounts over the speaker.
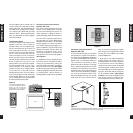
Three Stage Installation System for
Remodels or New Construction
You install only the parts you need for a
particular stage of construction. When the
framing and wiring are finished, you
install the
bracket
. After the drywall is up,
but before the painter begins to paint, you
install the
frame
and provide the rustproof
aluminum
grilles
to the painter so that
they can be painted to match the sur-
roundings. Only when construction is
completely finished do you put the valu-
able
speaker
in the wall. You don’t have
to mask or prep the speaker for painting,
and worries about theft during the final
phases of construction are never an issue!
Infrared Sensor Mount
The speaker baffle has a locator designed
for the Niles MS-1 MicroSensor,™ a
miniature infrared sensor. The MS-1
installs discreetly behind the aluminum
grille and therefore minimizes wall clut-
ter in your home. When you want to
control your equipment, you simply
point your remote control at the speaker
from up to 15 feet away.
Low Diffraction, Paintable
Aluminum Grilles
HD speakers come standard with alu-
minum grilles. The grille has hundreds of
precisely sized perforations, creating an
acoustically transparent grille. The alu-
minum construction is 100% rustproof.
Features and Benefits
3
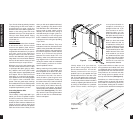
Installation Considerations
Recommended Amplifier Power
For satisfactory performance, we recom-
mend an amplifier with a power rating of
ten to one hundred fifty watts. Curiously,
most speakers are not damaged by large
amplifiers but by small amplifiers. If your
system is playing loudly, a small amplifier
will run out of power very quickly. When
an amplifier runs out of power it creates
damaging “clipping” distortion. A more
powerful amplifier will play at the same
volume without distorting. See the section
on operating the speakers for more infor-
mation about clipping distortion.
Speaker Wire
Use 2-conductor speaker wire when con-
necting HD speakers to your receiver or
amplifier. For most applications, we rec-
ommend you use 16 or 18 gauge wire.
For wiring runs longer than 80 feet we
recommend 14 gauge wire. The spring
loaded terminals of the HD speakers will
accommodate up to 12 gauge wire
directly. Larger sizes can be accommodat-
ed via pin connectors.
When you run wire inside walls, special
jacketing (CL-2 or CL-3) is required to
both protect the wire and for fire preven-
tion. In some areas conduit is required.
For a trouble-free installation, low voltage
wire such as speaker wire must be run in
accordance with the National Electrical
Installation Considerations
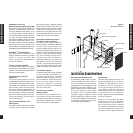
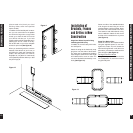
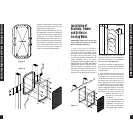
Figure 1
Model HD•LRS Shown
New Construction Wings
Bracket
Frame
Speaker Baffle
IR Knockout
Acoustic
Fine Tuning Controls
Grille
4