


CONCEALING SPEAKER WIRE (CONTINUED)
CUTTING HOLES
In traditional wood stud/drywall construction, first cut the hole for the speaker. Then, in the open-
ing, use a drill with a long bit to auger a route across the ceiling joists. Sometimes, you will need to
use a “notching” technique to reach areas the drill bit won’t reach or to turn corners (e.g. down a
wall without an accessible attic).
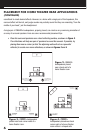
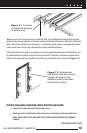
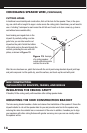
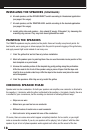
Avoid making an irregular hole in the
drywall. By carefully cutting a rectan
-
gular hole, you can later use the cut
drywall as the patch. Notch the bottom
of the joists and run the wire through the
notches, protecting the wire with nail
plates, as shown in Figure
13.
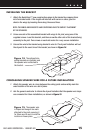
After the wire has been run, patch the hole with the cut drywall using standard drywall joint tape
and joint compound. Let the patch dry, sand the surface, and touch-up the wall with paint.
NEW CONSTRUCTION:
INSTALLATION OF BRACKETS, FRAMES, AND GRILLES
INSULATING THE CEILING CAVITY
If feasible, fill the ceiling cavity with insulation after cutting speaker holes.
MOUNTING THE NEW CONSTRUCTION BRACKET
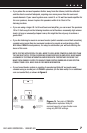
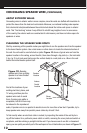
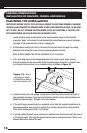
The hole-saving bracket enables a faster and cleaner final installation of the speaker. It forces the
drywall installer to cut out the speaker hole for you and provides wire ties for the speaker wire,
reducing the risks of accidental loss or movement of the wire. In addition, it enables you to align
your speakers with other ceiling fixtures with greater accuracy, since you can see exactly where
the speaker will be.
Figure 13. Example
of a ceiling speaker
cutout with ceiling joists
notched for wire run.
14