


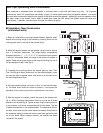


Installation: New Construction
(unfinished walls)
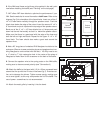
1. Begin by installing the mounting bracket between adjacent studs.
Attach the mounting wings to the bracket by inserting them into the
locking plastic tabs in the side of the bracket (fig.2).
2. Select the desired location for the speaker, using a level to ensure
that it is precisely positioned. The wings feature progressively
elongated sections (1", 1", 2", 2", 2", 3", 3") with screw holes spaced
in one-inch increments. Attach the wings to the studs with screws or
staples. Break off the extra portion of the wing by bending it at one of
the pre-stamped "break" lines (fig.3).
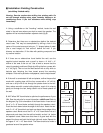
3. Complete the pre-wiring before the drywall goes up (see "Tech
Tips: Pre-Wiring for New Construction" on the previous page). Leave
an extra few feet of speaker cable, and secure it to the cable tie on
the mounting bracket (fig.4).
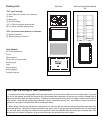
4. During the drywall phase, cut a hole
13 9/16" x 9"
around the brack-
et. The bezel outer frame will extend out about 1 inch beyond the
perimeter of the cutout to hide minor imperfections in the cutout.
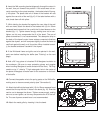
5. After the drywall is complete, attach the bezel to the bracket with
(8) 4 x 50mm recessed head screws that line up with the 8 raised
bosses on the bracket (fig.5). Tighten screws snugly, making sure not
to over-tighten, as this may compromise the fit of the bezel. The use
of power screwdrivers is not recommended. The absorptive strip on
the back of the bezel's outer frame reduces unwanted vibrations and
will compress slightly to allow the frame to rest flush against the wall
on all four sides. When installed correctly, the bracket and bezel
"sandwich" the drywall.
Break
Break
Break
Break
34567891011
34567891011
12 12 13 14
12 12 13 14
34567891011
34567891011
12 12 13 14
12 12 13 14
fig.3
12
12
3
3
12
12
34567891011
34567891011
12 12 13 14
12 12 13 14
34567891011
34567891011
12 12 13 14
12 12 13 14
fig.2
3
3
12
12
Cable Tie
fig.4
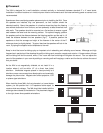
Tech Tips: Optimizing Sonic Performance
Bass response is smoothest when the speaker is mounted within a rigid wall that flexes very little. For improved
performance, add 2"x4" cross-braces horizontally roughly 15 inches above and below the speaker location. Use wood
glue and extra screws when attaching the drywall to the studs around the speaker. Additionally, once the speaker cutout
has been made in the drywall, add a bead of wood glue inside the wall where the drywall meets the studs and
cross-braces. If possible, use two layers of drywall for maximum rigidity.
1
1
345
345
12
12
fig.5