


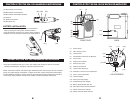
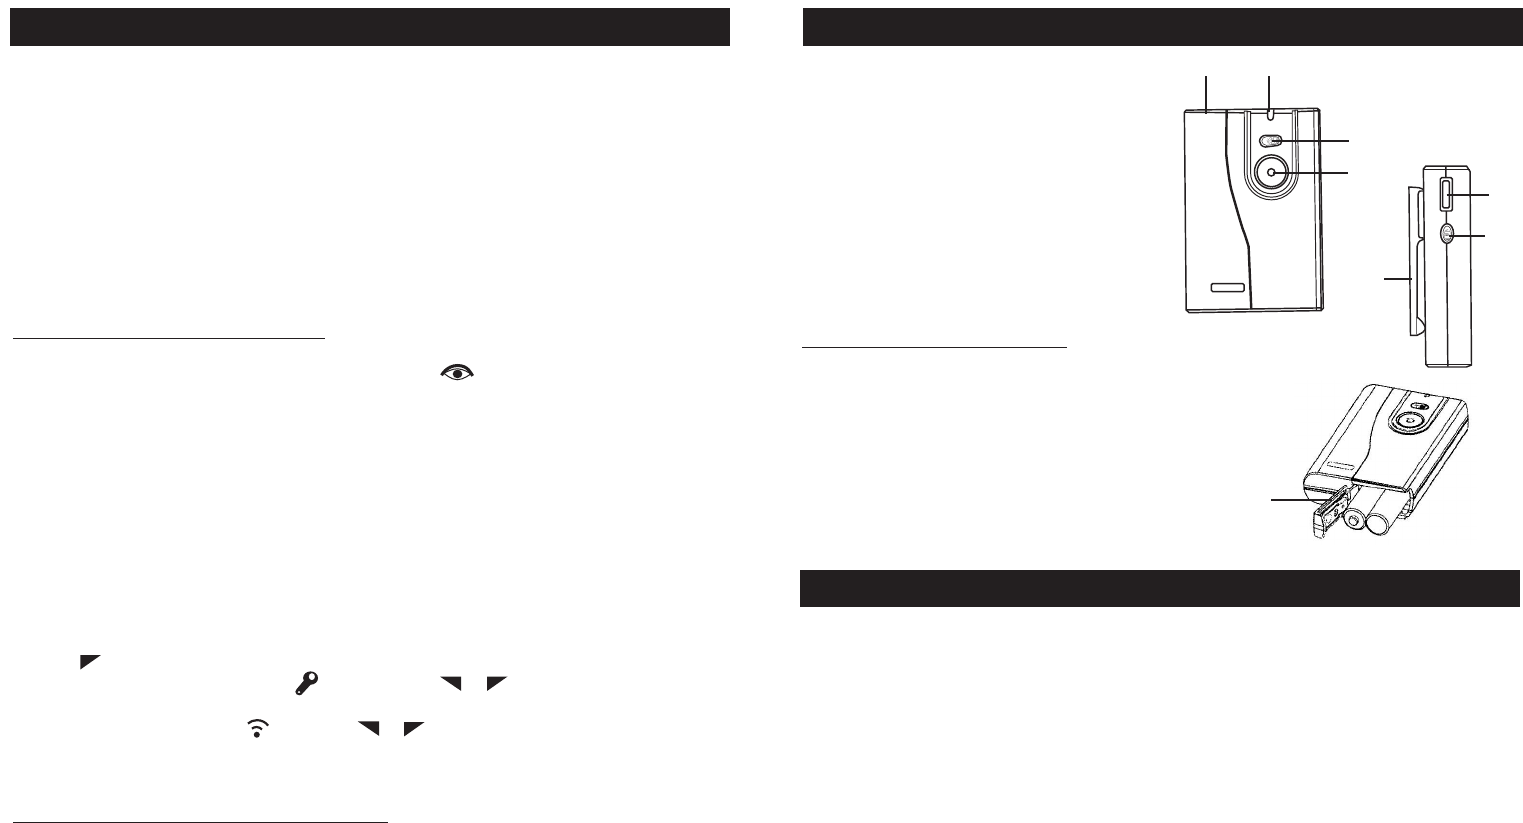
CONTROLS FOR THE WL-16U BODYPACK TRANSMITTER
(19) Power Switch
(20) Power Indicator
(21) Infrared Wire Interface of the Transmitter
(22) Volume Control
(23) Volume Lock
(24) Strap Clip
(25) Lavaliere Microphone Jack
BATTERY INSTALLATION
• Press the Battery Cover (26) outward as indicated by
the embossed arrow to pop open the battery
compartment
• Insert the batteries. (Pay attention to the correct
polarity.) Close and slide the battery cover back to the
locked position
(19)
(20)
(21)
(22)
(23)
(24)
(25)
(26)
OPERATING THE WL-16U BODYPACK TRANSMITTER
• Insert the Lavaliere Microphone into the transmitter’s microphone jack (25)
• Press the Transmitter Switch (19) to "ON". The Indicator (20) will light for about two seconds
indicating useable battery strength for operation and then shut off.
• Space the microphone about 6-12 inches from the mouth for best sound.
• To adjust the transmitted volume level for best audio, press the Volume Lock switch (23) on the
side of the transmitter to "H or L", and then the Volume Adjusting Rotary control (22) can be
adjusted for optimum audio. If the sound is distorted, either move the mic farther from the mouth
or turn down this control (22) to lower the audio level input to the transmitter.
NOTE: If the Power Indicator (20) doesn’t light momentarily when first turning on the unit or flashes
during use, please change the batteries. If it lights all the time, please re-adjust the channel again.
When the power switch is on "ST," then the receiver will be on mute status, and the system will be
quiet and operating without sound. To avoid feedback whistling or howling, keep the mic behind the
receiver’s speaker and at least 5-10 feet away. Adjust positions and volume as needed to eliminate
feedback interference.
5
• Press the Power Switch (1) to turn on the receiver.
• The LCD display will display the channel and battery status.
• Adjust the Volume Switch (2) for the level desired.
NOTE: If the LCD display doesn’t display the unit’s battery is low. Please charge first before using,
after turning the unit off with the power switch (1). The WA-1620U will automatically shut off when
power is too low for operation and must be recharged before further usage. The unit can also be
used with the AC power, and such operation will also charge the battery simultaneously while using.
If the unit is amplifying continuous high audio levels then the internal AC adapter may not provide
enough power for full operation and you’ll need to let battery charge for a while to build up a power
reserve before using again with AC.
Adjusting Frequency Channel
Auto-Searching For Open Channels
Continuously press the button labeled "OK" for 3 seconds. " " will appear and flash on the
screen. Release pressing "OK". The WA-1620U receiver will go into Auto-Searching Status. The
buzzer will sound continuously when the receiver has found an open channel.
Changing the Transmitter Channel Automatically
After the receiver’s channel has been selected above, and the receiver is still buzzing, hold the
Infrared Wireless Interface (20 & 29) of the transmitter (body pack or handheld mic) several inches
from the Infrared Wireless Interface (4) of the receiver. Turn on the switch (19 or 27) of the body
pack or handheld transmitter and wait a few seconds for the receiver buzzing to stop, which signals
the successful programming of the channel selected on the receiver into the transmitter.
NOTE: Please avoid doing the above in bright sunlight as it may effect the infra-red data transfer.
Selecting the Receiver’s Operating Channel Manually
• Press " " for three seconds to enter into the function setup mode
• Select Manual Channel Select mode " " by using and " " " "
• Press "OK" to select the channel displayed. It will change every time "OK" is pressed
• Select the Infrared Link mode " " by using " " " " and press "OK," the buzzer will sound
continuously. Proceed to transfer this channel info to the wireless microphone or the body pack
transmitter as above.
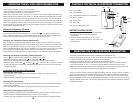
Operating with Auxiliary Equipment
Operating the Audio Input
• Insert the audio input, such as from a wired microphone, Walkman or CD player into the
Auxiliary Input (7)
• Adjust the Auxiliary Volume Control (6) of the Auxiliary Input
Operating the Audio Output
• Auxiliary Output (8) is the output jack of the audio signal and can be connected with amplifying
and recording equipment
NOTE: The Main Volume Rotary control (2) should be used to adjust the audio output volume
Methods for Increasing the Audio Volume
• A single wireless microphone can be used simultaneously with any number of receivers on the
same frequency for added amplification of the volume in a given location.
• Higher power audio amplifiers can also be connected to the Output (8) for increased loudness.
OPERATING THE WA-1620U RECEIVER/AMPLIFIER
4