


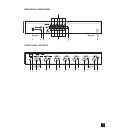

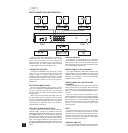
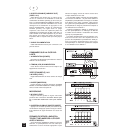
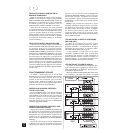

Using the short RCA leads supplied, connect the
FIXED OUTPUT (5) of Channels 1 and 2 to the
INPUT (4) of Channels 3 & 4. Then connect the
FIXED OUTPUT of Channels 3 & 4 to the INPUTs of
Channels 5 & 6. (In a mono system connect Channel
1 FIXED OUTPUT to Channel 2 INPUT etc.)
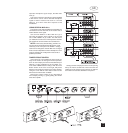
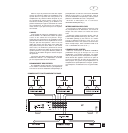
CONNECTING OUTPUTS.
Connect the VARIABLE OUT sockets (6) of each
channel to the appropriate power amplifier and
speaker system. The power amplifiers and loud-
speakers should be matched with respect to power
and quality. NAD supplies a range of power and inte-
grated amplifiers suitable for use in these types of
installations.
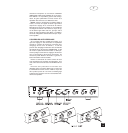
SETTING THE MUSIC LEVEL.
Set the hi-fi preamplifier volume control to mini-
mum. Set the NAD-911 MICROPHONE LEVEL con-
trol (5) to minimum and the rest of the Channel
LEVEL controls (3) to the 12 O’clock position. Switch
the system on.
With a music source playing (preferably a CD) turn
the preamplifier volume control up until the music
reaches a generally acceptable level. Now adjust
each of the individual speaker volumes to exactly the
required level by adjusting each of the NAD-911
channel LEVEL controls (3).
SETTING THE MICROPHONE LEVEL.
Switch off the music source. Set the MICRO-
PHONE LEVEL control (5) to minimum. Press the
MICROPHONE MASTER INSERT button (6) in and
the INSERT buttons (4) on all channels. Speak into
the microphone whilst slowly turning up the MICRO-
PHONE LEVEL control (5) until the announcement
level is about right. Switch the music source on and
fine adjust the MICROPHONE LEVEL. Switch out the
MICROPHONE MASTER INSERT button when fin-
ished.
BASIC OPERATION.
The NAD-911 is used primarily as an installation
tool to distribute and accurately set up the sound lev-
els in all parts of the venue. So in general daily oper-
ation, adjust the music source and overall level using
the hi-fi preamplifier controls only.
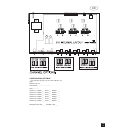
INSERT SIGNAL TO ALL CHANNELS
In a simple installation, where all the channels are
linked together, press the INSERT (4) button on all
channels. Announcements will be fed to all speakers
whenever the microphone is used and the MASTER
INSERT button is pressed.
INSERT SIGNAL ONLY ON SELECTED
CHANNELS
Press the INSERT buttons (4) only on the channels
where announcements are required. Announcements
will be fed to those speakers whenever the micro-
phone is used and the MASTER INSERT button is
pressed.
Only the channels with the INSERT buttons
depressed will be fed with the announcements when
the microphone is used and the MASTER INSERT
button is pressed. If announcements are to be fed
only to specific channels then press the INSERT (4)
buttons on only those channels which need
announcements.
NOTE:
The microphone Insert signal can be configured
internally to be disabled, inserted before or after
either one of the six channel level controls. The facto-
ry default setting inserts the signal before the level
control for all channels. Changing the configuration
must be left to qualified personnel.
USING MIC LINE OUT
As well as feeding the Microphone signal internally
to each channel using the Insert function, there is a
NA
D
6
GB
BASIC CONNECTION AND OPERATION.