


TWEETER MOUNTING
When positioning the tweeter for the best imaging, aim the passenger side tweeter toward where
the driver’s head will be. The same process should also be completed on the driver’s side tweeter but
this time you’ll aim the tweeter toward where the passenger’s head will be. Positioning the tweeters
in this manner will help to set up a very solid soundstage.
MIDRANGE MOUNTING
To get the best possible music reproduction, it is important to isolate the sound that is produced from
the rear of the speaker from the sound that is produced from the front of the speaker. To isolate the
front from the back wave, make sure the speaker is mounted in a baffl e or plate, so that the back of
the speaker is in a sealed chamber.
Surface Mounting
• Select mounting location. Mark wire hole and screw locations using the surface cup as a template.
• Drill holes for tweeter wires and mounting screws
• Using the supplied screws, attach the surface cup to surface
• Run tweeter wires through the hole and twist the tweeter into the cup
• Connect the tweeter wires to the supplied crossover
Flush and Angle Mounting
• Select mounting location and mark a 1-7/8” diameter hole with supplied template
• Cut out the 1-7/8” hole (a hole saw is recommended for metal and hard plastic surfaces;
an X-acto knife for any other surface)
• Place the supplied bevel headed screws through the fl ush/angle cup and thread into the
mounting clip, but do not tighten
• Take the assembled fl ush/angle cup and mounting clip and place them into the 1-7/8” diameter
hole, making sure the mounting clip goes completely through the hole
• Tighten the screw in the base of the fl ush cup until the cup is completely tight
• Split tweeter wires and run through the holes and twist the tweeter into the cup
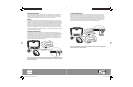
Mounting
• Select the mounting location (door panels, rear side panels, rear deck, etc...)
• Using the supplied templates, mark the mounting holes on the door panel or rear deck
• Drill or cut the required holes as needed
• Install the units as illustrated in the diagrams
*Note: The TXC6.1 and TXC6.0 are supplied with plastic mounting adapters. The adapters are used
to convert the smaller basket sizes needed for European models to the larger domestic sizes. The
plates will allow a tight and accurate fi t, decreasing the need to fabricate adapters out of MDF or
plastic.
For answers to further questions, please call 1-800-call-MTX
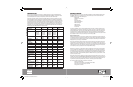
Three Way System
While the TXC sound quality is the best in the market, the addition of the TXC6.0 woofer can create an
even better musical experience with more precise reproduction. The TXC6.0 has a separate cross-
over, and the 2-way system can become a true 3-way system where it splits the lower frequencies
between the original midrange and this additional woofer. This makes each speaker responsible for
fewer frequencies and allows clearer, more accurate reproduction.
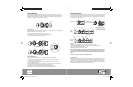
SURFACE MOUNT
ANGLE MOUNT
1 "
7
/
8
FLUSH MOUNT
1 "
7
/
8
INSTALLATION KEY
MOUNTING ADAPTER RING
Use the included mounting adapter
ring to fit the TXC6.1 & TXC6.0 6½
"
speaker in ≤ 6½" mounting locations
WOOFER
STEALTH/O.E.M.
STEALTH/O.E.M.
WITH ADAPTER RING
WOOFER ADAPTER RING
FLUSH
MOUNT
GRIL
L
E
WOO
FER
F
LUSH
MO
UNT
R
I
N
G
SPRI
NG
CLIPS
SURFACE
MOUNT
GRILLE WOOFER
FLUSH
MOUNT
RING
SURFACE
MOUNT
RING
MTX002049 TXC Owners Manual.indd 4-5MTX002049 TXC Owners Manual.indd 4-5 4/6/05 3:30:42 PM4/6/05 3:30:42 PM