


5
MP52 CONFIGURATION GUIDE
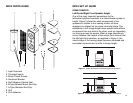
BOOKSHELF
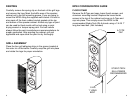
Remove the B-Style end caps, brass thumb screws, and
aluminum mounting bracket. Replace the brass thumb
screws in each end of the cabinet and snap A-Type end
caps into place. Then simply place the self adhesive cabinet
feet in the appropriate locations to protect the MP52 cabinet
and whatever surface that it will sit on.
A-TYPE
CAP
A-TYPE
CAP
SELF ADHESIVE
CABINET FEET
10
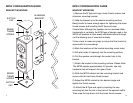
WIRING
Connecting the Speakers to Your System
Though there are many sizes of speaker wire available.
MTX recommends using 18 gauge or heavier wire to
connect your loudspeakers to your amplifier or receiver.
Before cutting the speaker wire to the proper lengths, be
sure to leave an extra two or three feet of surplus wire, just
in case you have to move the components around. Using a
wire cutter or sharp knife, strip off about half an inch of
insulation from both ends. Twist the exposed wires to make
them easier to insert in the speaker terminals. Make sure
that you unplug your amplifier or receiver before proceeding
any further.
When using the MP52 as a center channel or surround
speaker follow the hook-up directions included with your
surround processor.
It is essential that you connect your two speakers “in
phase”. To do so, first take note of the code used on the
speaker wire to differentiate between the two wires that run
through it.
To wire your speakers in phase, make sure the positive (+)
terminals on the back of your receiver are connected with
the red terminals on the back of your loudspeakers, and the
negative (-) terminals on the receiver are connected with
the black terminals on the speakers (see diagram). Note
that negative (-) terminals on the receiver may also be
marked “common” or “ground” (GND).
Be certain that no stray strands of wire cross from one
terminal to another on either speaker or receiver. This could
result in a damaging short.
+
-
+
-
+
-
RED
BLACK
RED
BLACK
RED BLACK
LEFT RIGHT