


MTX.COM
PISTON CHANGE (RE-CONE KIT)
Along with the excessive SPL, MTX has created a replaceable cone assembly so the competition level of
bass (done with the dual 2Ω voice coils) can be switched out with a dual 4Ω voice coil for every day listening
with increased sonic quality and still be the same speaker with excessive high SPL. But since the installation
of the JackHammer is a large investment in time and resources, the cone can be removed without removing
the entire sub or enclosure.
Re-coning the woofer is surprisingly easy. No glue is needed, just bolts, and if you followed the enclosure
design it can be done without taking the woofer out of the enclosure. Directions for either procedure follow.
To Re-cone the Woofer when Removed from the Enclosure
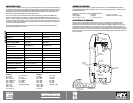
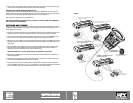
To remove the cone, unscrew the twelve
3
⁄16" hex screws from the front gasket of the woofer and remove the
gasket. Next remove the six
5
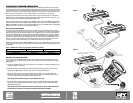
⁄32" hex screws from the back of the spider plateau and loosen the tinsel leads at
the terminal. The tinsel leads are the four 3mm hex screws at the top of the terminal that hold the voice coil
wires. Gently pull on the cone under the surround and the cone assembly should pull away from the woofer
motor. Be sure and pull evenly to prevent the assembly from binding in the basket. You are now ready to put in
the new re-cone kit.
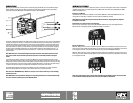
Place the new cone assembly into the woofer motor. Make sure to align the tinsel leads from the re-cone kit
with the terminals and line up the large notches in the surround with the largest holes in the basket. Insert
the tinsel leads into the terminal ensuring the red lead is going into the positive (+) position and the black lead
is going into the negative (–) position. Tighten the four set screws and then slightly tug in the tinsel leads to
make sure they are tight in the terminal.
Next, insert the six
5
⁄32” hex screws back into the spider plateau and tighten. Replace the top gasket over
the surround on the top of the woofer. The counter-bore holes in the gasket need to align with the smaller
threaded holes in the basket. Insert the twelve
3
⁄16" hex gasket screws into the counter-bored holes and
tighten. Your new cone is now installed and you are ready to once again experience the JackHammer’s
extreme bass!
To Re-cone the Woofer when Installed in the Enclosure
If you have made the back removable, as suggested earlier in this manual, you can remove the cone without
removing the woofer from the enclosure. To remove the cone, unscrew the twelve
3
⁄16" hex screws from the
front gasket of the woofer and then remove the top gasket. DO NOT remove the T-30 wood screws because
the gasket can be removed with these still in place. Next, remove the six
5
⁄8" bolts from the back with a
15
⁄16"
wrench and pull off the back of the enclosure. Then, remove the six
5
⁄32" hex screws from the back of the
spider plateau and loosen the tinsel leads at the terminal. The tinsel leads are the four 3mm hex screws at
the top of the terminal that hold the voice coil wires. Gently pull on the cone under the surround and the cone
assembly should pull away from the woofer motor. Be sure and pull evenly to prevent the assembly from
binding in the basket. You are now ready to put in the new re-cone kit.
Place the new cone assembly into the woofer motor. Make sure to align the tinsel leads from the re-cone kit
with the terminals and line up the large notches in the surround with the largest holes in the basket. Insert
the tinsel leads into the terminal ensuring the red lead is going into the positive (+) position and the black lead
is going into the negative (–) position. Tighten the four set screws and then slightly tug in the tinsel leads to
make sure they are tight in the terminal.
Next, insert the six
5
⁄32" hex screws back into the spider plateau and tighten. Replace the top gasket over
the surround on the top of the woofer. The counter-bore holes in the gasket need to align with the smaller
threaded holes in the basket. Insert the twelve
3
⁄16" hex gasket screws into the counter-bored holes and
tighten. Finally, replace the back of the enclosure and re-attach the
5
⁄8" bolts to support the back of the woofer.
Your new cone is now installed and you are ready to once again experience the JackHammer’s extreme
bass!
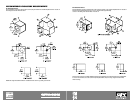
Ê,,Ê "/Ê"-
7/Ê/,Ê/,"1Ê"-
Ê-/
£ÓʮʣÉ{£{Ê8ÊθÊ/",8Ê-"/Ê
-/Ê7/Ê,/Ê,"Ê*/
/ÎäÊ/",8Ê,6Ê1-Ê/-Ê/"Ê"1 /Ê/Ê7"",
Ê7"",Ê"- ¿/Ê Ê/"ÊÊ,"6Ê",
," Ê/ Ê/-Ê Ê-/9Ê Ê*®
£ÓʮʣÉ{ÓäÊ8Ê££É{¸Ê-"/Ê*Ê-,7Ê
-/Ê7/Ê,/Ê,"Ê*/Ê8Ê-"/
-<ÊÎɣȸÊ,"6Ê/-Ê/"Ê/Ê/Ê-/
"Ê",Ê," Ê
Ê/ -Ê-
7/Ê/,
ÈʮʣÉ{ÓäÊ8Ê£¸Ê-"/Ê1//" ÊÊ-,7Ê
-/Ê7/Ê,/Ê,"Ê*/Ê8Ê-"/
-<ÊxÉÎÓ¸Ê,"6Ê/-Ê",Ê,"
Ê
2%$).35,!4)/.
6#
",!#+).35,!4)/.
6#
",!#+).35,!4)/.
6#
53%--(%8+%94/,//3%.
3%43#2%734/).34!,,4).3%,,%!$3
53%--(%8+%94/,//3%.
3%43#2%734/).34!,,7)2%
2%$).35,!4)/.
6#
Figure 4