M&S Systems | 800.421-1587 | www.mssystems.com 8
XDM4600
Note: If the display shows NO DATA, there is no signal from the old remote. Make sure the two
remotes are close enough and lined up.
Edit Key Names
Each device key has a default name matching what is printed on the key, but you can change the name that
appears on the display. Each name can contain up to 8 characters.
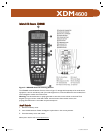
1. Press the EDIT button on the back of the remote. Use a paperclip or similar tool to press this
button. EDIT? appears in the display.
2. Press the desired device or storage button whose display name you want to change. The current
name for this button appears in the display with the first character blinking.
3. Press VOL+ or VOL- to scroll through characters until you reach the character you want. You can
press Clear to clear the last character or insert a space. Names will be centered during operation.
4. Press CH+ to move forward to the next character or CH- to move back to the previous character.
5. When you are finished, press the EDIT button again or wait 15 seconds for the remote to go back to
its normal mode.
Note: Refer to the instructions that came with the XDM46R to see a list of the available characters.
Program Macros
You can program macros into the XDM46R to perform a series of functions with just two key presses
(MACRO + assigned Storage or Device button). Each macro can be programmed to perform up to 20
steps.
To program a macro:
1. Press the LEARN button on the back of the remote. Use a paperclip or similar tool to press this
button.
2. Press the MACRO button on the front panel of the remote. This puts you in Macro Learning mode.
The display shows MACRO?
3. Select a storage button (0-9) or a device button that will launch the macro.
4. Use the remote to walk through the steps you want the macro to perform.
− The default delay between steps when the macro is performed is 0.5 seconds. You can change
this delay time to anywhere from 1-99 seconds to allow for such things as device warm-up time.
To change the delay time between macro steps, press the button you want the delay to follow
and hold it the amount of time you want to delay. The display will count 1-99. Release the button
when you reach the delay time you prefer.
Note: An inserted delay does not count as one of the 20 possible macro steps.
5. Press the LEARN button on the back of the remote to finish the macro and return to normal mode.
115951B.pdf 13115951B.pdf 13 12/16/2005 8:06:46 AM12/16/2005 8:06:46 AM


