


page 9powered subwoofers
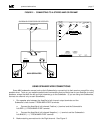
2. For convenience, you can also connect the Satellite speakers to the Subwoofer. Both sets of
wires will be connected to the same terminals on the Subwoofer. Connect both the Amplifier's
Left channel Positive (+) terminal and the Left Satellite's Positive (+) terminal to the Subwoofer
Left RED (+) "FROM AMPLIFIER" terminal. Also connect both the Amplifier's Left channel
Negative ( — ) terminal and the Left Satellite's Negative ( — )terminal to the Subwoofer's Left
BLACK ( — ) "FROM AMPLIFIER" terminal. Make matching connections for the Right channel.
If your Amplifier has two sets of speaker outputs (e.g., A and B), you can connect the Satellites to one set
and the Subwoofer to the other. But if you get weak or no output when you connect your speaker this way,
connect both sets of speaker wires to the same output terminals.
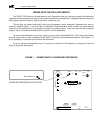
PLUGGING IN THE SUBWOOFER
Once all the speaker wires or preamp interconnect cables are in place, you are ready to plug in the
Subwoofer. Set the "BASS LEVEL" control to "MIN". Then plug the AC cord in. You should hear a thump from
the Subwoofer. This is the normal sound of its power supply charging and discharging when it is plugged in and
unplugged.
Once your system wiring is complete and the Subwoofer is plugged into the wall, leave it plugged in, even
when the system is turned off. The normal mode of operation for the Subwoofer is to remain plugged in 24 hours
a day. Among other things, this means that you don't have to walk over to the Subwoofer to turn it on every time
you want to use the system.
If you decide to plug the subwoofer into a switched outlet on another component, that outlet must have a
minimum power rating of 200 watts.
Now, play some music through your system to make sure that the Satellite speakers are working properly.
If they are, carefully advance the "BASS LEVEL" control. The Subwoofer should begin to play. Set the "BASS
LEVEL" control where the Subwoofer sounds in balance with the Satellite speakers. If the system is not working
properly, unplug the Subwoofer and check all of your connections. Call your dealer or the factory if you cannot
solve any problem.
5. SATELLITE/SUBWOOFER PHASING TEST
You are now almost finished with the basic set-up. But before you can sit down to enjoy your new
Subwoofer, you need to perform one simple Phasing Test. This test insures optimum sound in the critical bass
frequencies where your Subwoofer and Satellite speakers overlap.
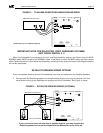
Play a familiar CD, LP, or tape with steady, consistent bass. Listen carefully to the mid-bass (70 - 100 Hz)
region — the part of the spectrum where electric or string basses and drums are found. Then, move the "PHASE"
switch on the SUBWOOFER's back panel from either up (+) or down (—) to the opposite position.
Now listen to the same musical passage, concentrating on the mid-bass region. If you hear less bass, the
original connections were correct. If you hear more bass, the new connections are correct. If you have two
Subwoofers, perform one test for each Subwoofer. When you perform each test, make sure the other Subwoofer
is not operating by either unplugging its input cable or its power cord.
Another method of setting phase uses a pink noise source and a spectrum analyzer. If you have these,
place the microphone at the main listening position and look at its display in the mid-bass region of 70 - 100 Hz.
The wiring/ switch position showing the most output in that region has the correct phase.
You need to perform this test because when Satellite speakers are located separate from a Subwoofer,
each speaker is at a different distance from your ear. In some cases, the difference will be just enough so that
the output from the Subwoofer arrives out of phase with the output of the Satellites. When this happens, that
critical mid-bass is actually cancelled. You should re-do this test any time you move your speakers.