


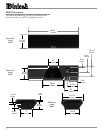
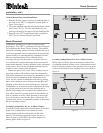

8
down. When the desired angle is achieved tighten the
four screws.
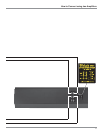
6. Locate the Loudspeaker Grille and align the fastening
pins to the Grommets (there are four pins on each side)
on the front of the XR27. Carefully push down to se-
cure the Grille to the Loudspeaker until it is firmly
seated.
Vertical On-Wall Installation
The supplied On-Wall Mounting Brackets allow for two
different mounting positions of the XR27 Loudspeaker
relative to the wall. The first position is with the Loud-
speaker close to and parallel with the wall. The second po-
sition places the Loudspeaker further away from the wall
and allows for horizontal rotation of ± 30 Degrees.
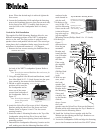
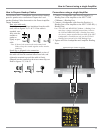
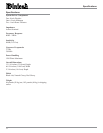
1. Remove the four screws securing the Stabilizer Bar to
the back of the XR27 Loudspeaker System. Refer to
figure 14.
Note: Save the just removed Stabilizer Bar and screws for
possible future use.
2. Using the supplied Allen Wrench and hardware, install
four Allen Head 10/32 - 3/4 inch Screws into the open-
ings vacated by the removal of the Stabilizer Bar.
3. Decide on which mounting
position will be used for
the Loudspeaker and re-
move one of the center
screws from both ends of
the Loudspeaker. Refer to
figure 15.
Note: Save the just removed
screws for possible
future use.
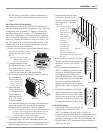
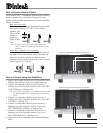
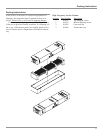
4. Attach the Nylon Pivot Pin to one of the L Mounting
Brackets using the short Pivot Pin Screw and Lock
Washer. Refer to figures 16 and 17 for the correct
opening location.
5. Attach the other L Mounting Bracket to the Top of the
Loudspeaker using the long Pivot Screw and Steel
Bushing into the correct opening, based on the desired
mounting position.
6. Determine the Loudspeaker Mounting Location on the
wall, making sure that the Mounting Brackets will be
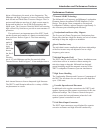
Stabilizer Bar Screws
Stabilizer Bar
Figure 14
anchored to the
studs located in-
side the wall.
7. Referring to fig-
ures 16 and 17 in-
stall the Mounting
Sleeve on the wall
(orient with open-
ing at the top) us-
ing the supplied
Mounting Screws (Phillips Head 1/4 x 1-3/4 inch).
8. Referring to
figure 17,
measure down
from the just
mounted L
Bracket and
install the Bot-
tom L Bracket
together with
the Shim
Plate, using
the supplied
Mounting
Screws
(Phillips Head
1/4 x 1-3/4
inch).
9. With two per-
sons, orient
the Loud-
speaker End
with the Top L
Bracket above
the Mounting
Sleeve and
carefully line
up the bracket
with the
sleeve. Lower
the Loud-
speaker onto the Nylon Pivot Point on the Bottom L
Bracket while at the same time the Top L Bracket is
inserted into the Mounting Sleeve.
10. Install the Locking Screw together with the Flat
Washer into the opening on the Top L Bracket to se-
cure the Loudspeaker.
11. Locate the Loudspeaker Grille and align the fastening
pins to the Grommets on the front of the XR27 (there
Figure 15
Remove this Screw
Figure 17
Figure 16
Opening for
Locking Screw
Opening for screw,
allowing close to
wall mounting
Opening for screw, allow-
ing horizontal rotation of
Column
Top and Bottom L Mounting Bracket