


4 Assembly
NOTE: Assembly of the Prodigy requires 2 people.
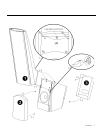
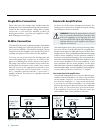
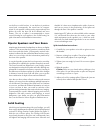
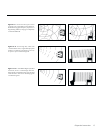
1: Electrostatic Panel Assembly
1.1 Remove the top two screws and washers from the
Prodigy woofer body. Back out the two screws and
washers immediately beneath the two screws that were
just removed until they protrude approximately
3
/4
”
from the woofer body. These screws must be in
place in order to assemble the Prodigy.
With the electrostatic panel assembly leaning slightly
towards you as you approach the woofer body, rest the
lower open notches of the rear metal plate on the
pair of protruding machine screws, making sure that
the washers are on the top side of the metal plate.
1.2 After resting the electrostatic panel assembly on the two
protruding screws, it needs to be lifted up vertically
so that the bottom aluminum trim will clear the
woofer body when pivoted into place. Slowly pivot
the electrostatic panel assembly into place.
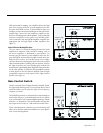
NOTE: When the electrostatic panel assembly is in
place, the aluminum trim on both sides of the bottom
should be resting on top of the woofer body. Be careful
to ensure that these aluminum pieces do not bite into
the woofer body when the electrostatic panel assembly
is screwed into place.
1.3 Making sure the electrostatic panel assembly is being
firmly held in place (we recommend having some-
one else hold it), insert the top two screws and
washers and thread them into place, reach in with
the
5
/32” allen wrench (included in instruction box)
and tighten all four screws until they are firmly in place.
1.4 Connect the electrostatic panel by aligning the line
on top of the connector with the dot on top of the
receptacle and gently pushing the connector into
place. To remove the electrostatic panel connector,
twist the end of the connector in the direction indi-
cated by the arrow and gently pull it off.
NOTE: While playing, the Prodigy displays a blue light
through the electrostatic panel. The button shown in
step 1.3 will turn the light on or off, depending on
your preference.
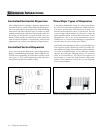
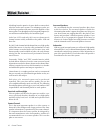
2: Front Grill Cloth
2.1 Holding gently by the sides, attach the front grill cloth
by first gently pushing the bottom into place—
2.2 —and then the top into place. To remove the front grill
cloth reverse these steps.
NOTE: When the front grill cloth is in place, the stat
panel connector should align with the notch in the
top of the front grill cloth.
3: Rear Grill Cloth
3.1 Holding gently by the sides, attach the back grill cloth
by first gently pushing the top into place—
3.2 —and then the bottom into place. To remove the back
grill reverse these steps.
ASSEMBLY