


10
2. Using a 3/32" Allen key, remove the four 4-40 socket-head cap
screws securing the end caps on the read of the Nº26's chassis.
3. Using a Phillips screwdriver, remove the four 4-40 screws securing
the Nº26's top plate. Carefully slide the top plate to the rear and
remove it.
4. Adjust the gain switches (using a ballpoint pen or similar
instrument) and install optional loads as desired.
5. Reassemble the Nº26.
Be sure all associated equipment is disconnected from the AC mains.
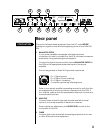
After making all signal connections and internal adjustments, connect
the DC cable to either of the DC connectors on the rear panel of the
PLS-226.
Connect the other end of the DC cable to the POWER SUPPLY INPUT
connector on the rear panel of the Nº26.
Connect the AC cord to the male IEC connector on the rear panel of
the PLS-226, then connect the AC cord to the AC mains.
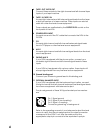
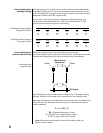
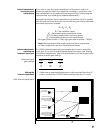
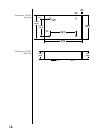
To PLS-226 To AC mains
1
3
2
1
2
3
1 = Line (hot)
2 = Neutral
3 = Earth ground
AC power cord polarity
The LEDs on the PLS-226 and Nº26 will light. Allow the Nº26's circuitry to
stabilize for 1 to 2 minutes, then connect all associated equipment to
the AC mains and activate it.
For optimal sonic performance and longevity, the Nº26/PLS-226 is
designed to remain powered at all times (a power-on/power-off
switch isn't provided).
Before connecting or disconnecting the PLS-226 from the AC
mains, be sure that the Nº26's OUTPUT LEVEL is set to OFF (the
lowest position), and that your power amplifiers are turned off.
Turning off the Nº26
Power connection and
system activation