


9
Reversing the polarity or phase is often needed when two or more mics are picking up the
same source. For example it would be needed when one mics the top and bottom of a snare - one
skin is going towards one mic and the other skin is going away from the other mic. If one signal
is not "reversed" then you lose lows. Polarity reverse can also help with some vocal / mic /
headphone situations because " somewhere " the polarity flipped one too many times. It happens.
General advise - try it each way - listen, with vocals, always ask the singer which way they prefer.
The headphones may "cancel" with the sound they hear in their skull while singing. This Mic Pre
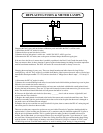
has no provision for changing the polarity. If you are recording direct to tape it is a good idea to
have a few phase reverse adapters on hand. All you need is two XLRs (a male and female) and
a foot of mic cable. It doesn't matter which end is which. Wire it up as follows:
PIN 1 (Shield) > PIN 1
PIN 2 > PIN 3
PIN 3 > PIN 2
You can use this between the MIC and PREAMP or often between the PREAMP and TAPE. If
you use both at once, you come out in phase. Mark these cables
PHASE REV ! This is another
reason why a 1 foot cable is good - thus avoiding confusion with normal cables.
We did include a 1/4 inch phone jack input on the front panel for electronic instruments.
This input has a 500 kohm input impedance similar to instument amplifiers which range from
50K to 1 Mohm. It provides a good input with gain control and EQ limiting and meters. You can
use either the INSTRUMENT INPUT or MIC INPUT but not both at the same time. As with
guitar amps, long cables from the guitar can lose highs so it may be worth having a low
capacitance 10 foot cable on hand.
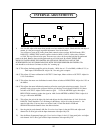
On the wiring PIN-OUTS, you may have noticed we specified CIRCUIT GROUND rather
than just GROUND. We have a few terminals on the back panel for various "ground schemes".
The CIRCUIT GROUND is the same ground as the electronics in the Mic Pre while the CHASSIS
GROUND is the same as the steel enclosure that is bolted to the rack and is also connected to the
"third pin AC Mains Ground. Both terminals are normally connected together with a small
"ground strap" but this strap can be moved to the side and wire can be attached to the terminals.
These are "MINI BANANA" style and will not accept regular size bananas found on electronic
test gear. Be careful with the ground strap because it can get lost if the terminals are loose. If it
does get lost - you can use a short bare wire.
There are two good reasons for using these ground terminals. The first is finding and fixing
hum and the second is preventing hum. If you have plugged everything in right and you are getting
hum then you have a number of options with these terminals. You can try simply moving the strap
so that chassis ground is separate from circuit ground. This is similar to breaking off the third pin
AC ground but includes the ground from rack mounting . One can experiment with attaching a
wire between the console ground and the circuit ground or between a rack and the chassis ground.
These are all techniques some technicians use when wiring studios. They also often cut the
ground (shield) on one side of the cable to prevent loops. DO NOT cut the shield on MIC cables
because you lose phantom, shielding at the mic, and hum only gets worse !
One other cause of hum - Some gear may radiate a field into whatever is closest. Move the
Mic Pre or the offender away from each other. That may help.