


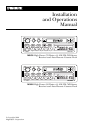


Your new AM/FM/WB cassette unit
incorporates a microcomputer man-
aged electronic AM/FM stereo tun-
ing system and FM Optimizer along
with rugged auto reverse cassette
mechanism. The two as a combina-
tion will provide the user with the
finest crystal clear AM/FM stereo
radio broadcast reproduction and
flawless reproduction of your person-
al cassette tape library.
To insure trouble free long term per-
formance from your new unit, please
take a moment to read this manual
completely to make yourself aware of
all basic radio operation and memory
setting procedures.
Also at this time, it would be a good
idea to write down the serial number
of the unit in the space provided. In
the unlikely event that the radio will
need warranty service, you will need
this number to obtain the service.
Serial # ________________________
Introduction
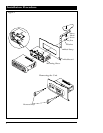
Mechanical Installation
Space Requirements:
To mount your new AM/FM cassette
unit, you will need a rectangle hole in
the mounting location 182mm
(width) x 53mm (height), (
7
⁄
8” x 2
1
⁄
8”)
and a full 6” of unobstructed space
behind the mounting location.
Step 1:
After obtaining the required space
and mounting hole dimensions
required, remove the mounting
sleeve from the unit. Insert the
mounting sleeve into the hole on the
dashboard. Secure it by bending the
tabs inward as shown in fig 1. Select
the appropriate tab according to the
thickness of the dashboard.
Step 2:
Bring the power, ground, antenna
and speaker wires through the center
of the mounting sleeve. Make all the
speaker and power connections to
the main harness supplied with the
unit. Refer to the “wiring” section of
this unit for proper connection. After
all the connections have been made
and are correct, plug the harness and
the antenna cable into the mating
plugs located on the rear of the unit.
Step 3:
Turn on the ignition key and do a
pre-installation check of all the func-
tions with the unit out of the dash-
board to make sure that everything is
operating properly before final instal-
lation.
Step 4:
Securely attach the rear support strap
provided to the rear of the unit with
the fasteners provided. Bend the
strap to allow the unit to slide into it’s
mounting sleeve. Reach up behind
the unit and grab the strap while slid-
ing the unit into the mounting sleeve
until it snaps into place. Secure the
end of the strap to a solid portion of
the dashboard structure or the fire
wall.
2