


8 5 0 i R U s e r M a n u a l
SYSTEM OPERATION
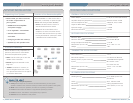
TURNING THE SYSTEM ON
4. While speaking in a normal voice,
increase the A VOLUME level until
your voice is barely audible.
Remember! This equipment is
designed to supplement and distribute
the end user’s voice so they are able to speak at a conversational tone.
Having the volume set too high will result in feedback and listener fatigue.
11 | 850iR User Manual
850iR User Manual | 12
8 5 0 i R U s e r M a n u a l
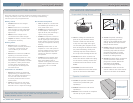
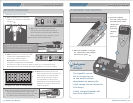
2. Slip the LT-71 LightMic with lanyard
around the neck and position the top of
the microphone just below the collarbone.
Note: Positioning of the LightMic is critical
for proper volume adjustment.
LT-71
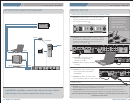
1. Turn the 850iR switch to the ON
position. The red LED on the switch
will glow.
3. Turn on the LightMic and set the operating
channel to “A.” This microphone will be
designated as the “Teacher Mic.”
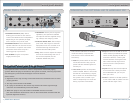
LES 850iR Classroom Amplification System
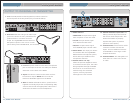
SPEAKER OUTPUTS
250
400
70
0
1K 1K4
2K
5
4K
6K
+1
0
0
-10
OFF
OFF
OFF
OFF
ON
ON
ON
ON
VOL.
ADJ.
ALD OUT
AUX OUT
VOL.
ADJ.
COMPUTER
AUDIO INPUTS
TV/VCR CD/DVD
800i
X
INPU
T
PAGING INPU
T
ADJ
DC POWER CHARGERS
24VDC
L LR R
SENSOR INPUTS
SENSOR
SHOR
T
1 2
3
4
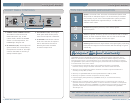
5. Once initial volume level is set,
walk around the room and listen for
audio dropout and overall audio
quality. Fine-tuning the audio is
accomplished by making minor
adjustments to the 8-band Graphic
Equalizer on the back panel of the
receiver/amplifier.
6. If a second student pass-around microphone
was purchased with system, repeat steps
3-4 but set the operating channel to “B.”
(If a HM-70 was purchased, see page 16.)
A CH B
OFF
ON
>>
>>
>>
>>
>>
>>
A CH B
OFF
ON
A CH B
OFF
ON
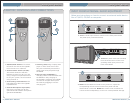
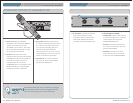
1. Ensure That the LightMic is turned OFF.
1
CHARGING THE LIGHTMIC
Helpful
Hints
The LightMic can be
left in charger for up
to two weeks without
degradation to battery life.
A full charge can be attained in
8–10 hours.
A fully charged LightMic will
last up to eight hours.
LES 850iR Classroom Amplification System
See page 3 for hints on setting the EQ.
3. When the LightMic is charged
the LED on the cradle charger
will return to green.
2. Place the LightMic
into the cradle charger.
The LED on the cradle
charger will
glow red
indicating
charging
has
started.
>>
>>
>>
LT-71
2
3