


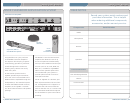
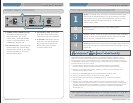


LES 850iR Classroom Amplification System
1
LES 850iR Classroom Amplification System
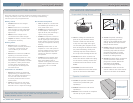
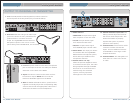
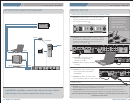
Below are instructions on how to connect an external audio device
like a TV/VCR, CD/DVD or computer.
INPUT FROM EXTERNAL AUDIO EQUIPMENT
3
9 | 850iR User Manual
850iR User Manual | 14
8 5 0 i R U s e r M a n u a l 8 5 0 i R U s e r M a n u a l
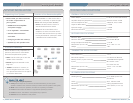
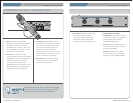
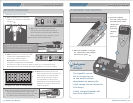
1. ON/OFF/MUTE Switch: This switch,
located on the side of the LightMic,
turns the unit on or off/mute.
2. Channel Select Switch (CH A/B):
This switch allows for selection
between Channel A or B. If you are
using a single microphone/transmit-
ter for your system, we recommend
using Channel A.
3. Power/Charge LED Indicator: The
light glows blue when the LightMic
is powered ON.
4. External Microphone Input (MIC):
Use the 3.5 mm MIC jack for the
optional TK-250 headset microphone
(part# MC-TK250LTM).
5. Auxiliary (AUX): Plug a laptop, MP3
player or other audio source into
this jack to wirelessly transmit the
audio signal to be played through
the 850iR.
6. Charger Input (CHARGER): A
charging cradle comes standard with
the 850iR for daily charging of
the LightMic. If desired, the LightMic
can also be charged directly from
the cable by plugging it into this
charging jack.
2. Connect a patch cable (not included)
from the audio source in the corre-
sponding audio input jacks on the
back of the 850iR.
3. With both the 850iR and audio source power on, adjust the
corresponding volume control on the front panel until the
desired level is achieved. NOTE! Be careful to not overdrive the
volume to the loudspeaker(s), as this can cause potential damage.
1. Turn the audio input volume controls on the front panel all the
way down (fully counterclockwise).
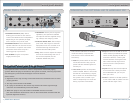
SPEAKER OUTPUTS
250
400
70
0
1K 1K4
2K5
4K
6K
+1
0
0
-10
OFF
OFF
OFF
OFF
ON
ON
ON
ON
VOL.
ADJ.
ALD OUT
AUX OUT
VOL.
ADJ.
COMPUTER
AUDIO INPUTS
TV/VCR CD/DVD
800i
X
INPU
T
PAGING INPU
T
ADJ
DC POWER CHARGER
S
24VDC
L LR R
SENSOR INPUT
S
SENSOR
SHOR
T
1 2
3
4
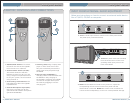
LIGHTMIC CONTROLS AND CONNECTIONS
LT-71
LT-71
1
2
3
4
5
6
2