


Using the VP-411DS 4x1 Automatic UXGA / Audio Switcher
7
5 Using the VP-411DS 4x1 Automatic UXGA / Audio Switcher
This section describes how to:
Connect the VP-411DS (see section 5.1)
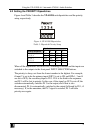
Select the default master source signal (see section 5.2)
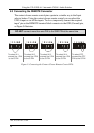
Connect the REMOTE connector (see section 5.3)
Connect a PC (see section 5.4)
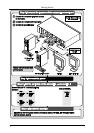
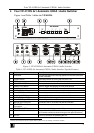
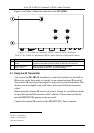
5.1 Connecting the VP-411DS 4x1 Automatic UXGA / Audio Switcher
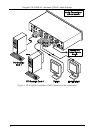
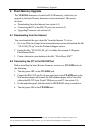
To connect your VP-411DS, as illustrated in the example in Figure 3, do the
following
1
:
1. Connect up to four
2
UXGA/AUDIO sources (for example, PC graphic cards) to
the UXGA IN 15-pin HD connectors and to the AUDIO IN 3.5mm mini plug
connector
3
.
2. Connect the UXGA OUTPUT 15-pin HD connector and the AUDIO OUTPUT
3.5mm mini plug connector to the acceptor
3
(for example, a display and
speakers).
3. If required, connect a local display to the UXGA IN 1 LOOP 15-pin HD
connector.
4. Set the PRIORITY dipswitches (see section 5.2).
5. If required, connect:
The contact closure remote control PINS (see section 5.3)
PC and/or controller to the RS-232 port (see section 5.4)
6. Connect the 12V DC power adapter to the power socket and connect the adapter
to the mains electricity.
1 Switch OFF the power on each device before connecting it to your VP-411DS. After connecting your VP-411DS, switch on
its power and then switch on the power on each device
2 You do not have to connect all the inputs
3 Audio connections are not shown in Figure 3