


IMPORTANT SAFETY INFORMATION
1. READ these instructions.
2. KEEP these instructions.
3. HEED all warnings.
4. FOLLOW all instructions.
5. DO NOT use this apparatus near water.
6. CLEAN ONLY with dry cloth.
7. DO NOT block any ventilation openings. Install in accordance with the manufacturer’s instructions.
8. Do not install near any heat sources such as radiators, heat registers, stoves, or other appara-
tus (including amplifiers) that produce heat.
9. DO NOT defeat the safety purpose of the polarized or grounding type plug. A polarized plug has
two blades with one wider than the other. A grounding type plug has two blades and a third
grounding prong. The wider blade or the third prong are provided for your safety. If the provided
plug does not fit into your outlet, consult an electrician for replacement of the obsolete outlet.
10. PROTECT the power cord from being walked on or pinched, particularly at plugs, convenience
receptacles, and the point where they exit from the apparatus.
11. ONLY USE attachments/accessories specified by the manufacturer.
12. USE only with a cart, stand, tripod, bracket, or table specified by the manufacturer,
or sold with the apparatus. When a cart is used, use caution when moving the cart/
apparatus combination to avoid injury from tip-over.
13. UNPLUG this apparatus during lightning storms or when unused for long periods of time.
14. REFER all servicing to qualified service personnel. Servicing is required when the apparatus
has been damaged in any way, such as power-supply cord or plug is damaged, liquid has been
spilled or objects have fallen into the apparatus, the apparatus has been exposed to rain or
moisture, does not operate normally, or has been dropped.
15. DO NOT expose this apparatus to dripping or splashing and ensure that no objects filled with
liquids, such as vases, are placed on the apparatus.
16. To completely disconnect this apparatus from the AC Mains, disconnect the power supply cord
plug from the AC receptacle.
17. The mains plug of the power supply cord shall remain readily operable.
The exclamation point, within an equilateral triangle, is intended to alert the user to
the presence of important operating and maintenance (servicing) instructions in the
literature accompanying the product.
The lightning flash with arrowhead symbol within an equilateral triangle, is intended
to alert the user to the presence of uninsulated “dangerous voltage” within the
product’s enclosure that may be of sufficient magnitude to constitute a risk of
electrical shock to persons.
WARNING: To reduce the risk of fire or electrical shock, do not expose this apparatus to rain or moisture.
WARNING: No naked flame sources – such as candles – should be placed on the product.
WARNING: This product is intended to be operated ONLY from the AC Voltages listed on the back
panel or included power supply of the product. Operation from other voltages other than those
indicated may cause irreversible damage to the product and void the products warranty. The use
of AC Plug Adapters is cautioned because it can allow the product to be plugged into voltages
in which the product was not designed to operate. If the product is equipped with a detachable
power cord, use only the type provided with your product or by your local distributor and/or
retailer. If you are unsure of the correct operational voltage, please contact your local distributor
and/or retailer.
CAUTION: Place the equipment near a main power supply outlet and make sure that you can
easily access the power breaker switch.
PACKING LIST
2 Satellite speakers with pedestals and wires attached
1 Control pod, attached to one satellite speaker
1 Subwoofer
1 USB Wireless Transmitter
1 4-inch USB Adapter Cable
1 Packet of rubber isolation feet
1 Owner’s manual
DOES NOT NEED SOFTWARE DISC FOR OPERATION
SPEAKER PLACEMENT
1. The ProMedia 2.1 Wireless system uses a short-range, line-of-sight
transmitter. It was not designed to be used through walls or at distances
greater than about 30 feet.
2. For best imaging with movies and games, the two satellite speakers should
be positioned on each side the video monitor. For music listening, the satellite
speakers can be placed in any convenient location within 30 feet of the
computer with the USB Transmitter. For best sound and imaging place the
speakers near ear level and 3-5 feet apart. To wall mount, the pedestal stands
may be removed by unscrewing the 1/4” 20-thread bolt, which accommodates
a wide variety of wall brackets available through stereo and appliance stores.
Klipsch WB-1 wall brackets are available at www.klipsch.com.
3. Place the subwoofer on the floor within the cables’ reach of the satellite speak-
ers. The subwoofer must be placed on the floor near a wall with the rear panel
toward the wall. Do not cover up the sub driver or front port of the enclosure
and be sure to provide enough ventilation to the rear of the subwoofer. It
is normal for this panel to be warm to the touch. The subwoofer should be
at least 3 feet (1m) from a CRT monitor to avoid interference. Placing the
subwoofer in a corner can further enhance bass output. Subwoofer placement
will ultimately be determined by what sounds best to your ear.
4. Speaker or power cables running across an area of heavy foot traffic should
be positioned against a wall or corner and secured with tape.
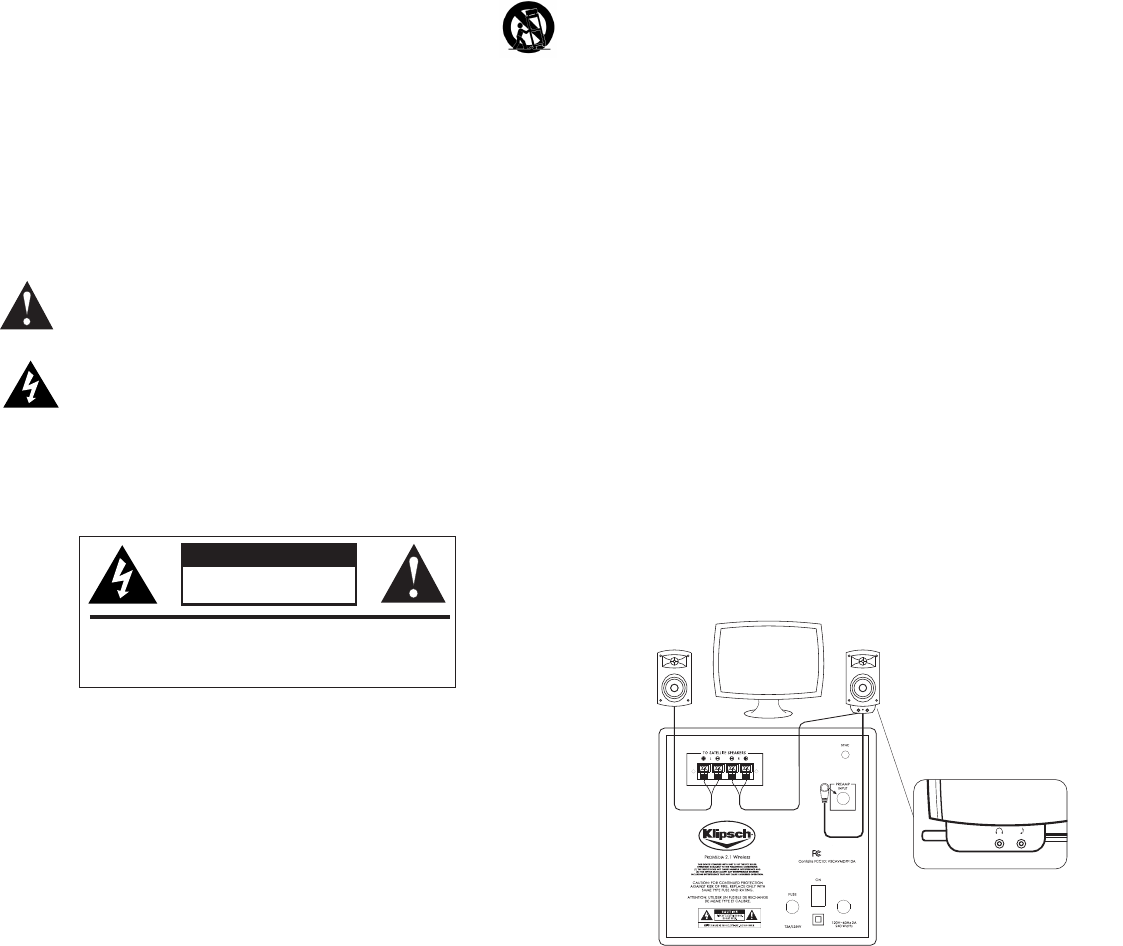
SPEAKER CONNECTION DIAGRAM
1. Do not plug in the AC power cord until your computer/audio system is set up.
2. Care should be advised concerning the cables at back of sub. Bumping them
could cause damage.
3. Connect the DIN plug to the sub from the control satellite preamp. Wire
should hang down from plug.
4. Connect the speakers by inserting the tinned wire leads into the subwoofer.
The solid black wires (-) connect to the black spring clips; the black wires
with red stripes (+) to the red spring clips.
5. Plug the AC power cord into a wall outlet.
6. Plug headphone mini stereo plug in headphone jack, if desired.
7. Plug stereo mini plug into MP3/Aux jack. Plug stereo mini plug into MP3
player (for example).
If you don’t want to use the wireless, connect computer to Aux In. See Control Pod Features.
Cable not included.
USB WIRELESS TRANSMITTER
1. Perform main system setup as described above.
a. Set up the system, plug in AC power cord and turn on power switch on rear
panel of subwoofer.
b. The red LED on rear panel of subwoofer should begin flashing.
2. Connecting the USB Wireless Transmitter.
a.The computer should already be up and running
WARNING
RISK OF ELECTRIC SHOCK.
DO NOT OPEN.
WARNING: Do Not Open! Risk of Electrical Shock. Voltages in this
equipment are hazardous to life. No user-serviceable parts inside.
Refer all servicing to qualified service personnel.