


S18X 4Ω
4
25.2
89.6
221 (.1426)
10000 (5000)
.965 (24.5)
7.46
5.824
7.302
.43
.406
44.78
728.2
5.59
158.36
498 (8161)
11 3/8 (28.9)
Model:
Nominal Impedance [Zn], ohm [per coil]
Resonance Frequency [fs], Hz
Sensitivity [SPLo], dB @ 1W, 1m
Effective Piston Area [Sd], in
2
(m
2
)
Power Handling Watts, Peak (RMS)
Effective Excursion [EXmax™], in (mm)
DC Resistance [Re], ohm [coils in series]
Voice Coil Inductance [Le], mH
Mechanical Q-Factor [Qms]
Electrical Q-Factor [Qes]
Total Q-Factor [Qts]
Force Factor [BL], Tm
Moving Mass [Mms], g
Equivalent Volume [Vas], ft
3
Equivalent Volume [Vas], L
Net Displacement, in
3
(cc)
Mounting Depth, in (cm)
S18X 2Ω
2
22.18
89.7
221 (.1426)
10000 (5000)
.965 (24.5)
4.07
4.289
7.83
.291
.281
40.36
836.5
6.27
177.61
498 (8161)
11 3/8 (28.9)
PERFORMANCE
Congratulations on your
KICKER purchase
Please record your purchase
information and keep your sales
receipt for validation of warranty.
Note: All specifications and performance figures are subject to change. Please visit the www.kicker.com for the most current information.
Please allow two weeks of break-in time for the subwoofer to reach optimum performance. To get the best performance
from your new Kicker subwoofers, we recommend using genuine Kicker Accessories and Wiring.
2
INSTALLATION
SOLOXSUBWOOFER
SPAIRASSEMBLY
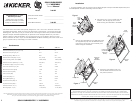
Owner’sManual
S18XSP
Model:
SOLOXSUBWOOFERSPAIRASSEMBLY
3
Authorized Kicker Dealer:
Purchase Date:
SPAIR Model Number:
_________________________
_________________________
_________________________
Performance
The Kicker SoloX subwoofers were specially designed for “Livin’ Loud” out in the harsh automotive
competition environment. When you push your subwoofers to the extreme, you're bound to find the
breaking point, and when you do you can be secure in knowing that Kicker has provided the SPAIR
(Simple Pull Apart Insertable Replacement) to replace all of the damaged elements of your Solo X
without a lengthy or difficult installation. You can simply remove your old SPAIR, unpack your new
SPAIR, reconnect the wires, drop it into the BAM (Basket and Motor Assembly) and screw it back on to
get your system back up and kicking in a matter of minutes.
S18XSP
Installation
1. To begin installation, start by removing the old SPAIR (Simple Pull Apart Insertable Replacement) from
the BAM (Basket and Motor Assembly) as shown below.
Remove the four (4) Acorn Head Nuts and
washers, and the eight (8) Acorn Head
Bolts securing the old SPAIR to the BAM.
Disconnect the speaker wires from
the old SPAIR and take note of how
they were connected.
Remove the old SPAIR from the BAM and install
the supplied Gap Cap into the BAM around the
pole piece to protect the motor assembly from
debris during the installation.
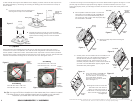
a.
b.
c.
Acorn
Head
Bolts
Acorn
Head
Nuts and
washers
Install
Gap Cap
Locator Pin
Locator Hole
(on the Back
Side of the
SPAIR)
BAM
Old
SPAIR
Locator Hole
Locator Pin
Old
SPAIR
Disconnect
Speaker
Cable Wires
BAM
Old
SPAIR
Figure 1
Figure 2
Figure 3
Enclosure
Baffle
Enclosure
Baffle
A Note on PowerHandlingCapacity SoloX subwoofers will handle massive amounts of power in any of the
recommended enclosures, minimum or maximum. The smaller enclosures are best for use in limited-space
applications. The larger recommended enclosures will yield more bass at the resonate frequency of the enclosure.
The listed Power Handling capacities assume that both voice coils are in use with the appropriate sub-sonic/resonate
frequency filter. Always connect both coils in a dual voice-coil speaker.
Note: The use of a subsonic filter will significantly increase the power handling. The power handling specifications in these charts are
calculated using a 25Hz (56Hz for the Vented SPL enclosure), 24dB per octave sub-sonic (resonate frequency) filter.