


HD View4
6
Introduction
DISTRIBUTION AMPLIFIERS
Tech Support: Toll Free USA/Canada 888-258-2028 tech@keydigital.com
Customer Support: 718-796-7178 Ext. 23 customerservice@keydigital.com
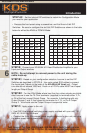
STEP A2: Set the internal DIP switches to match the Configuration Mode
you need for your application.
• Remove the front panel using a screwdriver, and find the six 8-bit DIP
Switches. Be sure to configure the six 8-bit DIP Switches as shown in the table
below for either the ADA4 or PCMD4 Mode:
STEP B: Connect your KD-ADA4 HD View4 Distribution Amplifier to your
Input and Output sources.
NOTE: Do not attempt to connect power to the unit during the
cable hook-up.
STEP B1: Based on your configuration selection, be sure to set the DIP
Switches as described in STEPS A. Use color-coded RCA cables to connect
the Inputs and Outputs to the back of the KD-ADA4 HD View4 unit. Output
runs should not exceed 1000 feet. Each run of YPrPb cable MUST be of equal
length per Output Group.
STEP B2: For the ADA4 Mode where less than four video outputs are distrib-
uted, be sure to use the 75 Ohm terminator (supplied) to terminate either Y, Pr,
or Pb of the first unused Output Group. For example, if distributing with only
Output Groups 1 and 2, then place the terminator on Y, Pr, or Pb of Output
Group 3. You should use the Output Groups in sequential order.
STEP C: Apply power to the unit:
• Use ONLY the external wall-plug power supply provided with your unit, 110-
240V AC, 50-60 Hz, 0.9 Amps
• Connect the 5-pin DIN external power supply connector to your unit, and plug
the power supply into a power outle
ADA4 MODE
BIT SW1 SW2 SW3 SW4 SW5 SW8
1 ON ON OFF OFF OFF ON
2 OFF OFF ON ON ON OFF
3 OFF OFF ON OFF OFF OFF
4 OFF ON OFF ON ON ON
5 ON ON ON OFF OFF ON
6 OFF OFF OFF ON OFF OFF
7 OFF ON OFF OFF ON OFF
8 ON OFF ON OFF OFF OFF
PCMD4 MODE
BIT SW1 SW2 SW3 SW4 SW5 SW8
1 OFF OFF ON ON ON OFF
2 ON ON OFF OFF OFF ON
3 OFF ON OFF ON ON ON
4 OFF OFF ON OFF OFF OFF
5 OFF OFF OFF ON ON OFF
6 ON ON ON OFF OFF ON
7 ON OFF ON ON OFF ON
8 OFF ON OFF OFF ON ON