


— 4 —
English
• If you experience problems during
installation, consult your Kenwood dealer.
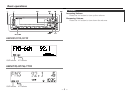
• If the unit fails to operate properly, press the
RESET button. When the faceplate is not
visible, slide the manual open switch (as
illustrated on p.6) for as many times as you
have preset to make the faceplate control
appear. The unit returns to factory settings
when the RESET button is pressed. If the
unit still fails to operate properly after the
RESET button has been pressed, contact
your local KENWOOD dealer for assistance.
• Press the reset button if the CD auto changer
is first controlled and operates incorrectly.
The original operating condition will return.
• Characters in the LCD may become difficult
to read in temperatures below 41 ˚F (5 ˚C).
NOTE
Mask key
If you have transmitted the Mask Key's signal
once to the unit in advance, you will have to
transmit it once again if the unit has been
removed from the battery. This function
helps prevent theft.
When using the unit for the first time:
In order to deactivate the demonstration
mode, be sure to press the transmit button
to transmit the Mask Key's signal.
If this procedure is not carried out, the
control panel of the unit will re-open in two
seconds even with your vehicle's ignition
turned off.
Do not loose the "Mask Key".
If power is disconnected from the unit,
correct operation can only be restored by the
"Mask Key's" signal.
The "Mask Key" will also be required for
service repair.
If you send products in for repair that include
a mask key, make sure to present the unit
together with the mask key.
Cleaning the Unit
If the front panel gets dirty, turn off the
power and wipe the panel with a dry silicon
cloth or soft cloth.
Do not wipe the panel with a stiff cloth or a
cloth dampened by volatile solvents such as
paint thinner and alcohol. They can scratch
the surface of the panel and/or cause the
indicator letters to peel off.
2CAUTION
NOTE
2CAUTION
Safety precautions
Cleaning the Tape Head
After you have used the tape player many
times over a long period, magnetic powder
from the tapes and dust accumulates on the
tape head, causing noise and a deterioration
in sound quality. Clean the tape head using a
cleaning tape or cleaning kit designed for use
in car audio systems.
Handling Cassette Tapes
• Do not play a cassette whose tape has gone
slack. In such a case, wind it tight using a
pencil or the like in one of the spools. Playing
slack cassette tapes can result in the tape
tangling around the capstan and/or pinch
rollers, causing trouble.
• Do not play a deformed cassette or one
whose label is starting to come off, as it can
cause the unit to malfunction.
• Do not leave tapes in hot places, such as
above the fascia panel (dashboard) and other
spots exposed to direct sunlight, or near
heater outlets. They can deform the cassette.
• Avoid using extremely long cassette tapes,
such as 100-minute-long tapes. Such tapes
are very thin, and can tangle easily around
the pinch rollers or other parts inside the unit,
causing unit failure.
• Remove a cassette tape from the unit when
not listening to it for a whilst. If you leave a
tape in the unit too long, it may stick to the
tape head and cause unit malfunction.
Dolby noise reduction manufactured under
license from Dolby Laboratories Licensing
Corporation.
”DOLBY” and the double-D symbol are
trademarks of Dolby Laboratories Licensing
Corporation.
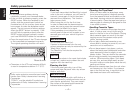
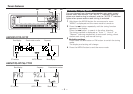
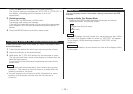
MENU
EJECT
PROG/PTY
SCANB NR
B.S/RDM
REP D.SCN
MTL/M.RDM
NF
DAB
DISP
NAME.S
OFF
DISC
DISC
44W 4
LOUD
T I
VOL ADJ
Reset button