


Setting the Clock
Without setting the built-in clock, you cannot use Daily Timer and Sleep Timer.
• “0:00” flashes on the main display until you set the clock.
1
Press to activate the clock setting mode.
• If you have already adjusted the clock before, press
the button repeatedly until the clock setting mode is
selected.
2
or
Adjust the hour, then the minute.
• To exit from the clock setting, press CLOCK/TIMER as required.
• To go back to the previous step, press CANCEL.
Setting the Sleep Timer
When the System is on, press repeatedly to specify the time (in
minutes) as follows:
The SLEEP indicator lights up.
• To check the remaining time until the System shuts off, press once.
Setting the Daily Timer
Using Daily Timer, you can wake up with your favorite music.
• You can store three Daily Timer settings; however, you can activate only one of
the Daily Timers.
1
Press repeatedly to select one of the timer setting modes
you want to set—DAILY 1 ON time, DAILY 2 ON time, or
DAILY 3 ON time—as follows:
2
or
1 Adjust the hour then the minute for on-time.
2 Adjust the hour then the minute for off-time.
3 Select the playback source—“TUNER-FM,” “TUNER-AM,”
“DISC,” “AUDIO IN,” or “IPOD.”
4 For “FM/AM”: Select a preset channel.
For “DISC”: Select a track. (For MP3/WMA: Select the
group, then the track number.).
For “AUDIO IN”: Make the connected device ready for
playback.
5 Select the volume.
• You can select the volume level (“VOLUME 0”
(VOL MIN) to “VOLUME 40” (VOL MAX) and
“VOLUME – –”). If you select “VOLUME – –,” the volume
is set to the last level when the System is turned off.
3
Turn off the System (on standby).
• When the on-time comes, the System sets the volume
gradually to the preset level.
• To exit from the timer setting, press CLOCK/TIMER as required.
• To correct a misentry during the process, press CANCEL. You can return to the
previous step.
To Turn Off the Daily Timer
1 Press repeatedly to select “DAILY 1,” “DAILY 2,” or “DAILY 3.”
2
To turn on the Daily Timer again, select one of the timer settings by pressing
CLOCK/TIMER, then press SET.
Turning Off the System Automatically
—AUTO STANDBY function
(only for Disc/iPod)
Press and hold until the A.STBY indicator lights on the display.
• The A.STBY indicator starts flashing after playback stops.
If no operation is done for about 3 minutes, the System turns off.
• Not applicable for FM/AM/AUDIO IN.
To cancel this function, press and hold again.
Basic Tuner Operations
To Press Indication/Result
Select FM or AM
Press repeatedly.
• The selected frequency band appear.
Select a frequency
or
Press and hold for more than 2 seconds.
The System starts searching for stations and
stops when a station of sufficient signal
strength is tuned in.
• If an FM program is broadcast in stereo,
the S (stereo) indicator lights up (only
when the reception is good).
• Press during searching to stop.
• Press repeatedly to change the frequency
step by step.
Tune in to a preset
station
or
Press to select its preset number.
• For presetting stations, see below.
Change the FM
reception mode
(When an FM
stereo broadcast is
hard to receive)
Press to improve reception.
The M (mono) indicator lights up.
Stereo effect will be lost.
To restore the stereo effect, press again.
Presetting Stations
You can preset 30 FM and 15 AM stations manually.
1
Tune in to a station you want to preset.
• You can also store the FM reception mode.
2
Press to activate the preset number entry mode.
• Finish the following steps while the indication on the
display is flashing.
3
or
Press to select a preset number for the station you want to
store.
4
Press to store the station.
5 7
6 8
Troubleshooting
Maintenance Specifications
Receiving FM Stations with Radio Data System
Radio Data System allows FM stations to send an additional signal along with their
regular program signals.
With the System, you can receive the following types of Radio Data System signals.
PS (Program Service): Shows commonly known station names.
PTY (Program Type): Shows types of broadcast programs.
RT (Radio Text): Shows text messages the station sends.
Enhanced Other Networks: Provides the information about the types of the
programs broadcast by the Radio Data System
stations of the different networks.
NOTE:
If you want to know more about Radio Data System, visit <http://www.rds.org.uk>.
Changing the Radio Data System Information
Each time you press the button, the information changes as follows:
NOTE:
If no Radio Data System signals are sent by a station, “NO PS,” “NO PTY,” or “NO RT”
appears.
Searching for Programs by PTY Codes (PTY Search)
You can locate a particular kind of program from the preset stations (see the left
column) by specifying the PTY codes.
1
Press to enter the PTY code setting mode.
“PTY” and “SELECT” appear alternately.
2
or
Select a PTY code.
3
The System searches for 30 preset FM stations, stops when it
finds the one you have selected, and tunes in to that station.
• To stop searching any time during search, press PTY SEARCH.
• To continue searching after it stops on an unwanted station, press PTY SEARCH
while the indications on the display are flashing.
NOTE:
If no program is found, “NOTFOUND” appears.
Switching Temporarily to a Program of Your Choice
Automatically
The Enhanced Other Networks function allows the System to switch temporarily to
a preset FM station broadcasting a program of your choice (TA, NEWS, or INFO).
• This function works while listening to an FM station providing the required
signals.
Press repeatedly to select the program type as follows:
TA: Traffic announcement in your area.
NEWS: News
INFO: Program the purpose of which is impart advice in the
widest sense.
Listening to Digital Audio Player
Learning More about This System
Playing Back an iPod (see page 5)
• Compatible iPod:
– iPod nano 1GB/2GB/4GB
– iPod nano (2nd Generation) 2GB/4GB/8GB
– iPod nano (3rd Generation) 4GB/8GB
– iPod mini 4GB/6GB
– iPod (4th Generation) 20GB/40GB
– iPod photo (4th Generation) 20GB/30GB/40GB/60GB
– iPod video (5th Generation) 30GB/60GB/80GB
– iPod touch (1st Generation) 8GB/16GB
• If incompatible iPod type is connected, the iPod may not be
operated from the System. To enable the operation, before
connecting the iPod, switch the charge mode to “OFF” (see
page 5) with “iPod” selected as source.
• Sound distortion may occur when playing back audio
sources with high recording levels. When distortion occurs,
it is recommended to turn off the equalizer of the iPod. For
information on operating the iPod, see the iPod instruction
manual.
Setting the Clock and Using Timers (see page 6)
• You can set the clock and Daily Timer while the Save Mode
is turned on. While setting the clock or Daily Timer, the
display is turning on.
• The clock may gain or lose 1 to 2 minutes per month. If this
happens, readjust the clock.
• When you unplug the AC power cord or if a power failure
occurs, the clock and the timer will be canceled. You need
to set the clock first, then the timer again.
Timer Priority:
• If you set the Sleep Timer after Daily Timer starts playing the
selected source, Daily Timer is canceled.
SAFETY INSTRUCTIONS
“SOME DOS AND DON’TS ON THE SAFE USE OF EQUIPMENT”
This equipment has been designed and manufactured to meet international safety standards but, like any electrical
equipment, care must be taken if you are to obtain the best results and safety is to be assured.
Do read the operating instructions before you attempt to use the equipment.
Do ensure that all electrical connections (including the mains plug, extension leads and interconnections between
pieces of equipment) are properly made and in accordance with the manufacturer’s instructions. Switch off and
withdraw the mains plug when making or changing connections.
Do consult your dealer if you are ever in doubt about the installation, operation or safety of your equipment.
Do be careful with glass panels or doors on equipment.
DON’T continue to operate the equipment if you are in any doubt about it working normally, or if it is damaged in any
way—switch off, withdraw the mains plug and consult your dealer.
DON’T remove any fixed cover as this may expose dangerous voltages.
DON’T leave equipment switched on when it is unattended unless it is specifically stated that it is designed for
unattended operation or has a standby mode.
Switch off using the switch on the equipment and make sure that your family know how to do this.
Special arrangements may need to be made for infirm or handicapped people.
DON’T use equipment such as personal stereos or radios so that you are distracted from the requirements of traffic
safety. It is illegal to watch television whilst driving.
DON’T listen to headphones at high volume as such use can permanently damage your hearing.
DON’T obstruct the ventilation of the equipment, for example with curtains or soft furnishings.
Overheating will cause damage and shorten the life of the equipment.
DON’T use makeshift stands and NEVER fix legs with wood screws—to ensure complete safety always fit the
manufacturer’s approved stand or legs with the fixings provided according to the instructions.
DON’T allow electrical equipment to be exposed to rain or moisture.
ABOVE ALL
– NEVER let anyone, especially children, push anything into holes, slots or any other opening in the case
—this could result in a fatal electrical shock.;
– NEVER guess or take chances with electrical equipment of any kind—it is better to be safe than sorry!
Listening to FM and AM Broadcasts
Listening to Digital Audio Player
Digital Audio Player
To get the best performance of the System, keep your discs
and mechanism clean.
Handling discs
• Remove the disc from its case by holding it at the edge
while pressing the center hole lightly.
• Do not touch the shiny surface of the disc, or bend the disc.
• Put the disc back in its case after use.
• Be careful not to scratch the surface of the disc when
placing it back in its case.
• Avoid exposure to direct sunlight, temperature extremes,
and moisture.
To clean the disc:
• Wipe the disc with a soft cloth in a straight line from center
to edge.
Cleaning the System
• Stains should be wiped off with a soft cloth. If the System is
heavily stained, wipe it with a cloth soaked in water-diluted
neutral detergent and wrung well, then wipe clean with a
dry cloth.
• Since the System may deteriorate in quality, become
damaged or get its paint peeled off, be careful about the
following:
– DO NOT wipe it hard.
– DO NOT wipe it with thinner or benzine.
– DO NOT apply any volatile substance such as insecticides
to it.
– DO NOT allow any rubber or plastic to remain in contact
for a long time.
Setting the Clock and Using Timers
Amplifier section
OUTPUT POWER:
60 W (30 W + 30 W) at 4 Ω (10% THD)
Speakers/Impedance: 4 Ω – 16 Ω
Audio input AUDIO IN: 500 mV/50 kΩ (at “IN LVL1”)
250 mV/50 kΩ (at “IN LVL2”)
125 mV/50 kΩ (at “IN LVL3”)
Digital input: iPod
Tuner section
FM tuning range: 87.50 MHz - 108.00 MHz
AM (MW) tuning range: 522 kHz - 1 629 kHz
CD player section
Dynamic range: 88 dB
Signal-to-noise ratio: 85 dB
Wow and flutter: Immeasurable
iPod section
iPod output power: DC 5 V 500 mA
Speakers
Speaker units: 10 cm cone x 1
Impedance: 4 Ω
Dimensions (approx.): 160 mm x 250 mm x 150 mm
(W/H/D)
Mass (approx.): 1.6 kg each
General
Power requirements: AC 230 V , 50 Hz
Power consumption: 20 W (power on)
6.5 W (standby mode)
1 W or less (Save Mode)
Dimensions (W x H x D): 165 mm x 251 mm x 255 mm
Mass: 2.6 kg
Specifications and appearance are subject to change without
prior notice.
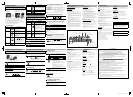
To audio output (or
headphone out, etc.)
Stereo mini plug cord
(not supplied)
iPod Operations
The iPod does not play, but “CONNECT” appears on the
display.
\ The iPod battery is low or exhausted. Charge the iPod
battery.
Radio Operations
Hard to listen to broadcasts because of noise.
\ Antennas connections are incorrect or loose.
\ The AM loop antenna is too close to the System.
\ The FM antenna is not properly extended and
positioned.
\ Electrostatic discharge from your body may cause noise.
If this happens, turn off and on the System again.
Timer Operations
Daily Timer does not work.
\ The System has been turned on when the on-time
comes. Timer starts working only when the System is
turned off.
How the Enhanced Other Networks function actually
works:
When a station starts broadcasting the program of your
choice, the System automatically switches to the station.
The program type indicator starts flashing.
After the program is over, the System goes back to the
previously tuned station, but the function still remains
active (the indicator stops flashing and remains lit).
Microsoft and Windows Media are either registered
trademarks or trademarks of Microsoft Corporation in the
United States and/or other countries.
iPod is a trademark of Apple Inc., registered in the U.S. and
other countries.
1
Turn the volume to minimum.
2
Press repeatedly to select “AUDIO IN.”
3
Start playing the Digital Audio Player connected.
4
Adjust the volume.
To Adjust the Audio Input Level
If the sound from the Digital Audio Player connected to the AUDIO IN jack is too
loud or too quiet, you can change the audio input level through the AUDIO IN jack
(without changing the volume level).
Press and hold for more than 2 seconds while “AUDIO IN” is selected
as the source.
You can select one of three levels as follows:
As the number increases, the sound becomes louder.
Basic and Common Operations (see page 3)
• Pressing one of the source buttons also turns on the System
and starts playing back if the source is ready or connected.
Playing Back a Disc (see page 4)
• This System cannot play “packet write” discs.
• For MP3/WMA playback...
– In this manual, “file” and “track” are interchangeably used
for MP3/WMA operations.
– This System can show the Tag data (Version 1).
– MP3/WMA discs are required a longer readout time than
regular CDs. (It depends on the complexity of the group/
file configuration.)
– Some MP3/WMA files cannot be played back and will be
skipped. This result from their recording processes and
conditions.
– When making MP3/WMA discs, use ISO 9660 Level 1 or
Level 2 for the disc format.
– This System can play back MP3/WMA files with the
extension code <.mp3> or <.wma> (regardless of the
letter case—upper/lower).
– It is recommended that you make each MP3/WMA file at a
sampling rate of 44.1 kHz and at bit rate of 128 kbps. This
System cannot play back files made at bit rate of less than
64 kbps.
– Playback order of MP3/WMA tracks may be different from
the one you have intended while recording. If a folder
does not include MP3/WMA tracks, they are ignored.
• This System can recognize up to 99 groups in a disc. The
total number of groups and tracks (in a disc) that can be
recognized by the System is 512 (for MP3/WMA).
If you are having a problem with your System, check this list
for a possible solution before calling for service.
General
Power does not come on.
\ Power plug is not inserted securely. Plug in securely.
Adjustments or settings are suddenly canceled before you
finish.
\ There is a time limit. Repeat the procedure again.
Operations are disabled.
\ The built-in microprocessor may malfunction due to
external electrical interference. Unplug the AC power
cord and then plug it back in.
Unable to operate the System from the remote control.
\ The path between the remote control and the remote
sensor on the System is blocked.
\ The batteries are exhausted.
No sound is heard.
\ Speaker connections are incorrect or loose.
\ Headphones are connected.
The System does not work properly.
\ Many functions of this System are implemented by
microcomputers. If the System does not work correctly,
disconnect the AC power cord from the wall outlet, wait
for a while, and connect the cord again.
Disc Operations
The disc does not play.
\ The disc is placed upside down. Place the disc with the
label side up.
\ The disc is recorded with the “packet writing (UDF file
system).” It cannot be played. Check the files you want to
play back.
MP3/WMA groups and tracks are not played back as you
expect.
\ Playing order is determined when the groups and tracks
were recorded. It depends on the writing application.
The disc sound is discontinuous.
\ The disc is scratched or dirty.
The disc tray does not open or close.
\ The AC power cord is not plugged in.
\ Disc ejection is prohibited (see page 4).
The following operations are explained using the remote control, unless
mentioned otherwise. However, if the System has the same or similar button
names, they can also be used for the operations.
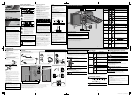
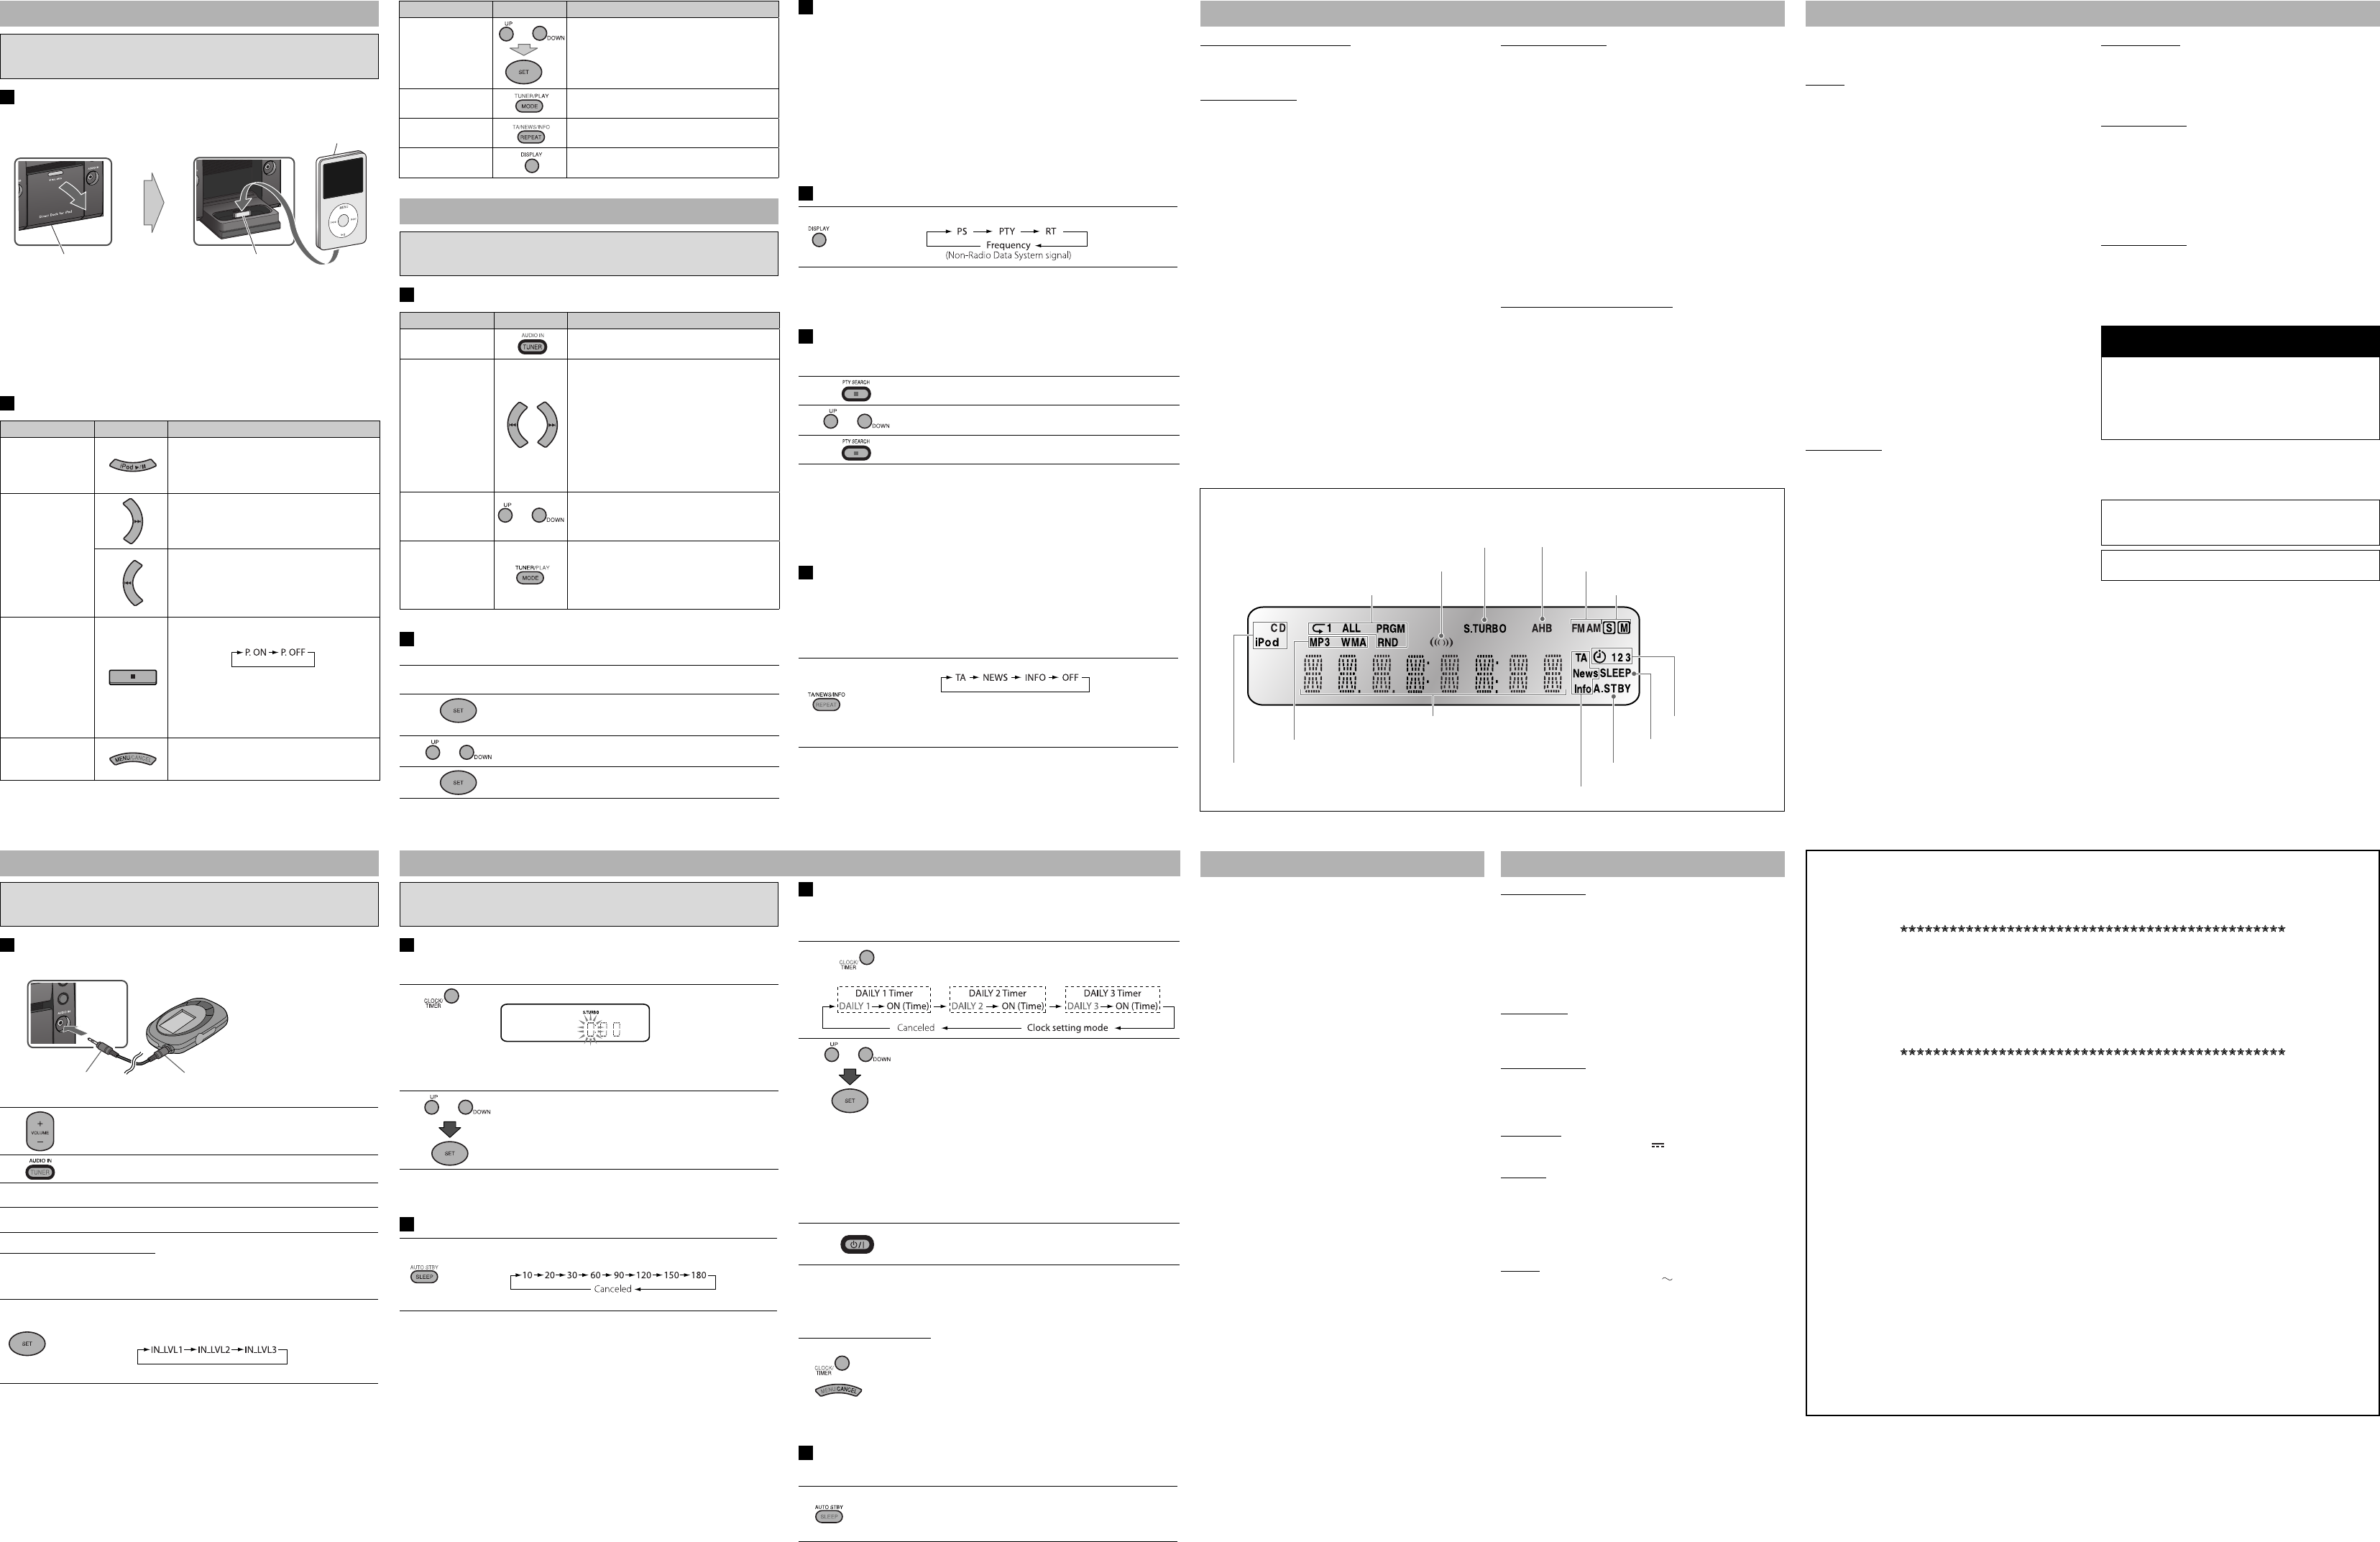
Display Information
Play mode indicators (See page 4.)
Radio Data System indicators (See page 5.)
Main display
A.STBY (Auto Standby) indicator (See page 6.)
AHB indicator (See page 3.)
Source indicators (See page 3.)
Timer mode indicators
(See page 6.)
SLEEP indicator (See page 6.)
File type indicators (See page 4.)
FM reception indicators (See page 5.)
Source indicators (See page 3.)
S.TURBO (Sound Turbo) indicator (See page 3.)
Surround mode indicator (See page 3.)
The following operations are explained using the remote control, unless
mentioned otherwise. However, if the System has the same or similar button
names, they can also be used for the operations.
Front view
The following operations are explained using the remote control, unless
mentioned otherwise. However, if the System has the same or similar button
names, they can also be used for the operations.
Listening to an iPod
The following operations are explained using the remote control, unless
mentioned otherwise. However, if the System has the same or similar button
names, they can also be used for the operations.
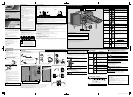
Connecting an iPod
• Be sure to reduce the volume on the System to the minimum level before
connecting an iPod. Adjust the volume after starting playback.
• DO NOT connect or disconnect the iPod when the System is turned on.
• You cannot send any data to your iPod from the System.
• Do not carry the System with iPod dock open and iPod is connected. You might
drop it or it might cause damages to the iPod dock.
• Do not touch or hit the iPod terminal pins or connector pins in the iPod dock
directly. It might cause damages to the connector part.
Basic iPod Operations
To Press Indication/Result
Play back an iPod
The System detects the iPod and starts
playback.
• To turn off the iPod, press and hold for
more than 2 seconds.
Select a track
Select the next tracks.
• Press and hold to fast-forward the track
during playback.
To stop searching, release the button.
To go back to the beginning of the current
or previous tracks.
• Press and hold to fast-reverse the track
during playback.
To stop searching, release the button.
Change the
charge mode (on
the System only)
Press and hold while “iPod” is selected as the
source. To select the charge mode:
P. ON: The battery in the iPod is charged
through the iPod terminal when
“iPod” is selected as the source or
during Standby Mode.
P. OFF: The battery is not charged.
Display the menu/
Go back to the
previous menu
—
Connector pins
Apple iPod
(separately
purchased))
Open the direct
dock for iPod.
Insert the iPod directly to
the connector pins in the
direct dock for iPod.
Direct dock for iPod
Front view
GVT0242-001A EN_UX-GP5[B]6
To Press Indication/Result
Select an item on
the menu
or
• The UP/DOWN buttons work in the same
way as operating the iPod’s click wheel
counterclockwise/clockwise. (Refer to the
iPod’s instruction manual for details.)
Play back at
random
• Refer to the iPod’s instruction manual for
details.
Play back
repeatedly
• Refer to the iPod’s instruction manual for
details.
Turn on iPod’s
backlight
Press and hold for 2 seconds.