


5
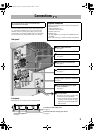
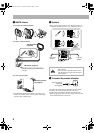
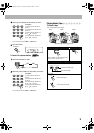
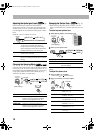
TV/monitor
Connect the COMPONENT, S-VIDEO, or VIDEO jacks
which you want to use.
• To select progressive scanning mode (see page 14), use
COMPONENT jacks.
• After connecting a TV, select the proper video signal mode
according to the connection method. See “Changing the
Scanning Mode” on page 14.
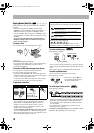
@ Digital audio component
• Set “DIGITAL AUDIO OUTPUT” in the “AUDIO” menu
correctly according to the connected digital audio
equipment (see page 36). If
the
setting is incorrect, loud
noise may be generated causing damage to the speakers.
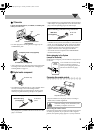
• By using QP Link (Quick Portable Link), you can easily
start playing back a portable audio device on this unit. See
page 11 for details.
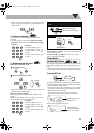
• If an external device is not equipped with a stereo mini plug
audio output, use a plug adaptor to convert the stereo mini
plug to the corresponding plug of the audio output.
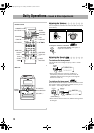
• You can connect a USB mass storage class device such as a
USB flash memory device, hard disk drive, multimedia card
reader, etc. to this System. See pages 10 and 37 for details.
•
If you press USB MEMORY 3, the System detects the
USB mass storage class device and the control screen
appears on the TV screen
. See page 26 for details.
• You cannot connect a computer to the USB MEMORY
terminal of the System.
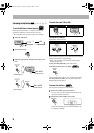
Before plugging in the System
(except for Australia)
Set the correct voltage for your area with the voltage selector
on the rear.
Preparing the remote control
• Dispose of batteries in the proper manner, according to
federal, state, and local regulations.
When using the remote control
Point the top of the remote control toward the remote sensor
as directly as possible. If you operate it from a diagonal
position, the operating range (approx. 5 m) may be shorter.
When connecting a portable audio device (AUX)
Green
Blue
Red
Component video cord
(not supplied)
S-Video cord (not supplied)
Composite video cord (supplied)
Protective cap
Stereo mini plug
(not supplied)
At the front
panel
When connecting a USB mass storage class device
DO NOT recharge, short, disassemble, heat
the battery or dispose of it in a fire.
USB cable
(not supplied)
At the front
panel
110V
127V
220V
230V
-240V
VOLTAGE
SELECTOR
Use a screwdriver to set the voltage
selector to the same voltage as
where you are plugging in the unit.
(See also the back cover page.)
R6(SUM-3)/AA(15F)
UX-G68[U].book Page 5 Tuesday, December 5, 2006 4:03 PM