


10
Getting Started
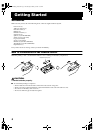
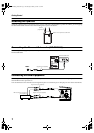
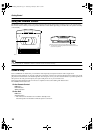
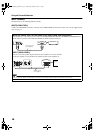
Example of attachment (Speakers)
The speakers can be attached to a wall.
Attach the bracket (supplied) to the wall using two screws (not
supplied) and place the Speaker onto the bracket.
Then, use the wing bolt (supplied) to fix the Speaker firmly to
the brakcet.
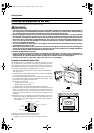
• Do not place anything on top of the Center Unit. Doing so may cause the Center Unit to fall, causing malfunctioning and/or injury.
• Do not climb onto the Center Unit or hang from it. Doing so may damage the Center Unit and/or cause injury. Special care
must be taken in this respect when there are small children in the home.
• Avoid sandwiching the cords between the Center Unit and wall. This may upset the Center Unit’s balance, causing the Center
Unit to fall.
• Make sure that the cords will not interfere with daily activities and that the users will not trip over them. Do not pull the con-
nected cords with excessive force.
• Check regularly that none of the screws are loose.
• In the event that the Center Unit has fallen, turn off the power, disconnect its power plug from the power outlet, and contact
your dealer for an inspection and repairs. Continued use of the Center Unit may result in a fire or electric shocks.
• Do not place valuables (breakables) underneath the location where the Center Unit is attached. They will be damaged if the
Center Unit should fall.
• The manufacturer accepts absolutely no liability for any accidents or damage resulting from inadequate assembly or mount-
ing, insufficient strength of attachment, misuse or abuse, or natural disasters.
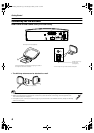
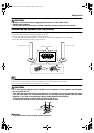
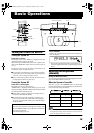
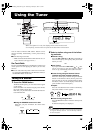
Changing the Display and Control Buttons Settings
You can change the direction of the characters and symbols on the display
and the assignment of the functions to each control button on the Unit.
Change the settings depending on whether the Unit is placed vertically or
horizontally. The factory setting is “V”.
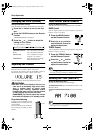
Now you can plug the AC power cord into the wall outlet, and your System is at your
command!
Before operating, verify that the display shows the clock. If malfunctions may occur, re-
connect the power cord.
When the Unit is placed vertically
Set the DISP.SET switch to “V”.
When the Unit is placed horizontally
Set the DISP.SET switch to “H”.
Wall
Bracket (supplied)
Wing bolt (supplied)
Screws (not supplied)
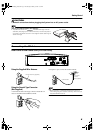
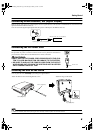
ANTENNA
OUT IN
SPEAKERS
SPEAKER IMPEDANCE 4 16
AC IN
AM
EXT
FM
(
75
)
COAXIAL
AM
LOOP
R
L
MD/AUX
SUB
WOOFER
CD DIGITAL
OUT
H
V
DISP.SET
DISP.SET
SOURCE PRESET VOL
COMPACT COMPONENT SYSTEM
SOURCE PRESET VOL
HV
DISP.SET
COMPACT COMPONENT SYSTEM
SOURCE PRESET VOL
SOURCE PRESET VOL
HV
DISP.SET
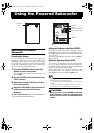
CAUTION:
• Be sure to turn off the System when changing the settings.
VS-DT2000(J)_EN.book Page 10 Wednesday, February 6, 2002 4:37 PM