


15
English
■
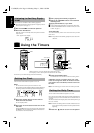
2. Setting the ON time (Example: 12:15)
41 Press the TIMER/SNOOZE button on the Unit.
The Timer indicator lights up and the current ON time
blinks on the display1
51 3UHVV#WKH#
¢#RU#4#EXWWRQ#RQ#WKH#8QLW#WR#VHW#WKH#WLPH#\RX#
ZDQW#WKH#8QLW#WR#FRPH#RQ1
Pressing the ¢ button moves the time forwards and press-
ing the
4 button moves the time backwards. Hold down
the button to move the time in 10-minute intervals.
■
3. Setting the OFF time (Example: 13:15)
41 3UHVV#WKH#7,0(526122=(#EXWWRQ#RQ#WKH#8QLW1
7KH#FXUUHQW#2))#WLPH#EOLQNV#RQ#WKH#GLVSOD\1
51 3UHVV#WKH#¢#RU#4#EXWWRQ#RQ#WKH#8QLW#WR#VHW#WKH#WLPH#\RX#
ZDQW#WKH#8QLW#WR#EH#WXUQHG#RII1
Pressing the ¢ button moves the time forwards and press-
ing the
4 button moves the time backwards. Hold down
the button to move the time in 10-minute intervals.
■
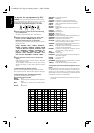
4. Selecting the music source
41 3UHVV#WKH#7,0(526122=(#EXWWRQ#RQ#WKH#8QLW1
³781(5´#EOLQNV#RQ#WKH#GLVSOD\1
51 3UHVV#WKH#
¢#RU#4#EXWWRQ#WR#VHOHFW#WKH#PXVLF#VRXUFH#\RX#
ZDQW#WR#OLVWHQ#WR1
7KH#GLVSOD\#FKDQJHV#DV#VKRZQ#EHORZ1
■
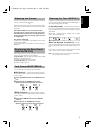
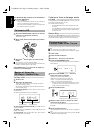
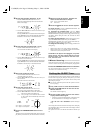
5. Setting the volume level
41 3UHVV#WKH#7,0(526122=(#EXWWRQ#RQ#WKH#8QLW1
7KH#FXUUHQW#YROXPH#VHWWLQJ#EOLQNV#RQ#WKH#GLVSOD\1
51 3UHVV#WKH#
¢#RU#4#EXWWRQ#WR#VHOHFW#WKH#YROXPH#OHYHO
00# = The current volume level will be used.
4#WR#8= /RZ#+4,#WR#KLJK#+8,#OHYHO1#:KHQ#WKH#WLPHU#LV#WXUQHG#
RQ/#WKH#9ROXPH#ZLOO#EH#DXWRPDWLFDOO\#WXUQHG#WR#WKH#
VHW#SRVLWLRQ1
■
6. Press the TIMER/SNOOZE button on the
Unit.
7KH#WLPHU#VHWWLQJ#LV#FRPSOHWHG#DQG#WKH#GLVSOD\#UHWXUQV#WR#WKH#GLV0
SOD\#EHIRUH#\RX#VHW#WKH#WLPHU#+7KH#7LPHU#LQGLFDWRU#UHPDLQV#OLW,1
■
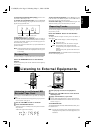
7. Before turning off the Unit, prepare the
music source selected in step 4.
7XQHU= 7XQH#LQ#WR#WKH#GHVLUHG#VWDWLRQ1
&'= ,QVHUW#D#&'1
■
8. Press the button to turn off the System.
To cancel the timer,#SUHVV#WKH#7,0(526122=(#EXWWRQ1#7KH
7LPHU#LQGLFDWRU#JRHV#RXW#RQ#WKH#GLVSOD\1
To re-activate the cancelled timer, press the TIMER/
SNOOZE button to light the Timer indicator. Then, press the TIM-
ER/SNOOZE button repeatedly until the display returns to the orig-
inal display before setting the timer. (Be sure that the Timer
indicator is lit)
To confirm the timer settings, cancel the timer once by press-
ing the TIMER/SNOOZE button. Then, press the TIMER/
SNOOZE button repeatedly, and you can see the current timer set-
tings (ON time, OFF time, source, and volume).
To change the timer setting,#UHSHDW#WKH#VHWWLQJ#SURFHGXUH#IURP
WKH#EHJLQQLQJ1
‡:KHQ#WKH#WLPHU#WXUQV#RQ/#WKH#7LPHU#LQGLFDWRU#VWDUWV#EOLQNLQJ1
‡:KHQ#WKH#WLPHU#WXUQV#RQ/#LW#LV#SRVVLEOH#WR#IDGH#LQ#WKH#VRXQG#IURP#
YROXPH#OHYHO#3#+]HUR,#WR#WKH#SUHVHW#YROXPH1
CAUTION: If the System is unplugged, or a power
failure occurs, the timer setting will be lost after
about 24 hours. You will need to reset the clock
first, then the timer.
5-Minute Snoozing——————————
:KHQ#WKH#WLPHU#WXUQV#RQ#WKH#PXVLF#VRXUFH#\RX#FDQ/#LI#\RX#ZLVK/#DF0
WLYDWH#WKH#80PLQXWH#VQRR]LQJ#IXQFWLRQ#WR#WHPSRUDULO\#VWRS#SOD\EDFN1
Press the TIMER/SNOOZE button on the Unit.
7KH#³61=´#LQGLFDWRU#OLJKWV#XS#RQ#WKH#GLVSOD\#DQG#WKH#SRZHU#LV#
WXUQHG#RII#IRU#ILYH#PLQXWHV#IRU#VQRR]LQJ1
8VH#WKH#6OHHS#7LPHU#WR#WXUQ#WKH#6\VWHP#RII#DIWHU#D#FHUWDLQ#QXPEHU#RI
PLQXWHV#ZKHQ#LW#LV#SOD\LQJ1#%\#VHWWLQJ#WKH#6OHHS#7LPHU/#\RX#FDQ#IDOO
DVOHHS#WR#PXVLF#DQG#NQRZ#WKDW#\RXU#6\VWHP#ZLOO#WXUQ#RII#E\#LWVHOI
UDWKHU#WKDQ#SOD\#DOO#QLJKW1
■
<RX#FDQ#RQO\#VHW#WKH#6OHHS#7LPHU#ZKHQ#WKH#6\VWHP#LV#RQ#DQG#D#
VRXUFH#LV#SOD\LQJ1
■
1. Play a CD or tune in to the desired station.
■
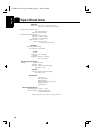
2. Press the SLEEP button on the Unit or the
Remote Control.
7KH#³6/((3´#LQGLFDWRU#OLJKWV#XS1
■
3. Set the length of time you want the source
to play before shutting off.
‡ (DFK#WLPH#\RX#SUHVV#WKH#6/((3#EXWWRQ/#LW#FKDQJHV#WKH#QXP0
EHU#RI#PLQXWHV#VKRZQ#RQ#WKH#GLVSOD\#LQ#WKLV#VHTXHQFH=
= 30 = 60 = 90 = 120 = Cancelled = +EDFN#WR#WKH#EHJLQ0
QLQJ,
$IWHU#VHWWLQJ#WKH#QXPEHU#RI#PLQXWHV#IRU#WKH#6OHHS#7LPHU/#WKH#GLVSOD\
ZLOO#VWRS#EOLQNLQJ#DIWHU#8#VHFRQGV#DQG#UHWXUQ#WR#WKH#GLVSOD\#DV#EHIRUH
VHWWLQJ#WKH#6OHHS#7LPHU1
7KH#6\VWHP#LV#QRZ#VHW#WR#WXUQ#RII#DIWHU#WKH#QXPEHU#RI#PLQXWHV#\RX
VHW1
+$IWHU#5#VHFRQGV,
+$IWHU#5#VHFRQGV,
V
OL 1
VOL 5
VOLUME
VOL 5: Approx. 11 o’clock position
VOL 1: Approx. 8 o’clock position
Setting the SLEEP Timer
Ux5500(E)-e.fm Page 15 Monday, May 11, 1998 4:26 PM