


D
i
g
t
a
l
A
u
d
i
o
B
ro
a
d
c
a
s
t
in
g
D
ig
t
a
l
A
u
d
i
o
B
r
o
a
d
c
a
s
t
in
g
D
A
TA
DA
B
P
O
W
ER
INSTALLATIONS INSTALLATIONSINSTALLATIONSMÖGLICHKEITEN
Hooking metal
Metallklammer
Crochet métallique
Screws B
Schrauben B
Vis
B
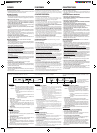
Installing the main unit Installationsmöglichkeiten
Installation de l’appareil principal
1
2
Screw A
Schraube A
Vis
A
Mounting brackets
Montagewinkel
Supports de montage
1
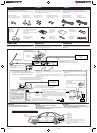
Attach the mounting brackets to the main unit.
2
Drill two holes where you want to attach the main unit.
3
Fix the main unit using the supplied tapping screws.
Note:
To avoid internal heat buildup inside the unit, do not attach it under a
floor mat.
1
Befestigen Sie die Montagewinkel am Hauptgerät.
2
Bohren Sie an dem Ort zwei entsprechende Löcher, an dem
Sie das Hauptgerät befestigen wollen.
3
Befestigen Sie das Hauptgerät mit Hilfe der mitgelieferten
Schneidschrauben.
Hinweis:
Um einen internen Wärmestau im Gerät zu verhindern, installieren Sie
es auf keinen Fall unter einer Fußmatte.
1
Fixez les supports de montage sur l’appareil principal.
2
Percez deux trous à l’endroit où vous souhaitez fixer l’appareil.
3
Fixez l’appareil principal en utilisant les deux vis à tôle
fournies.
Remarque:
Pour éviter une surchauffe interne de l’appareil, ne placez pas
l’appareil sous un tapis de sol.
Hanging Installation / Hängende Installation / Installation suspendue
3
Standing Installation / Stehende Installation / Installation debout
Screw A
Schraube A
Vis
A
Mounting bracket
Montagewinkel
Support de montage
1
Tapping screws
Schneidschraube
Vis à tôle
2
Screw A
Schraube A
Vis
A
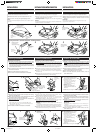
Connecting the DAB aerial
Attaching on the boot lid
1
Peel off the vinyl sheets (large portion and small portion) from
the protective seal and attach them where you want to place
the DAB aerial.
• Large portion of the protective seal is attached to the surface
of the boot lid and small part of the protective seal is attached
to back side of the boot lid.
2
Fix the protective plate on the protective seal attached on the
back side of the boot lid.
3
Attach the DAB aerial with supplied screws B.
4
Fix the antenna cord with cord clampers as illustrated.
Aerial base
Antennensockel
Base de l’antenne
Wasserdichter Gummi
• bringen Sie ihn an der Stelle an,
an der der Fenstergummi des
Fahrzeugs mit dem
Antennenkabel in Berührung
kommt.
Water proof rubber
• Place it where the weather strip of
the car touches the aerial cord.
Caoutchouc étanche
•
Placez-le où à l’endroit où le
calfeutrage touche le cordon de
l’antenne.
Caoutchouc étanche
•
Placez-le où à l’endroit où le
calfeutrage touche le cordon de
l’antenne.
Wasserdichter Gummi
• bringen Sie ihn an der Stelle an,
an der der Fenstergummi des
Fahrzeugs mit dem
Antennenkabel in Berührung
kommt.
Water proof rubber
• Place it where the weather strip of
the car touches the aerial cord.
Weather strip / Fenstergummi /
Calfeutrage
Tapping screws
Schneidschraube
Vis à tôle
3
Protective plate
Schutzblech
Plaque de protection
Protective seal
Schutzunterlage
Autocollant de
protection
Screw A
Schraube A
Vis
A
431
,
2
4321
Anbringung auf dem Autodach
1
Drehen Sie die beiden Sechskantschrauben heraus, um die
Metallklammer der DAB-Antenne abzunehmen.
2
Bringen Sie den DAB-Antennensockel mit Hilfe der beiden
Sechskantschrauben, die Sie im vorherigen Schritt
herausgedreht haben, an der DAB-Antenne an.
3
Ziehen Sie die Vinylfolie vom Antennensockel ab, und bringen
Sie die DAB-Antenne an der vorgesehenen Stelle an.
Hinweise:
• Reinigen und trocknen Sie die Fläche, auf der Sie die DAB-Antenne
montieren.
• Der Antennensockel kann nach der Demontage Spuren hinterlassen.
Vermeiden Sie es, den Sockel an einem solchen Ort anzubringen.
4
Befestigen Sie das Antennenkabel mit Hilfe der Kabelschellen
entsprechend der Darstellung in der Abbildung.
Weather strip / Fenstergummi /
Calfeutrage
Installation der DAB-Antenne
Anbringung auf dem Kofferraumdeckel
1
Ziehen Sie die (große und kleine) Vinylfolie von der
Schutzunterlage ab, und bringen Sie sie an der Stelle an, an
der die DAB-Antenne montiert werden soll.
• Der große Teil der Schutzunterlage wird auf der Oberfläche
des Kofferraumdeckels, der kleine Teil der Schutzunterlage
auf der Innenseite des Kofferraumdeckels angebracht.
2
Befestigen Sie das Schutzblech auf der Schutzunterlage, die
auf der Innenseite des Kofferraumdeckels befestigt wurde.
3
Montieren Sie die DAB-Antenne mit den mitgelieferten
Schrauben B.
4
Befestigen Sie das Antennenkabel mit Hilfe der Kabelschellen
entsprechend der Darstellung in der Abbildung.
Connexion de l’antenne DAB
Fixation sur le couvercle du coffre
1
Décollez la feuille de vinyle (la grande portion et la petite
portion) des autocollants de protection et collez-les à l’endroit
où vous souhaitez installer l’antenne DAB.
• La grande portion de l’autocollant de protection se colle sur
la surface du couvercle du coffre et la petite portion se colle
du côté arrière du couvercle du coffre.
2
Fixez la plaque de protection sur l’autocollant de protection
collé du côté arrière du couvercle du coffre.
3
Fixez l’antenne DAB avec les vis
B
fournis.
4
Fixez le cordon d’antenne, comme montré, avec les
serre-câbles fournis.
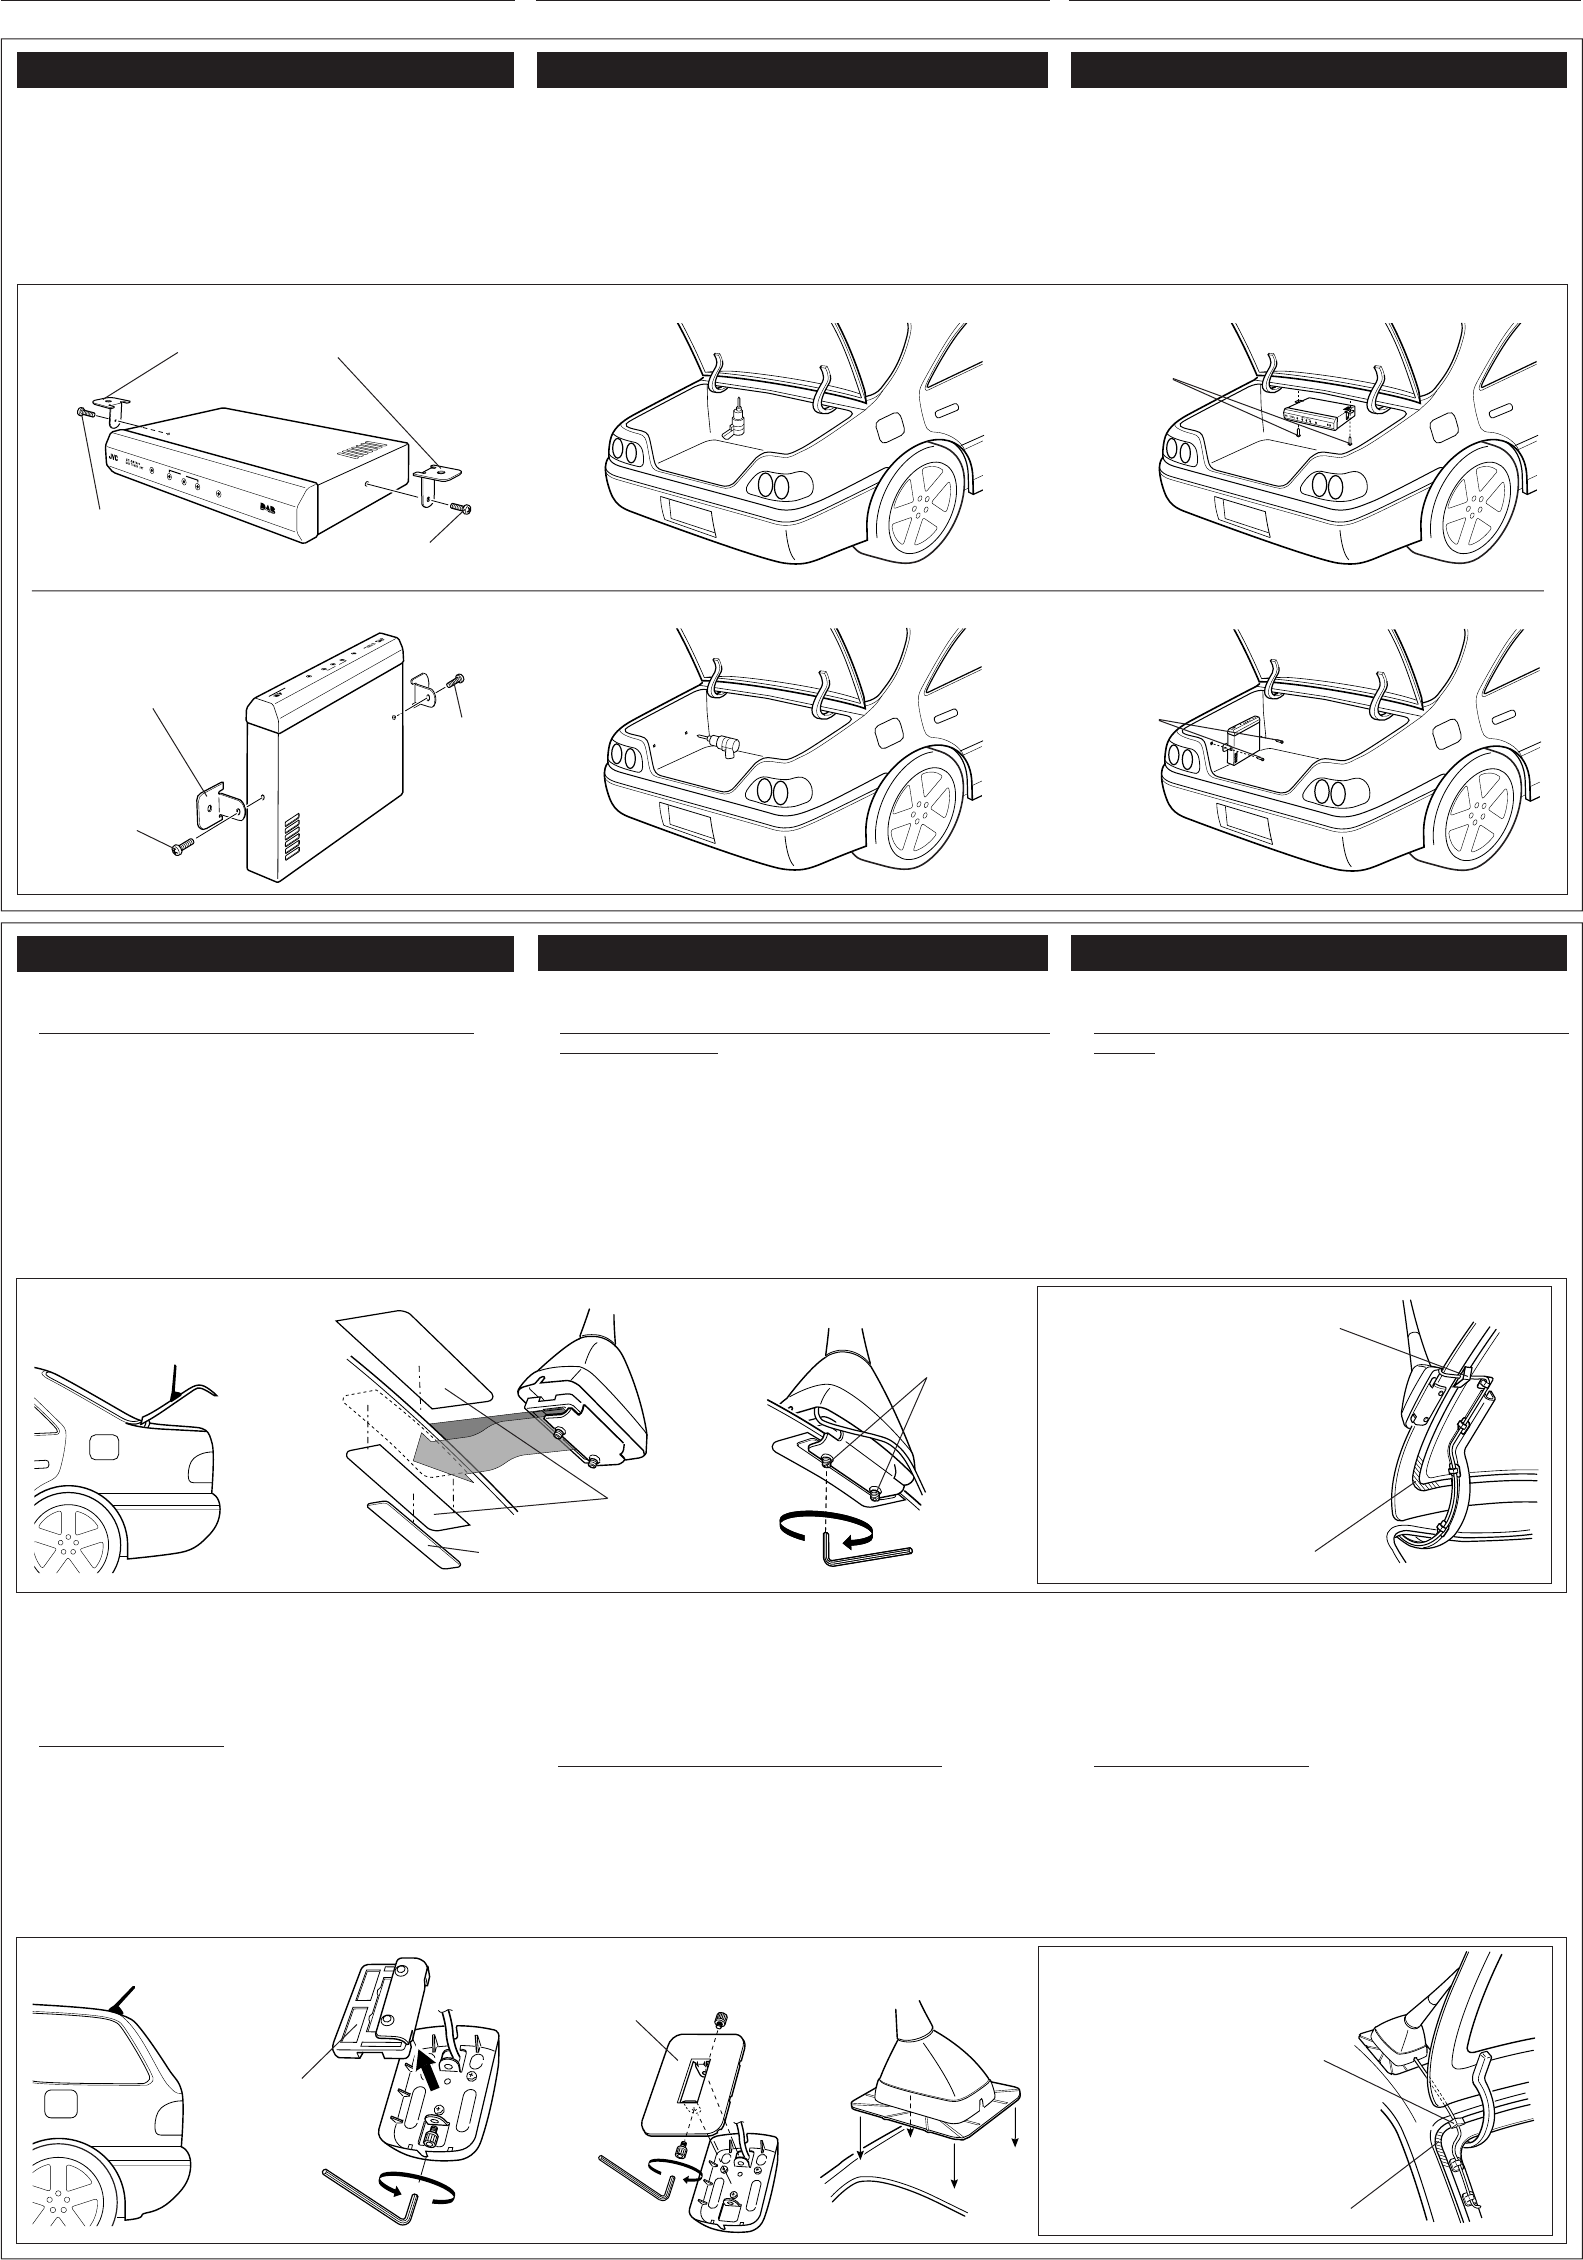
Attaching on the roof
1
Remove the two hex-head screws to replace the hooking
metal from the DAB aerial.
2
Attach the DAB aerial base to the DAB aerial with the two
hex-head screws removed in the above step.
3
Peel off the vinyl sheet from the aerial base and attach the
DAB aerial where you want to place.
Notes:
• Wipe and dry the area where you attach the DAB aerial.
• The aerial base may leave its trace when unmounting. Avoid
attaching it on such a place.
4
Fix the aerial cord with cord clampers as illustrated.
Fixation sur le toit
1
Retirez les deux vis à tête hexagonale pour retirer le crochet
métallique de l’antenne DAB.
2
Fixez la base de l’antenne DAB sur l’antenne DAB avec les
deux vis à tête hexagonale que vous avez retirées à l’étape
précédente.
3
Décollez la feuille de vinyle de la base de l’antenne et fixez
l’antenne à l’endroit que vous souhaitez.
Remarques:
• Essuyez et séchez l’emplacement où vous souhaites fixer
l’appareil.
• La base de l’antenne peut laisser une trace après son démontage.
Faites attention à l’endroit où vous la placez.
4
Fixez le cordon d’antenne, comme montré, avec les
serre-câbles fournis.
KT-DB1500 EN/GE/FR.f 99.4.30, 5:28 PM4