


11
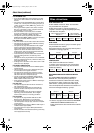
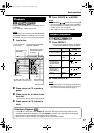
You can enjoy pictures of better quality using the
following cord instead of the supplied video cord.
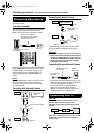
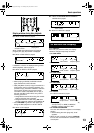
Connecting by using the S-Video cord
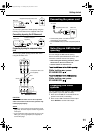
Connecting by using the component video
cord
You can enjoy better quality pictures than when
using the S-Video cord.
CAUTION
Use either the S-Video cord or the component
video cord. If both cords are used, pictures may
not be played properly.
NOTE
• In order to enjoy pictures with Progressive mode
(page 26), the TV is required to have Progressive
video input.
• If the component video input jacks of your TV are
BNC type, use a plug adapter (not supplied) to
convert the plugs.
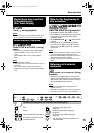
• Connect the power cord after all other
connections are complete.
• The STANDBY lamp (on the front panel) will be
lit.
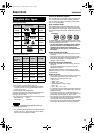
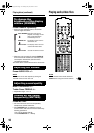
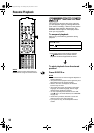
You can change the AM interval spacing.
Some countries space AM stations 9 kHz apart,
and some countries use 10 kHz spacing.
• Before doing the following procedure, select
AM as source, then turn off the unit.
• Use the buttons on the main unit.
To set the AM tuner to the 10 kHz spacing:
While holding ¢, press
STANDBY/ON .
To set the AM tuner to the 9 kHz spacing:
While holding 4, press
STANDBY/ON .
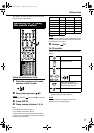
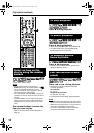
You can select the video output to match it to the
color system of your TV (PAL or NTSC).
1 Press and hold VFP for 4 seconds while the
system is turned off (on standby).
2 Press cursor 2/3 to select the video output.
Press ENTER to set the video output.
VIDEO
S-VIDEO
COMPONENT
YPB PR
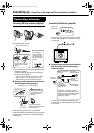
VIDEO OUT
TV
Supplied composite video cord
Main unit
VIDEO
S-VIDEO
COMPONENT
YPB PR
VIDEO OUT
TV
Main unit
S-Video cord (not
supplied)
VIDEO
S-VIDEO
COMPONENT
YPB PR
VIDEO OUT
Component video cord
(not supplied)
Main unit
Blue
Red
Green
TV
Connecting the power cord
Selecting an AM interval
spacing
Changing the color
system
AC outlet
Supplied power cord
Main unit
Getting started
EX-D11[U].book Page 11 Tuesday, May 30, 2006 4:13 PM