


20
Using the Cassette Deck
(Recording)
REC PAUSE
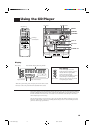
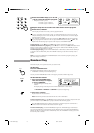
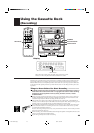
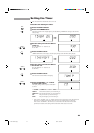
Display
kHz
MHz
CONT.
ALL PRGM
REC
A.BASS EX S.MODE
SLEEP MONO
STCLOCK
RANDOM
REC indicator
When the System is being used, the display shows other items as well.
However, we have only shown the items described in this section.
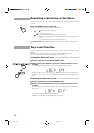
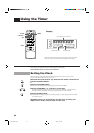
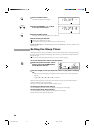
STANDBY
PLAY & EXCHANGER
PHONES
FM/AM
TAPE
AUX
P.UPP.DOWN
CD
TUNING
UP
DECK A/B
DUBBING
CD REC START
REV. MODE
TUNING
DOWN
COMPU
PLAY
CONTROL
1 BIT
DUAL D/A CONVERTER
COMPACT
DIGITAL AUDIO
EJECT EJECT
PLAY REC/PLAY
AUTO REVERSE AUTO REVERSE
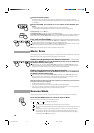
SOUND
MODE
VOLUME
REPEAT
RANDOM
CONTINUE
ACTIVE
BASS EX.
REC
START/STOP
DUBBING
REC START/STOP
CD REC START
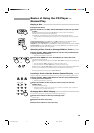
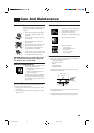
1
/CLEAR
C D
TAPE
CLOCK TIMER
SLEEP
SELECT
–+
RM-SMXJ10E REMOTE CONTROL
2 3
4 5 6
AUX
FM/AM
FM MODE
PLAY MODECD3CD2CD1
A – TAPE - B
REC PAUSE
SOUND
MODE
VOLUME
ACTIVE
BASS EX.
SHIFT
7 8 9
10 +10
SET
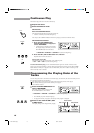
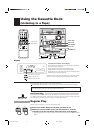
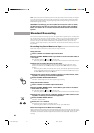
Recording onto a cassette from any of the sound sources is simple. Just place a tape in Deck B, have the
source ready, make one or two settings, and you’re ready to record. For each source the procedure is a
little bit different and now we’ll explain just what to do for each one. If you forget, just come back to the
section which has the specific procedures you need. But first, here are a few things to make your record-
ings better.
Things to Know Before You Start Recording ———————
o It should be noted that it may be unlawful to re-record pre-recorded tapes, records, or
discs without the consent of the owner of copyright in the sound or video recording,
broadcast or cable programme and in any literary, dramatic, musical, or artistic
embodied therein.
o When you want to record onto both sides of a tape, you can set Reverse mode on to do so. However,
recording automatically stops after recording in the 2 direction in Reverse mode. Therefore, make
sure that the tape direction is 3 when recording with Reverse mode on.
o The recording level, which is the volume at which the new tape is being made, is automatically set
correctly, so it is not affected by the VOLUME control on the System. Thus, during recording you can
adjust the sound you are actually listening to without affecting the recording level.
o Two small tabs on the back of the cassette tape, one for side A and one for side B, can be removed to
prevent accidental erasure or re-recording. To record on a cassette with the tabs removed, you must
cover the holes with adhesive tape first.
However, when a Type II tape is used, only cover part of the hole as shown, since the other part of the
hole is used to detect the tape type.
o When recording, you can hear Sound Mode effects through the speakers or headphones. However, the
sound is recorded without Sound Mode effects.
o Type I and Type II tapes can be used for recording.
EN01-28 MX-J10[B] 99.7.6, 10:38 AM20