


51
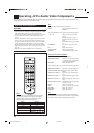
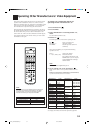
Operating JVC’s Audio/Video Components
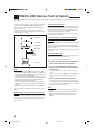
You can operate JVC’s audio and video components with this receiver’s remote control, since control signals for JVC
components are preset in the remote control.
Operating Audio Components
IMPORTANT:
To operate JVC’s audio components using this remote control:
• You need to connect JVC audio components through the COMPU
LINK (SYNCHRO) jacks (see page 45) in addition to the
connections using cables with RCA pin plugs (see pages 5 and 6).
• Aim the remote control directly at the remote sensor on the
receiver.
• If you use the buttons on the front panel or the menu function to
choose a source, the remote control will not operate that source.
To operate a source with the remote control, the source must be
selected using source selecting buttons on the remote control.
• To operate the cassette deck or MD recorder using the COMPU
LINK remote control system, set the source name correctly. (See
page 16.)
• Refer also to the manuals supplied with your components.
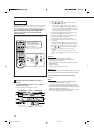
Tuner
You can always perform the following operations:
FM/AM: Alternates between FM and AM
(MW/LW).
After pressing FM/AM, you can perform the following operations:
1 – 10, +10: Selects a preset channel number
directly.
For channel number 5, press 5.
For channel number 15, press +10,
then 5.
For channel number 20, press +10, then
10.
PTY SEARCH: Searches for a program by PTY
codes.
PTY +/ –: Selects the PTY codes.
DISPLAY MODE: Shows the RDS signals.
FM MODE: Changes the FM reception mode.
Sound control section (Amplifier)
You can always perform the following operations:
SURROUND ON/OFF: Turns on or off the Surround modes
— Dolby Pro Logic, Dolby Digital,
and DTS Digital Surround.
DSP MODE: Selects the DSP modes.
After pressing SOUND, you can perform the following operations:
SUBWFR then LEVEL +/ –: Adjusts the subwoofer output level.
L/R BAL then BAL L/BAL R: Adjusts the front speakers output
balance.
CENTER then LEVEL +/ –: Adjusts the center speaker output
level.
REAR L then LEVEL +/ –: Adjusts the left rear speaker output
level.
REAR R then LEVEL +/ –: Adjusts the right rear speaker output
level.
DIGITAL EQ then LEVEL+/ –:Selects the audio band and adjusts
its frequency level.
EFFECT: Selects the effect level.
TEST: Turns on or off the test tone output.
CTR TONE: Selects the center tone.
ROOM SIZE: Selects the room size.
LIVENESS: Selects the liveness.
Note:
After adjusting sounds, press the corresponding source selecting
button to operate your target source by using the 10 keys; otherwise,
the 10 keys cannot be used for operating your target source.
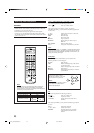
CONTROL
+
−
+
−
+
−
231
564
89
7/P
0
+1010
LINE DIF.ECT BOOST EFFECT
MENU
ENTER
SIZE
ROOMBASS
MODE
TEST
CTR TONE
LIVENESS
MIDNIGHT
SOUND
∗
SUBWFR
∗
DIGITAL EQ
∗
REAR L
∗
REAR R
∗
L/R BAL
∗
CENTER
MUTING
CH/
∗
LEVEL
PLAY
STOP
/REW FF/
EXIT
∗
BAL L
∗
BAL R
CATV/DBS
CONTROL
TV/VIDEO
MENU
TEXT
REC
DISPLAY
PAUSE
PAUSE
SET
RETURN FM MODE 100
+
CONTROL
A/V CONTROL RECEIVER
CATV/DBS VCR 1 TV AUDIO
DSP
MODE INPUTON/OFF
DVD MUILTIDVD
USB
CD
CDR
TAPE/MD
TV/DBS VIDEO PHONO
FM/AM
VCR 1 VCR 2
SURROUND
ANALOG/DIGITAL
SLEEP
PTY–PTY SEARCH –PTY
DISPLAY
MODE
TV VOL
VOLUME
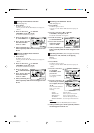
Note:
When you press one of the following buttons mentioned in
this section, the operation mode appears on the display
window for about 10 seconds. For example, the above
illustration shows that you have pressed CD.
Buttons Indications
FM/AM TUNER
CD CD
CDR CDR
PHONO PHONO
TAPE/MD TAPE
CONTROL (repeatedly)
SOUND SOUND
VCR1 TAPE
CDR
CDDSC
EN51_60.RX-8010&8012R_f 01.3.19, 2:00 PM51