


22
English
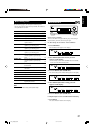
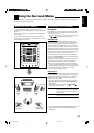
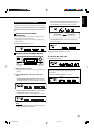
You can also use the remote control for
adjusting the speaker output level using
the test tone.
• You can also adjust the effect level
for DAP modes and Mono Film.
To adjust the speaker output level:
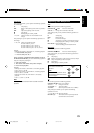
1 Press SOUND.
The 10 keys are activated for sound
adjustments.
2 Press TEST to check if you can
hear the sounds through all the speakers at equal level.
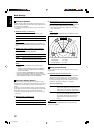
Test tone (TEST TONE) comes out of the speakers in the
following order.
• No test tone comes out of the speakers for which the
speaker setting is set to “NONE” (or “SUBWOOFER NO”
for the subwoofer).
L (Left front)
=
C (Center)
=
R (Right front)
=
RS (Right surround)
=
LS (Left surround)
=
SW (Subwoofer)
=
(Back to the beginning)
3 Adjust the speaker output level (–10 dB to +10 dB).
• For the left front speaker: Press FRONT L, then LEVEL +/–.
• For the center speaker: Press CENTER, then LEVEL +/–.
• For the right front speaker: Press FRONT R, then
LEVEL +/–.
• For the right surround speaker: Press SURR R, then
LEVEL +/–.
• For the left surround speaker: Press SURR L, then
LEVEL +/–.
• For the subwoofer: Press SUBWFR, then LEVEL +/–.
Note:
When you press LEVEL +/– once, the current level for the
selected speaker appears on the display, and the test tone
comes out of the selected speaker.
If no adjustment is done for about 4 seconds, the adjustment
mode for the selected speaker is canceled.
4 Press TEST again to stop the test tone.
To adjust the effect level:
1 Press SOUND.
The 10 keys are activated for sound adjustments.
2 Press EFFECT repeatedly to select the effect level
(EFFECT 1 to EFFECT 5).
The source indication resumes about 4 seconds after the
adjustment.
Adjusting the Equalization Patterns
You can adjust the equalization patterns to your preference.
• Once you have made adjustment, it is memorized for each source.
Equalization adjustment—DEQ 63HZ, DEQ250HZ,
DEQ 1KHZ, DEQ 4KHZ, DEQ16KHZ
You can adjust five frequencies (63 Hz, 250 Hz, 1 kHz,
4 kHz, 16 kHz) within the range of –8 dB to +8 dB in 2 dB
steps.
• When adjustment is made, the DIGITAL EQ indicator lights
up on the display.
To flat the equalization pattern, set all the frequencies to
“0 (0 dB)” in step 4 of “Basic Procedure” (on page 21). The
DIGITAL EQ indicator goes off from the display.
Note:
The equalization patterns affect the front speaker sounds only.
Adjusting the Speaker Output Levels
You can adjust the speaker output levels.
• Once you have made adjustment, it is memorized for each source.
Adjustable speakers—SUBWFR LEVEL,
FRONT L LEVEL, FRONT R LEVEL, CENTER LEVEL,
SURR L LEVEL, SURR R LEVEL
You can adjust the connected speakers’ output levels within the
range of –10 dB to +10 dB.
Note:
If you have deactivated a speaker (see page 18), the output level
adjustment for the speaker is not adjustable.
Adjusting the Sound Parameters for the
Surround and DSP Modes
You can adjust the Surround and DSP sound parameters to your
preference. (For Surround and DSP modes, see pages 23 and 26.)
Adjustable parameters
You can adjust the following parameters:
For DAP modes and Mono Film
• Once you have made adjustment, it is memorized for each
mode.
EFFECT: Adjust the effect level. As the number increases,
the effect becomes stronger.
(Adjustable range: 1 to 5. Normally select “3.” )
For Pro Logic II Music only
PANORAMA CTRL: Select “PANORAMA ON” to add
“wraparound” sound effect with side-wall image.
• To cancel it, select “PANORAMA OFF.”
Adjusting Sound
TEST
EFFECT
LEVEL
CD
-
DISC
REC PAUSE
SURR R
SURR L
SUBWFR
CENTER
FRONT R
FRONT L
REW
FF
TA/NEWS/INFO
21-22_5052[US]2.p65 05.1.7, 5:10 PM22