


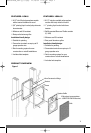

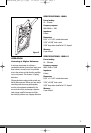

PACKAGE CONTENTS
■ Speakers x 2
■ Speaker frames x 2
■ Speaker grilles x 2
■ Speaker brackets x 2
■ Wings for new construction x 4
■ #6 x 1-5/8” Philips head drywall screws x 6
■ Speaker cutout template
PREPARING FOR
INSTALLATION
If you are installing the LSW-6/LSW-6.5 into
an existing wall, take time to consider any
possible obstructions, which may be hidden
inside the wall: studs, electrical wiring,
telephone wiring, plumbing, AC or heating
conduit and ductwork.
Determine the best mounting locations
based on the room layout. Before cutting
any holes, make sure the area behind both
speakers is clear for installation. Speakers
provide the best coverage, when centered
in the wall. Choose a suitable mounting
height, and then line up both speakers
approximately the same distance from the
sidewall and ceiling boundaries.
Label the speaker wires at the amplifier
location.
TOOLS REQUIRED
■ Stud Locator (for existing construction)
■ Drywall saw (for existing construction)
■ Pencil (for existing construction)
■ Cordless screwdriver with No2 Philips bit
■ 1/8” Slotted screwdriver x 2
■ Wire stripper
■ Wire labels
INSTALLATION
Installation Existing
Construction:
1. Using your stud locator, identify the
location of the studs on each side of the
proposed speaker mounting location.
2. Mark their edges, using masking tape.
3. Repeat this process for the other speaker.
4. You may have to adjust the speaker
mounting locations based on how
symmetrical the studs are located, in the
wall space.
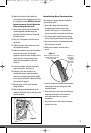
5. Check for clearance using the following
method.
a. Drill a 1/4” pilot hole in the center of the
intended speaker location.
b. Cut a foot-long piece of coat hanger.
c. Bend the wire, creating a right angle,
leaving 4-1/4” at one end.
d. Poke the “L-shaped” wire into the pilot
hole and turn it in a complete circle,
checking for obstructions.
e. Push it into the wall cavity to make
sure you have approximately 4” of
depth.
f. If the coat hanger movement is
obstructed by anything, fill the hole(s)
with spackle and try another location.
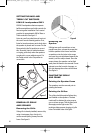
6. Locate the cutout template.
7. Use a pencil and the cutout template to
trace the speaker outline in the desired
locations on the wall.
8. Use a drywall saw to cut along the
penciled line.
9. Slip the mounting bracket through the
opening and pull it toward you so that its
front edge slides into the hole and stops
in place.
2
DS00387ACN_LSW-6_6.5.qxp 11/18/04 6:55 PM Page 2