5
Turn-On Modes
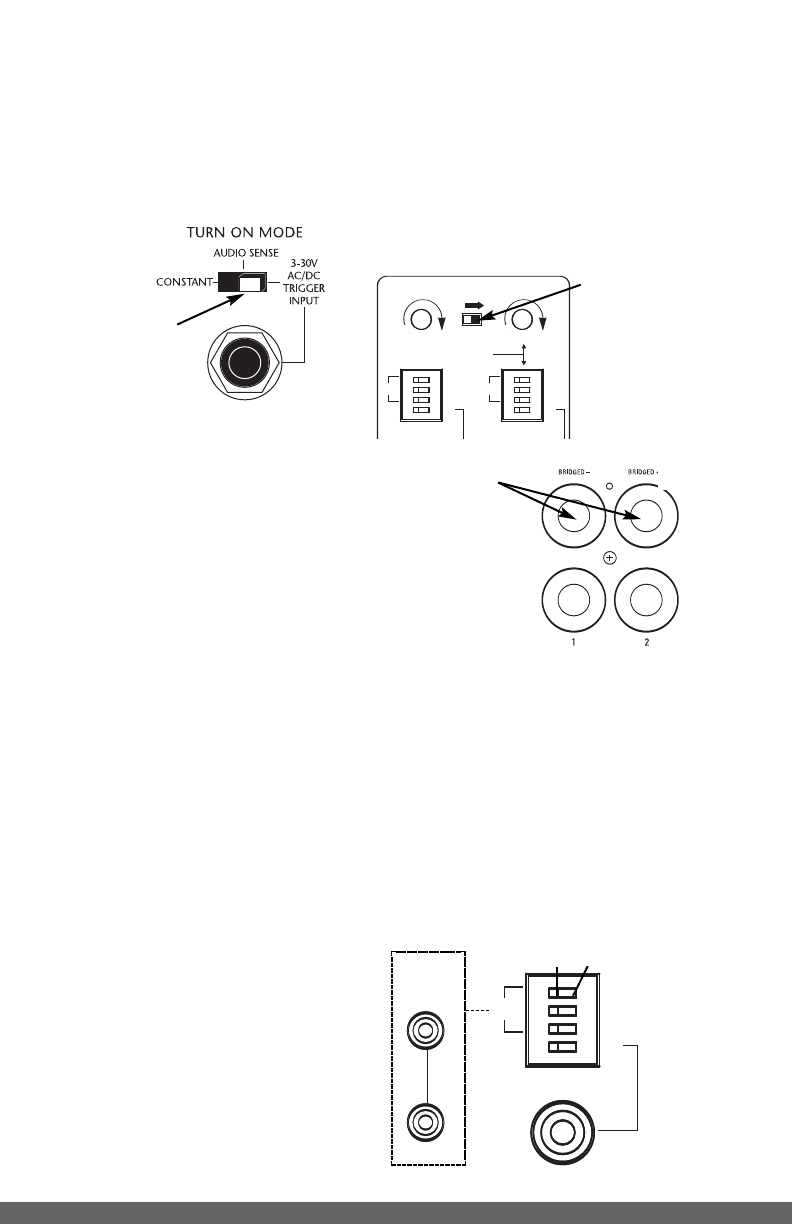
The Turn-On Mode selector switch gives
you three options for turning the A30-X12 on
and off.
See figure 5
Constant: The auto turn-on circuitry is off.
The front panel master power switch
operates the amplifier. In is "On", out is "Off".
Audio Sense: The master switch on the
front panel must be in the "On" position. The
amplifier is off when there is no audio signal
present at either the left or the right input,
but the sensing circuitry is on. The turn-on
sensing circuitry looks for a tiny amount of
audio signal present at any of the audio
inputs. If it detects a signal, the amplifier is
turned on. Once the audio signal stops, the
sensing circuit waits three minutes, then
turns the amplifier off.
3-30 Volt AC/DC Trigger Input: The master
switch on the front panel must be in the "On"
position. The amplifier is off when there is
no 3-30V AC or DC voltage detected at the
trigger input. Once the sensing circuitry
detects a voltage and a line-level audio
signal is detected at the input, the amplifier
is turned on. Once the voltage stops, the
sensing circuit instantly turns the amplifier
off. Voltage trigger can be supplied by
connecting a 12 Volt AC wall adapter to the
switched outlet of your stereo receiver.
DO NOT USE A DC WALL ADAPTER. The
long discharge time of the DC adapter’s
filter capacitor will delay the turn-off of
the amplifier.
Bridging Two Channels
into One
The A30-X12's bridging switches allow you
to create a more powerful amplifier channel
by combining or "bridging" two adjacent
channels.
BusMatrix Input Switch Setting
Each channel has a dedicated BusMatrix
DIP switch that assigns that channel’s
source. To assign a signal from the Main
Bus Input, select one of the first three
switches, which will give you Left (L), Right
(R) or Mono (L+R). To assign the channel’s
dedicated input select the fourth switch.
Only ONE switch should be selected to the
“ON” position.
Slide the switch with your
fingernail or a 1/8” slotted
screwdriver blade.
Figure 5
2
MAIN
BUS
INPUT
CASCADE
BUS
OUTPUT
1
BRIDGED
USE CH 2
WHEN
BRIDGED
L
R
L
+R
1
BUS
BRIDGED
+
BRIDGED
-
1 2
++
--
L
R
L
R
L
R
L
+R
2
BUS
AUDIO SENSE
TURN ON MODE
CONSTANT
12V
CONTROL
OUT
3-30VAC/DC
TRI GGER
INPUT
+
-
+
-
LEV ELLEV EL
Niles Audio Corporation,Inc.
M
iami, Fl orida USA
MODEL SI-1200
Slide the bridging
s
witch in the
direction of the
arrow to bridge two
adjacent amplifier
channels. Set the
controls of the
newly bridged pair
by using the EVEN
numbered channel.
When two channels
are bridged together,
connect speakers to
the two terminals
labeled “Bridged”.
-
+
2
MAIN
BUS
INPUT
CASCADE
BUS
OUTPUT
1
BRIDGED
USE CH 2
WHEN
BRIDGED
L
R
L+R
1
BUS
BRIDGED
+
BRIDGED
-
1 2
++
--
L
R
L
R
L
R
L+R
2
BUS
AUDIO SENSE
TURN ON MODE
CONSTANT
12V
CONTROL
OUT
3-30VAC/DC
TRIGGER
INPUT
+
-
+
-
LEVELLEVEL
Niles Audio Corporation, Inc.
Miami, Florida USA
MODEL SI-1200
2
MAIN
BUS
INPUT
CASCADE
BUS
OUTPUT
1
BRIDGED
USE CH 2
WHEN
BRIDGED
L
R
L+R
1
BUS
BRIDGED
+
BRIDGED
-
1 2
++
--
L
R
L
R
L
R
L+R
2
BUS
AUDIO SENSE
TURN ON MODE
CONSTANT
12V
CONTROL
OUT
3-30VAC/DC
TRIGGER
INPUT
+
-
+
-
LEVELLEVEL
Niles Audio Corporation,Inc.
Miami, Florida USA
MODEL SI-1200
“ON” Position“OFF”Position
2
MAIN
BUS
INPUT
CASCADE
BUS
OUTPUT
1
BRIDGED
USE CH 2
WHEN
BRIDGED
L
R
L+R
1
BUS
BRIDGED
+
BRIDGED
-
1 2
++
--
L
R
L
R
L
R
L+R
2
BUS
AUDIO SENSE
TURN ON MODE
CONSTANT
12V
CONTROL
OUT
3-30VAC/DC
TRIGGER
INPUT
+
-
+
-
LEVELLEV EL
Niles Audio Corporation,Inc.
Miami, Florida USA
MODEL SI-1200
L
R


