


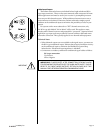


Page 15 | Fathom f110
showcasing the output capability of the Fathom and to verify that the Fathom (or
multiple Fathoms) are operational during system troubleshooting.
e Demo button is also used (in combination) to clear (return to at) the A.R.O.
equalizer settings. To clear the A.R.O.’s settings & turn o the Calibrate light, press
and hold the Demo button and then press the Defeat button. Please note that you
must perform this button sequence quickly. If you hold the Demo button for more
than 2 seconds without touching the Defeat button, the Demo tones will start.
Should this happen, simply wait for the Demo sequence to end and try again.
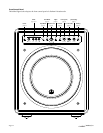
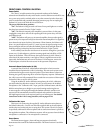
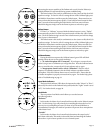
Defeat Button
If “Demo” or “Calibrate” is pressed while the defeat function is active, “Defeat”
is automatically canceled. No other front panel controls will alter the A.R.O. Defeat
state. e f110’s Defeat setting is stored in non-volatile memory and will not change
even if power is disconnected.
e Defeat button is also used (in combination) to clear (return to at) the A.R.O.
equalizer settings. To clear the A.R.O.’s settings & turn o the Calibrate light, press
and hold the Demo button and then press the Defeat button. Please note that you
must perform this button sequence quickly. If you hold the Demo button for more
than 2 seconds without touching the Defeat button, the Demo tones will start.
Should this happen, simply wait for the Demo sequence to end and try again.
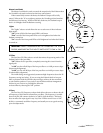
Calibrate Button
During the ARO test sequence the Calibrate button’s green LED will blink
quickly to alert the user to two special conditions:
1. “JL Audio Microphone NOT Connected”: If you forget to connect the mic
before trying to start a Calibration you will get this alert. Press the Calibrate button
once to cancel the alert, connect the A.R.O. microphone, and try again.
2. “Inappropriate Sound Level for A.R.O. Calibration”: Since the A.R.O.
sequence is completely automatic, this alert likely indicates a problem with the
microphone. Press the Calibrate button once to cancel the alert. Ensure that the
JL Audio microphone is properly connected and try again. For further help, please
refer to Troubleshooting on page 33.
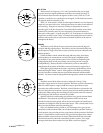
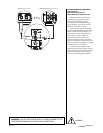
Input Mode Indicators
e Input Mode indicator LEDs show the input mode, either “Master” or “Slave”,
selected by the switch on the Fathom’s back panel (unless the “Lights” switch is set to
“o ”). For further details, see page 20.
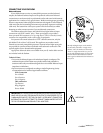
Level Mode
e two-position Level Mode switch allows you to select between
the following modes:
“Reference”
In this mode, the Master Level control knob has no e ect on the Fathom’s output
level. Use this setting if you will primarily be controlling the subwoofer level via
your receiver or preampli er/processor. For those of us with small children or
overenthusiastic teenagers, this mode of operation will prevent direct manipulation
of the Master Level.
“Variable”
In this mode, the Master Level control knob determines the output level of
the Fathom subwoofer. is mode is also useful when level matching the Fathom
subwoofer to a pair of stereo speakers in a two-channel system.