


28
VERTEC User’s Guide
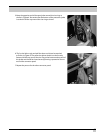
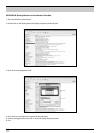
Step 4) Now launch System Architect in Windows. Once you see the Venue View of System Architect
appear, then proceed as follows.
Step 5) Verify that the HiQnet™ network is active by observing the network status icon located at the
bottom left of the Venue window. The icon should indicate “Network Active”. If it shows inactive status,
double click on the icon and the network will activate.
Step 6) Power up the loudspeaker connected to the network. Recheck the network status and verify that
the HiQnet network is Active. The loudspeaker will automatically determine an IP address and a HiQnet
Address. This can require up to 2 minutes in some cases. Once completed an Icon in the venue view will
appear representing the JBL Loudspeaker system connected to the network.
Step 7) Now double-click on the JBL loudspeaker to see the product specific control panel within System
Architect. From here you can control and change parameters and configuration of the JBL loudspeaker as
required.
ALTERNATE QUICK-START -- USING SYSTEM ARCHITECT’S NETWORK WIZARD:
Step 1) Once you have connected a powered up one DrivePack device to the network, verify that the
HiQnet network is active by observing the network status icon located at the bottom left of the Venue
window. The icon should indicate “Network Active”. If it shows inactive status, double click on the icon and
the network will activate.
Step 2) On the menu bar of System Architect™, click on Tools and then select Network Wizard. The
Network Wizard will open up. Click on Next to go to the next screen.
Step 3) The Wizard will detect the device on the network and a device icon appears in the Wizard window.
Select it and then click on the Configure button at the bottom of the screen.
Step 4) The ‘Configure Node’ window will open. Uncheck the ‘Use DHCP” button and verify that the
‘Readdress Automatically’ box at the top of the screen is unchecked.
Step 5) Exit the wizard by clicking on Finish.
Step 6) The JBL loudspeaker system will have appeared in the System Architect Venue view by this time.
Now double-click on the JBL loudspeaker to see the product-specific device control panel within System
Architect. From here you can control and change parameters and configuration of the JBL loudspeaker as
required.
WORKING WITH A NETWORK OF MULTIPLE JBL DEVICES:
Network Setup with DHCP
With the computer set to DHCP Enabled, connect devices to the network and apply power to devices one
or two at a time. The devices should AUTO-IP and populate Venue View as they are discovered by the
network. If they do not or seem to take too long to come up on the network, go back and use Static IP.
Static IP
Step 1) After completing the quick start procedure with one DrivePack device go back and verify that the
host PC’s Static IP address is set to an address in the auto IP range, such as:
IP Address: 169.254.1.Y (Y is a number between 1 and 254)
Subnet Mask: 255.255.0.0