


29
JBL Professional
Step 2) With System Architect running in Windows, power up the remaining loudspeakers connected to
the network one or two at a time. System Architect will automatically determine an IP address and a HiQnet
Address for each loudspeaker on the network assuming the devices populating the network are new units
(DHCP ENABLED). This can require up to 2 minutes in some cases. Once completed an Icon in the venue
view will appear representing the JBL Loudspeaker system connected to the network.
Step 3) If System Architect fails to recognize network devices within about two minutes, make sure all of
your connections are good and verify IP addressing. Launch the Network Wizard and repeat steps 3 - 4 in
the above procedure.
Note: If a device does not auto populate in Venue View or come up in Network Wizard, it is possible that
the device may have been previously configured for a subnet out of the IP range of your network. To find
these network devices you may need to launch Crown’s TCP/IQ utility that is bundled with System Architect
software. The TCP/IQ utility will find any device present on the network and will allow you to reconfigure the
device IP address and subnet mask to the same range as your network.
DISABLE DHCP/AUTO HIQNET ADDRESS IN SYSTEM ARCHITECT™:
Step 1) Click on any previous VP Series icons showing in venue view, and press the Delete key.
Step 2) Select Menu TOOLS->NETWORK WIZARD, click NEXT
Step 3) The master computer should discover the HiQnet™ products powered up on the network. If not,
please make sure all of your connections are good. and verify IP addressing.
Step 4) Once the Network Wizard Utility has launched and found devices on the network, select a single
component (It will highlight) - click on the CONFIGURE button located on the bottom of the window.
Step 5) System Architect will have detected the device, automatically assigned a HiQnet address and
disabled the “Readdress Automatically” function. You can manually assign a HiQnet address if desired.
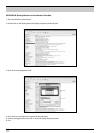
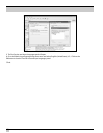
Step 6) Un-check the box labeled “Use DHCP”
Step 7) The IP Address entry box will un-dim.
Step 8) In the Set Address window, set up a Static IP address—The IP address consists of a set of 4 three-
digit numbers separated by a dot and must be unique. Network wizard will have already assigned an IP
address in the 169.254.X.Y range. You can start by leaving the IP address assigned by network wizard
or perhaps just change the X (third) number segment value to the same number in all devices. Start with
an address for example 169.254.1.Y. Enter the same number sets in the Subnet mask field for all of the
components as well as the master computer. Set the HiQnet address on each device sequentially. You can
change the IP address to a completely unique range at a later time, for example 126.126.0.Y or 192.168.1.Y
etc. You may want to create a network system log and write down all of your device IP addresses in your log
for future reference.
Step 9) Click OK. The Configure Node window will close.
Step 10) Repeat the procedure for all remaining devices on the network.