


27
JBL Professional
QUICK-START -- CONNECTING PC TO A JBL HiQNet DEVICE FOR THE FIRST TIME:
If this your first experience connecting a control computer running System Architect to a HiQnet-compliant
JBL product, then this initial test configuration will be useful. It will greatly help to resolve simple networking
issues before you connect to multiple devices or connect to a larger network:
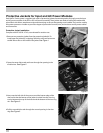
Step 1) Connect one networked loudspeaker to an unmanaged 100BaseT network switch with a standard
CAT5 cable. Don’t apply AC power to the loudspeaker just yet.
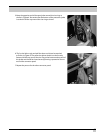
Step 2) Connect the control computer to the Ethernet switch with a standard CAT5 cable.
Setting up a Simple Isolated Ethernet Network Using DHCP
In this configuration DHCP will automatically assign an IP address to the device on the network and your
computer.
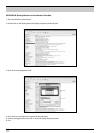
Step 1) Open Network Connections on your computer and confirm that DHCP is Enabled. To do this
click Start, point to Settings, click Control Panel, and then double-click Network Connections. When
your Network Connections Window opens, double click on the Local Area Network icon. A Local Area
Connections Status window will open. Click on the Properties button and the Local Area Connection
Properties window open. Next scroll through the items window, select the Internet Protocol (TCP/IP) item
and click on the Properties button. The Internet Protocol (TCP/IP) Properties window will open. Select the
“Obtain an IP address automatically” option. Click OK through all your open network windows to close
them.
Step 2) Apply power to your JBL DrivePack and wait for it to boot up. With DHCP enabled, the DrivePack
and your computer should both automatically negotiate an IP Address.
Step 3) Launch System Architect. The DrivePack system should appear in the Venue View within a few
minutes.
Step 4) If nothing comes up, you should first check that your System Architect™ application has the
‘Network Active when the application starts’ and ‘Auto Populate venue view with detected devices’ boxes
checked; these are found in the Tools menu under Options/General Network Information.
Step 5) If Auto Populate is checked and the network is active (look at the network status icon located at
the bottom left corner of the Venue View window) and the devices are still not showing in the Venue View,
select the Network Wizard in the Tools menu and change the IP address of the devices so they can be on
the same network as your computer.
Set up with a Static IP address
Step 1) Go back through Step 1 above, except select “Use the following IP Address:’ option.
Step 2) Change the TCP/IP address of the control computer to 169.254.1.y and change the subnet mask
set to 255.255.0.0.
Note: The placeholder “y” in the last segment of the IP address represents a number anywhere in the range
of 1 to 254. The only requirement in your number selection is that no two devices on the same network can
share the same IP address. Depending upon PC operating system configuration a reboot may be needed
now.
Step 3) Avoid connecting the switch to any other Ethernet equipment other than the PC and the
loudspeaker just yet. You’re creating a network with only two devices -- the PC and the loudspeaker. This is
useful for a first test as it avoids any additional networking configuration issues.