


5
CONNECTION TIPS
SPEAKER CONNECTIONS
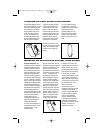
Separate and strip the
ends of the speaker wire
as shown. The wires sup-
plied with the system may
already be stripped and
tinned for easy insertion into
the speaker terminals. You
may need to separate the
two conductors further in
order to thread them through
the shelf stand or floor stand
adapter. Speakers and elec-
tronics terminals have corre-
sponding (+) and (–) terminals.
Most manufacturers of
speakers and electronics,
including JBL, use red to
denote the (+) terminal and
black to denote the (–)
terminal.
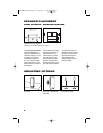
The (+) lead of the speaker
wire is noted with a stripe.
It is important to connect
both speakers identically:
(+) on the loudspeaker to
(+) on the amplifier and (–)
on the loudspeaker to (–) on
the amplifier. Wiring “out of
phase” results in thin sound,
weak bass and a poor stereo
image.
With the advent of multi-
channel surround sound
systems, connecting all of
the speakers in your system
with the correct polarity
remains equally important in
order to preserve the proper
ambience and directionality
of the program material.
To connect the supplied
speaker wires to the satellite
and center speaker terminals,
press the red or black plastic
cap for the desired terminal,
insert the bare end of the
wire into the hole below the
cap and release the cap.
Gently tug on the wire to
make sure that it is fully
inserted.
Such damage would not be
covered under the warranty.
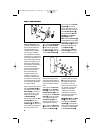
Step 7: Holding the Satellite
Speaker ¶ with both hands,
reinsert the ball portion of
the Ball and Shaft £ into
the Attachment Plate ¢.
Step 8: Hand-tighten the
Molded Nut ™ while posi-
tioning the speaker for the
desired orientation. If the
Molded Nut ™ is difficult to
tighten by hand, insert the
Metal Bar ∞ into one of the
holes in the outer edge of
the Molded Nut ™ and use
the bar as a lever. Be careful
not to cross-thread. The
swiveling ball enables you to
aim the speaker to one side
or the other, or to tilt it up
or down. Although stereo
imaging may be improved
by aiming the front speakers
toward the listening position,
especially for music selec-
tions, the surround speakers
are intended to provide a dif-
fuse, ambient sound that is
best achieved by aiming the
speakers straight out from
the wall. Aiming the sur-
round speakers toward
the listening position may
ruin the intended effect by
calling too much attention
to the information in those
channels.
Step 9: Once the speaker’s
orientation has been final-
ized, insert the Metal Bar ∞
into one of the holes in the
outer edge of the Molded
Nut ™ and tighten the
Molded Nut ™ securely.
Keep the Metal Bar ∞ in a
safe place, in the event that
you decide to adjust the
speaker’s orientation in the
future.
SCS-SAT500,300,200 OM 4/25/07 11:39 AM Page 7