15
ENGLISH
JABRA PRO 9450
3. CONFIGURING
3.1 CONFIGURING FOR DESK PHONES
Before rst-time use of the Jabra PRO 9450 with a desk phone, a clear dial tone and microphone volume must be
determined for optimal sound quality. Both features are manually adjusted on the base.
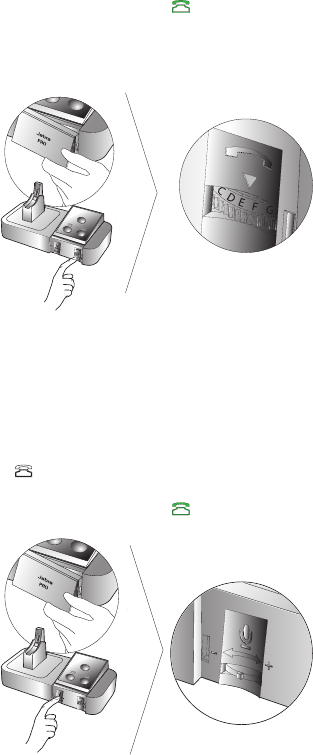
Set a Clear Dial Tone
1. Remove the front panel of the Jabra PRO 9450 base, as illustrated.
2. Put on the headset. The desk phone icon will change to . If the icon does not change, tap the desk phone
button on the base keypad.
3. Lift the desk phone handset and set aside, or press the headset button on the desk phone.
4. Rotate the clear dial tone switch from A to G, as illustrated, and listen in the headset for a clear dial tone.
5. Determine the best switch position. The dial tone should be strong, clear and undistorted.
6. Return the desk phone handset to the receiver, or press the headset button on the desk phone.
7. When nished, return the front panel to the base.
Changes made to the clear dial tone only apply to desk phones.
Set the Microphone Volume
1. Ensure the headset is docked, and then press and hold the desk phone button on the base keypad until the
desk phone icon changes to .
2. Remove the front panel of the Jabra PRO 9450 base, as illustrated.
3. Put on the headset. The desk phone icon will change to . If the icon does not change, tap the desk phone
button on the base keypad.
4. Get a dial tone by pressing the headset button on the desk phone, or by lifting the desk phone handset.
5. Make a test call. Dial a friend or colleagues phone number using the desk phone.
6. If your speaking volume is too quiet or too loud, adjust the microphone volume on the base, as illustrated.
Ensure the listener does not adjust their own volume.
7. When nished, end the call and return the front panel of the Jabra PRO 9450.
Changes made to the microphone volume switch only apply to desk phones.


