


underneath the platter. See SETUP INSTRUCTIONS for detailed
information on installing the Motor Drive Belt.
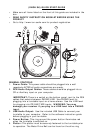
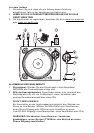
6.
Start/Stop Buttons: These buttons start and stop the turntable
motor. Both buttons have the same function. If they seem to not be
functioning, check to make sure that the Motor Drive Belt is properly
installed in the SETUP INSTRUCTIONS.
7.
1/8” Stereo Line Input: Connect Tape Players, Reel to Reel, or any
other audio source here. This signal is sent to the computer through
the USB. Make sure that your phono cartridge is installed while
using this input for maximum sound quality. Also make sure
that your RCA jacks are either plugged into an input device or not in
contact with metal.
Note: The 1/8" audio input is not routed to the turntable's RCA
output jacks, only to your computer via USB.
8.
33 and 45 RPM Buttons: These buttons control the RPM of the
turntable platter. A red LED indicates which RPM mode has been
selected.
NOTE: If the turntable is powered down while in the 45 RPM setting,
it will return to 33 RPM when it is powered up.
Note: You can record your 78RPM records by recording them at 33 or
45rpm, then changing them to 78 in the Audacity software.
9.
Pitch LED: This LED illuminates green when the pitch slider is set at
0%. When the pitch slider is moved away from zero, the LED
illuminates red.
10.
Pitch Slider: This slide control allows the pitch to be increased or
decreased by 10%. In the center position the pitch is at 0%. When
moved away from the center and towards the tone arm decreases the
pitch (slows down the platter) and moving the pitch slider away from
the tone arm increase the pitch (speeds up the platter.)
TONE ARM: Items 11 – 15 are all parts of the tonearm. Refer to the
TONEARM SETUP section for additional details on these controls. Your
model will be equipped with straight arm or S-arm style depending
upon model purchased.
11.
Counter Weight and Scale Ring: The Counterweight is used to
balance the head shell and cartridge assembly so that the proper
amount of stylus pressure is applied to the record.
12.
Anti-Skate Adjustment: This knob is used to compensate for inward
tracking forces. See TONEARM SETUP for more details.
13.
Arm Clip: This specially designed arm clip secures the tone arm while
at rest or when not in use. The arm clip has been designed to remain
in the up position while unlocked.
NOTE: When transporting the turntable, it is always recommended
that the headshell be removed and the arm clip secured to prevent
tonearm or turntable damage.
14.
Tone Arm Lock Nut: This Aluminum nut is used to secure the head
shell and cartridge assembly to the tone arm tube. See Cartridge
Setup for more details.
15.
Cartridge and Headshell: The cartridge is pre-mounted on a
standard headshell. The cartridge is user replaceable and compatible